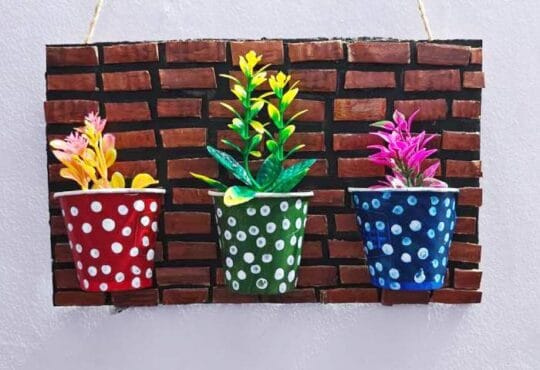
Pinterest-Worthy Wall Decor Ideas You Can Make at Home
Do you want to create a unique home that will reflect your style, but without spending a fortune? Your search ends here! Wall Decor Ideas that are worthy of Pinterest don’t need to be expensive or require professional skills. This article will show you how to transform your living room with beautiful, affordable handmade wall art. Discover inspiring DIY projects to elevate the aesthetic of your home and inspire your creativity. From textile creations and vibrant abstract pieces to clever ways to display them. Let’s transform those blank canvases!

Why DIY Wall Decor ?
DIY wall décor is more than just a simple aesthetic upgrade. It offers many benefits that go beyond decoration. It’s affordable wall decor. Why spend a lot of money on mass-produced artwork when you can create something unique at a fraction the price, and often with materials that you already own? Second, personalization has a huge impact. The pieces become a reflection on your personality, style and memories. This creates a truly customized wall art that is unlike anything you can buy in a store.
The act of creating is also a form of therapy. It is a way to relax, reduce stress and boost creativity. Many DIY projects also involve upcycling. This involves transforming old items into new treasures, and contributes to a sustainable lifestyle. This is more than decorating. It’s about creating your own space, one creative project and a time.
Essential Tools & Materials
Gathering a few essential supplies before you begin your journey into the world of home-made wall art will help you achieve success. You will need everyday items such as sharp scissors, an effective hot glue gun and various acrylic and craft paints, brushes and measuring tapes. DIY is a great way to be creative. You can find upcycling materials in your own home: cardboard boxes, fabric scraps, twine or string of different types, driftwood or natural branches collected on walks, magazines with colorful collages and old picture frames that need a fresh look. Remember to always prioritize safety. Use caution when using hot glue guns or sharp tools. Your crafting experience will be much more enjoyable if you have a clean and organized workspace.

Pin-Worthy DIY wall decor ideas
The exciting part is now transforming your walls. These DIY ideas can be done by anyone, regardless of their skill level. They come in a variety of styles ranging from modern minimalist to bohemian chic. Each project includes simple instructions, a list of materials, and suggestions for personalization.

- Textile & Fabric Creations
- Macrame Wall Hangings for Beginners
Simple macrame wall hangings will add a touch bohemian style to any room. This project uses simple knotting techniques to create intricate patterns that are easy to achieve. It is perfect for adding warmth and texture to any space. This is a great way to add a handmade, natural element and make a focal point.
- Concept/Style : Modern, bohemian and natural.
- Materials needed: A smooth wooden dowel (between 12-24 inches in length), sharp scissors and measuring tape.
- Step-by-Step Instructions:
- Make sure to cut multiple lengths of cord (each about 6-8 feet) depending on the length desired.
- Fold each cord in two and tie it on the wooden dowel with a Lark’s Head Knot.The loop is pushed under the wooden dowel. Bring the ends up and through the loop.
- Practice basic macrame knots such as the square knot, the half-hitch knot, and others.Online, you can find many free tutorials.
- Begin knotting your desired pattern.Alternating rows of square knots is a simple pattern.
- Trim the cords at the bottom into a V shape, fringe or any other style you desire.
- Tips and Variations: Try different colors of cords, use wooden beads or add natural elements such as small dried flowers to the design. To create asymmetrical patterns, vary the length of your cords. Try a piece that uses only Lark’s Head Knots and cords of varying lengths for a more simple look.

Fabric Swatch Art/Quilted panels
Create a colorful, textured piece of art using leftover fabric scraps. It’s an easy way to recycle leftover fabric from old clothes or sewing projects. The result is a beautiful, unique piece of art that will add a warm, artistic touch to your walls.
- Concept/Style: Eclectic, textured, colorful, modern patchwork.
- Materials needed: Fabric scraps of all kinds (cotton, linens, velvets, etc.). Fabric glue or hot glue is needed, a canvas stretched or cardboard piece that’s sturdy, scissors and optionally, iron-on interfacing to give it stability.
- Step-by-Step Instructions:
- Gather fabric scraps with complementary or contrasting patterns and colors.If necessary, iron them flat.
- Choose a pattern. You can choose geometric shapes, overlapping stripes, or an abstract arrangement.
- You can cut your fabric into any size and shape you like.You can make squares, rectangles or organic shapes.
- Adhere each fabric piece to the canvas or cardboard by applying fabric glue, or hot glue.Work your way from the corner or center outwards.
- For a different look, overlap pieces or leave small gaps.Make sure the edges are well glued.
- Before hanging, allow the glue to completely dry.
- Tips and Variations: To create a “quilted look”, you can sew the fabric pieces before attaching the backing. For a finished look, frame your fabric art. Fabric paint can be used to add stencils or details. Monochromatic palettes can create a sophisticated, subtle effect.

Yarn Art/Rainbow Wall Décor
Create geometric or abstract designs with colorful yarn, a few nails and some glue. This project is simple, but produces a piece of wall art with a lot of impact. It can be customized for any room or color scheme.
- Concept/Style: Geometric, modern, abstract, vibrant.
- Materials needed: A wooden board (plywood, MDF or any other size), yarn in various colors, small nails, (brads work best), a measuring tape, a pencil, hammer and a measuring tape.
- Step-by-Step Instructions:
- Choose your design. It can be a simple shape such as a triangle, a circle or a star or it could be an abstract pattern.
- Draw your design lightly onto the board with a pencil.
- Hammer in the nails evenly, along the lines of the design (about 0.5-1 inch apart).Make sure they are securely anchored in the board.
- The end of the first color yarn should be tied to a nail.
- Start winding the yarn around each nail, creating straight lines to fill out the shape.You can create parallel, zigzag or criss-cross lines.
- If you want to change colors, secure the ends of the yarn with a small knot behind a nail.
- Continue filling in your design until you are satisfied.
- Tips & Variations: Use ombre yarn for a gradient effect. Combining different textures of the yarn. Before adding nails, paint the board in a color that contrasts with it. Choose colors that blend together in the spectrum to create a “rainbow effect”.
- Paper & Print Perfection
- Gallery Wall with Repurposed Frames
A gallery wall with well-curated images is a classic idea for wall decor. It tells a tale. Reusing old frames allows you to create a highly personal display that is both affordable and unique. You can use them for your favorite prints, photos or drawings.
- Concept/Style Eclectic personalized curated vintage modern
- Materials needed: Old frames of various sizes, spray paint, acrylic paint, personal photos, printable art or your own sketches. Command strips or picture hanging nail, measuring tape, pencil and paper templates.
- Step-by-Step Instructions:
- Collect old frames.You don’t have to worry about the original finish or color of your frames.
- You can clean and then paint the frames if you wish.You can choose a single colour (e.g. matte black, white, gold) to create a cohesive appearance or you can mix and match colours for an eclectic look.
- Choose the art you want to use for each frame.You can use family photos, vacation snaps, postcards or magazine cutouts.
- Paper templates for each size of frame can be cut out.Lay these templates out on the floor or large kraft paper piece until you are happy with your layout. Take a picture of the layout.
- Tape the templates to the wall.If desired, use a level to make sure the lines are straight.
- The templates can be removed and the frames hung directly on top.You can use small nails or command strips to avoid damaging your frames.
- Tips and Variations: Add unexpected elements such as a decorative plate or shelf, a small mirror. Use wooden or fabric-covered letters to add different textures. Choose a theme that is consistent for your artwork (e.g. all black-and-white photos, or all botanical prints) to create a cohesive appearance.

Botanical prints from Pressed Leaves/Flowers
Bring the beauty of nature inside with timeless, delicate botanical prints made from pressed leaves and flowers. This wall art is a beautiful way to add a minimalist, serene touch. It’s also a great way to save memories of your garden and nature walks.
- Concept/Style: Natural, minimalist, serene, cottagecore.
- Materials needed: Acid-free art or watercolor paper, clear spray adhesive or craft glue, fresh flowers and leaves with thin petals (these work best), heavy books or flower presses with absorbent papers (like newspaper, blotter or blotter-paper), picture frames with glass or floating frames.
- Step-by-Step Instructions:
- Fresh flowers and leaves are best.Avoid specimens that are too thick or wet.
- Place them between absorbent sheets.Place them inside a floral press or underneath heavy books.
- To prevent mold, change the absorbent papers every few days during the first week.The sheets should be flat and completely dry.
- After pressing, arrange the dried botanicals on your acid-free paper.Try different compositions.
- Use a small amount of clear craft adhesive on the back of the larger pieces. Or, spray a little adhesive to attach them to the paper.
- Put your botanical print in a frame.Frames that float create an ethereal, beautiful effect.
- Tips and Variations: Create prints using different flowers to create a consistent look. Black paper will create a dramatic contrast. Add a personal touch by writing the date or name of the plant on the print.

Geometric paper cutouts/3D wall art
Explore the world of geometric cutouts for a striking 3-D wall art. You can add a contemporary sculpture element to your wall without spending a fortune by using simple cardstock.
- Concept/Style: Modern, minimalist, geometric, sculptural.
- Materials needed: Heavy Cardstock (various colours or one color), craft knife, precision scissors, mat for cutting, metal rulers, pencils, foam mounting tape, or hot glue.
- Step-by-Step Instructions:
- Choose a geometric shape that is simple (such as triangles, hexagons or circles), or choose a tessellating pattern.
- You can either draw or print the desired shapes on to cardstock.
- Cut out shapes with a craft blade and ruler to ensure precise lines.
- Cut out multiple identical shapes. Then, use foam mounting tape to layer the shapes.
- Arrange the cutouts onto the wall.You can create a repeating pattern, a large mosaic, or a free-form abstract design.
- Attach them to the walls using foam mounting tape or hot glue.
- Tips and Variations: Use a variety of shades in the same cardstock color to create subtle depth. Make a large mural using many small shapes that repeat. Cutouts and painted sections can be combined on the wall. Try metallic cardstock to create a glamorous effect.
- Natural & Organic Elements
- Driftwood or Branch Wall Hangings
A charming wall hanging will bring the calm of nature inside. These pieces are perfect for coastal, rustic or minimalist decor. They use found objects to create earthy, unique art that connects you to the outdoors.
- Concept/Style: Rustic, coastal, natural, minimalist.
- Materials needed: A piece of dry driftwood, or a decorative branch with a strong base, cotton twine, or natural twine, and small objects (feathers or seaglass, shells or pinecones). Hot glue gun, air plants or other small objects.
- Step-by-Step Instructions:
- Your driftwood or branch should be cleaned thoroughly.You can lightly sand the driftwood or branch if desired.
- Decide whether you want to hang your main branch horizontally or vertically.For horizontal hanging, tie a length twine at each end of the main branch.
- Cut the twine or cord into different lengths.
- Tie these cords securely to the main branch.
- Attach your decorative elements to the cords.You can glue sea glass, shells or feathers on the cords or loop in air plants.
- Adjust the lengths of the cords to your satisfaction and arrange the elements.
- Tips and Variations: Use small LED fairy light for a magical glow. Paint the branch in a color that contrasts with it. For extra visual interest, add a few ceramic beads or painted wood beads to the cords.

DIY Mirror Decor (Sunburst and Floral)
A DIY decorative frame can transform a cheap, plain mirror into an eye-catching focal point. Sunbursts and floral patterns are popular unique designs which add instant glamour to any room.
- Concept/Style: Glamorous, bohemian, art deco, custom.
- Materials Required: A round mirror of any size, bamboo skewers, wooden crafts sticks, or cardboard stripes (for sunburst), silk petals or artificial flowers with bendable stems (for floral), a hot glue gun and spray paint in gold, silver or your chosen color.
- Step by step instructions (Sunburst Mirror).
- Place your mirror on a flat surface.
- To create the “rays”, cut your craft sticks or skewers into different lengths.
- Start hot-gluing the rays around the circumference of the mirror in an alternate pattern (longer, shorter, and medium).The ends should be slightly overlapped in the middle.
- Spray paint the entire back of the mirror (including the rays).For even coverage, apply multiple thin coats.
- Allow to dry completely before hanging.
- Instructions for Using the Floral Mirror:
- Separate the petals from the individual flower heads.
- Start hot-gluing the small flower clusters or petals at the edge of the frame.
- To create a lush, full effect, layer the petals, either working inwards, or by creating a distinct edge.
- Use a single flower type or mix several varieties to create a variety of textures.
- Tips and Variations: Use wood spoons to create larger, bolder sunbursts. Use dried flowers to create a rustic floral mirror. Add metallic or glitter accents to your painted sunburst.
- Abstract & Textured Art
- Textured canvas art (Using Joint Compound/Spackle).
Use joint compound or spackle to create a minimalist 3D art with incredible texture. This technique creates rich, sculptural patterns that can then be painted to give a high-end, sophisticated look.
- Concept/Style: Modern, minimalist, sculptural, industrial chic.
- Materials Required: Stretched Canvas (Any Size), Joint Compound or Spackle (lightweight varieties recommended), Palette Knife or Putty Knife, Optional: Acrylic Paints and Brushes
- Step-by-Step Instructions:
- Place your canvas on a flat surface.
- On your palette knife, scoop a generous amount joint compound.
- Start by applying the compound on the canvas.You can create different textures.
- Subtle & Smooth:Spread an even, thin layer.
- Rigged:Drag a knife along the surface in parallel or wave-like lines.
- Abstract PeaksUse the knife to create peaks, valleys and a variety of shapes.
- Geometric ShapesCreate sections using tape and add texture to them.
- Try different textures with a fork, comb or your fingers.).
- It can take up to 48 hours, depending on the thickness of the compound.The compound will become bright white.
- After it dries, you can paint it in acrylics or leave it as white to create a minimalistic look.You can use a single colour for a monochromatic look or abstract washes.
- Tips and Variations: Before applying the joint compound, mix a small amount acrylic paint into it. This will give you a subtle colour. Create a diptych or triptych using multiple canvases. The finished piece can be framed to give it a gallery-like feel.

Pour Painting/Fluid Art
Pour painting is also called fluid art. This technique is a mix of acrylic paints and a pouring medium that creates vibrant, organic swirls and cells.
- Concept/Style: Abstract, vibrant, fluid, organic.
- Materials needed: Acrylic Paints (various colours), Pouring Medium (e.g. Floetrol, or specific acrylic pouring media), Silicon Oil (optional for cells), Plastic Cups, Stir Sticks, A canvas or wooden panel. Drop Cloths or Plastic Sheeting (it is messy! Painter’s tape to protect the backside of the canvas.
- Step-by-Step Instructions:
- Cover everything with dropcloths.Place your canvas on disposable cups so that paint can drip freely.
- Mix each acrylic color with the pouring medium in separate plastic cups.The ratio will vary depending on the paint and medium. Aim for a consistency similar to warm honey. Stir well to eliminate lumps.
- (Optional). Add a few drops silicone oil into each cup of color and gently stir one or two times.This creates “cells.”
- Choose your pouring technique:
- Dirty pour:Layer colors in a cup without mixing.
- Flip cup:Place your “dirty Pour” cup on top of the canvas and flip it quickly over, then lift the cups.
- Tree Ring pour:Pour the colors in a ring around the canvas.
- Spread the paint by tilting the canvas in different directions.
- Allow the paint drips to run off the edges.If you have used silicone oil, use a heat gun or a blowtorch (carefully).
- Allow the paint to dry flat completely for 24 – 72 hours depending on its thickness.
- Tips and Variations: Experimentation with different color palettes. Try various pouring techniques. For extra sparkle, add glitter or metallic paint. After the paint has dried, apply a clear gloss for added protection and a glossy finish.
Tips for Arranging & Hanging Your Art
The final step in displaying your wall art, is to make sure it is displayed effectively. The right arrangement and hanging will enhance your decor’s impact, making it Pinterest worthy.
- Plan your layout before you make any holes. Tape to the wall paper templates cut out in the size of the art pieces. You can experiment with different layouts (gallery, symmetrical or asymmetrical), without committing. You can use online apps, or sketch out ideas on paper. Consider how the pieces will interact with one another and with the surrounding furniture.
- Hanging Techniques – Select the best method to hang your artwork based on the type of wall and weight.
- Command Strips Ideal for renters and those who wish to hang their items without damage. These strips are available in different weight capacities, and they can be easily removed.
- Picture hanging nails/hooks: Standard solution for permanent solutions. Use nails that are appropriate for the wall material and weight (e.g. drywall anchors to hold heavier items).
- Picture Wire Ideal for hanging multiple smaller pieces or heavier frames.
- Achieving balance: Strive for visual harmony, even with an asymmetrical display. To create interest, mix sizes, shapes and textures. Combine your DIY items with store-bought pieces to create a more rich display. Think about the “visual impact” of each item. A large, dark piece has more impact than a smaller, lighter one.
- Height and Spacing: As a general rule, when hanging artworks or collections, it is best to hang them at eye-level. This is usually around 57-60″ from the floor up to the middle of the art. For a consistent look, keep the spacing between frames (e.g. 2-4 inches) constant when creating a gallery.
- Lighting: Artificial and natural lighting can have a dramatic impact on how your artwork is perceived. Watch how the light falls on your walls during different times of the day. Consider accent lighting, such as picture lights or spotlights, to draw attention to specific pieces. This is especially important for art with textured surfaces that play with shadows.
Conclusion and Call to Action
Now that you have a wealth of DIY ideas, your home can be transformed into a personal haven. Handmade wall art has many benefits, from the therapeutic nature of crafting to the irresistible charm of individual wall decorations which reflect your own personal journey. This is more than filling up empty spaces. It’s about infusing personality, creativity and a unique story into your home, while still being kind to your wallet.
Gather your materials and clear your workspace to let your imagination soar! Most beautiful homes are those that are loved and lived in, with lots of meaningful pieces. We are excited to see what you come up with. Please share your DIY creations below to inspire other DIY enthusiasts or tag us on Facebook. #MyDIYWallArt Showcase your amazing transformations! Subscribe to our newsletter to receive more inspiration for home decor and craft tips. Enjoy your crafting!