How to Draw a Glass of Water with Reflections and Bubbles: Step-by-Step Realism Guide
Are you looking for intriguing real-life drawing ideas that truly test your creative skill? Although it may seem easy, drawing a clean glass of water can be a masterclass in observation that tests your ability to draw light, transparency and fine aspects. In this comprehensive guide, you will learn the essential techniques for how to draw a glass of water with reflections and bubbles—transforming a blank page into a stunning, lifelike illusion. We’ll walk you through the process step by step, beginning with a sketch and moving to final, sparkling highlights, to ensure that your next work has amazing depth and authenticity. Let’s get into the art of spotting through the simplicity of things!
The Introduction: How a simple Glass of Water is a Reliable test of Realism
Drawing water with a glass is frequently regarded as one of the greatest difficulties in realism, next to perhaps getting portraits right. Why? Because you’re not just drawing a translucent object. You’re sketching absolutely nothing—the empty space that is defined by the glass material as well as the water that it holds.
Transparent objects are a challenge for artists since they require the capture of features that aren’t found in conventional still life images: reflections and refractions (how light is bent) in addition to the transparency. Understanding the subtle nuances of light moving between both the glass as well as into the water and studying how the background distortions and the small details such as bubbles challenge one’s ability to observe. This guide’s aim is to teach you how to accurately capture a glass of water in step-by-step fashion, and by focusing on the intricate dance of liquid and light.
Materials You’ll Need To Begin
Before you begin sketching, acquiring the appropriate drawing tools for realistic results is vital. Tools of high quality make creating smooth gradients and sharp highlights simpler.
- Graphite Pencils (HB-8B): A wide range is essential. Use 2H or HB to sketch your initial light sketches and precise detail, 2B and B to create mid-tones, and 6B-8B to create the most dark shadows, and for defining edges.
- Smooth Drawing Paper: Pick Bristol Paper or Hot-Press Watercolor. Smooth surfaces are essential to create the delicate seamless gradients needed for water and glass and allowing graphite to blend perfectly.
- Kneaded Eraser: It is ideal for gently lifting graphite to soften edges and sculpting highlights without damaging the paper.
- The Stick/Tombow Eraser (or Electric Eraser): Essential to create clear, precise highlights as well as creating boundaries of reflections.
- Blending Tool: Blending stumps (tortillons) or cotton swabs (soft tissue) are crucial for creating smooth transitions and eliminating texture that is grainy in the shading.
- Setting up the Light Source: A directionally oriented lamp (a desk lamp is ideal) set to the opposite side of the actual reference glass is highly recommended. This produces strong, clear shadows and highlights, making the process of observation much clearer.
Quick tip: The texture of your paper (its “tooth”) directly impacts your results in a realistic way. For the best realism with transparent objects, select the smoothest paper you can locate, as rough papers could hinder the illusion of glass that is seamless.
Watching Your Subject: Understanding Shape, Light and Reflection
The most important thing to do is prior to the moment your pencil is even on the paper. To draw in a realistic manner, it is necessary to first master the art of observation. Put a glass of water under good lighting and carefully study it.
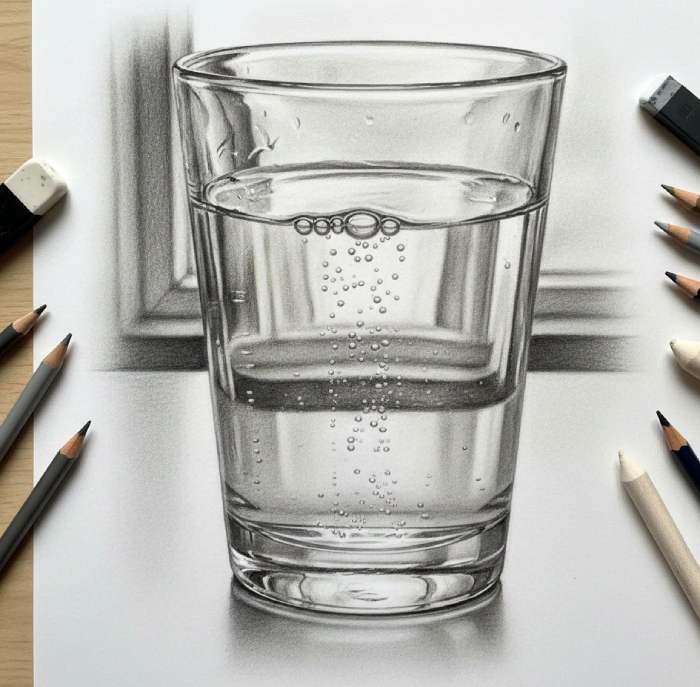
- How Water Reflects and Bends Light: Notice that water isn’t a simple glass, it functions as lenses. The objects that are seen through the water tend to be slightly magnified or altered. The water’s surface (the meniscus) has a slight curve. When light strikes the curve, a bright light appears.
- Understanding Glass Perspective and Shape: A glass is fundamentally the shape of a cylindrical. Pay attention to the shape of the ellipses (the curving shapes of the rim and the base). The ellipse on the rim is wider than that at the base, if you view it from above.
- Be observant of reflections in water Drawing Exercise: Reflections are the most important element in glass’s realistic look. They aren’t random; they are defined shapes that are created from the source of light as well as surrounding objects (windows walls, windows, or even the table). Utilize the light source you have to make clear and distinct reflections and determine the brightest bright white areas. These areas will not be affected by graphite or be elevated using an eraser.
Step 1 – Drawing the Basic Outline of the Glass
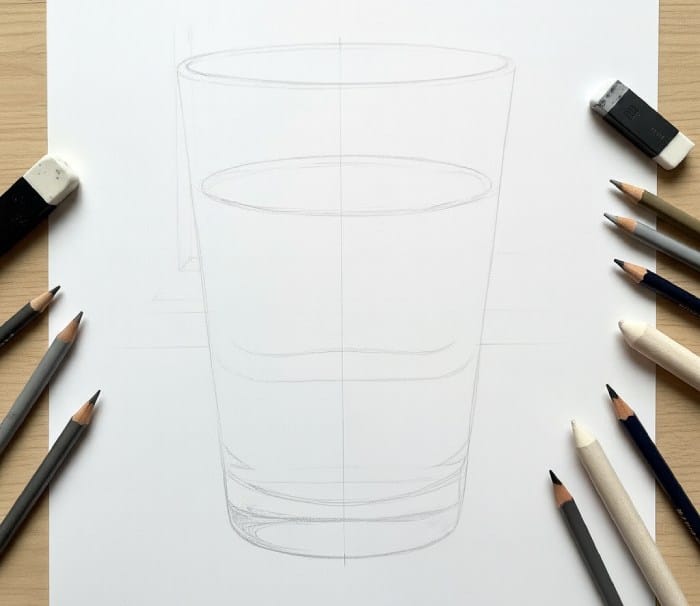
Begin drawing using the smallest sketching pencil (2H or HB). This stage is all concerned with proportions and symmetry.
- Create Symmetry: Create a thin, straight, vertical guideline across the middle of your page. This line marks the axis of glass and is the only way to ensure an exact symmetry.
- Definition of Width and Height: The glass’s height is the maximum as well as its width (usually near the rim, (or just beneath).
- Draw the Ellipses: Make sure you draw an edge of the ellipse on the glass. Be aware that the bottom curve of the ellipse should be slightly larger than the upper curve. Create the lower ellipse making sure it’s a little wider than the rim and that it is perfectly aligned with the vertical guideline.
- Connect the sides: Use soft, slightly curly lines to connect the rim to the base. Do not use straight lines. Even thick glass exhibits a slight curvature.
- Note the level of water: Draw a faint horizontal line that marks the point at which the water level resides.
Essential tip: Keep all lines thin. The idea is to shade on them and the dark lines could make the final work appear flat and cartoonish.
Step 2 – Draw your Water Level and Bubbles
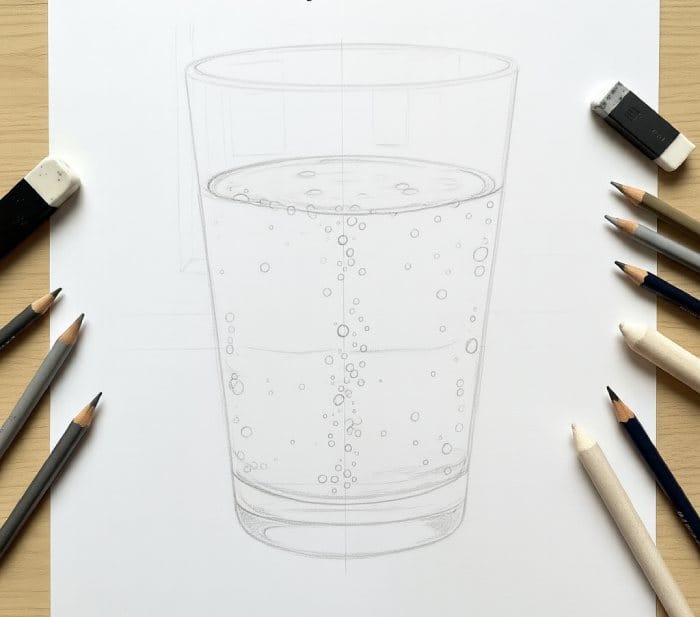
This section introduces the liquid as well as its small particulars.
- The position of the water line: Due to tension at the surface it is true that the water line (meniscus) isn’t always straight. It will curve slightly upwards when it joins the glass. Draw the curve gently.
- Drawing of Bubbles within Water Making bubbles out of water: Creates incredible depth and realism, particularly in the case of water that has been freshly made or carbonated.
- Size and placement: Use a very light pencil (H or 2H) to make tiny, circular bubbles within the glass. Variate their dimensions (pinpricks up to slightly larger-sized spheres).
- Clustering: Naturally, bubbles gather close to the edges of the glass and stick to the edges. Make clusters along the inside edges of the glass, and some that appear to rise within the main body of water.
- Highlights: Remember that each bubble is a tiny sphere that reflects light. The final result will be an extremely small, transparent dots (highlight) on one side of your bubble contour, as well as a fine dark crescent on the opposite side, to give it a dimension.
Step 3 – Adding Reflections and Highlights
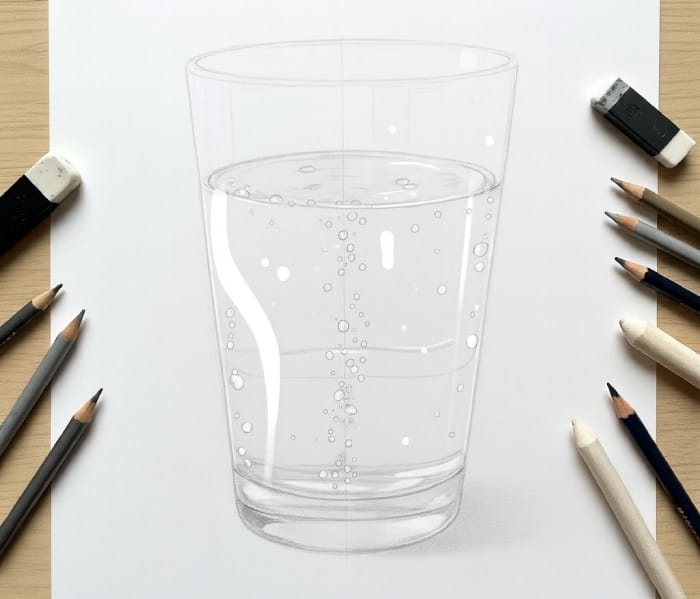
Reflections are the “wow’ aspect that makes glass come life.
- Identify Brightest Spots: Study your subject. What are the most pure white highlights? These are typically fine, thin streaks formed by light reflections that bounces off of the glass’s surface. Draw the areas of your drawing using the lightest pencil you can while reminding yourself not to shade these areas.
- glass Reflection Drawing Methodologies
- The S-Curve: In most cases, you’ll be able to see a bright and sinuous (S-shaped or curving) line of reflected light that runs horizontally across the body of glass. This is essential to define the curvature.
- Lift Graphite to highlights: After you have started shading (in step 4) You will then utilize your eraser that you have kneaded for lifting graphite to the form of reflections. For bright, clear highlights that are sharp and crisp make use of the stick or an electric eraser to draw distinct clear white lines.
- Reflected Forms: Include a few reflected forms from the surrounding environment, such as a window, table edge or wall color. They are soft but slightly disfigured forms on the glass’s surface and on the water.
Step 4: Shading and creating Transparency

It is here that the illusion occurs. The aim is to define the glass, not only by its shape however, but through reflections and shadows that appear on the glass’s surface.
- Level Shading Gradually: Start with 2B pencils and the pencil with a light touch. The darkest areas that are visible in glass usually less than the lines however, but the edges, and the regions in which light refracts most (e.g. the bottom curve, where the glass gets thicker, and the points of internal reflection).
- The Defined Edges: Utilize your darkest pencil (6B or 8B) extremely sparingly to draw sharp, thin lines that run across the edge of glass. This gives an illusion of glass being very thin in comparison to the backdrop.
- Blending to create transparency: Blending tissues or stumps for smooth, rounded gradients. The center of the glass must be among the heaviest parts (the the midtones). Do not make them entirely white. A very thin, smooth coating of graphite can suggest that the glass is transparent.
- Shading Strategies for Transparent objects: Pay attention to those darker areas that show to be visible through the glass. These are usually distortions of reflections from the background. If you shade the backdrop through the glass a bit lighter or darker than the background on the outside it is possible to demonstrate convincingly that reflection. The most intense contrast, with the darkest color, should be created at the point where the glass’s rim is the water line and at the bottom, where the glass is at its thickest.
Step 5 – Refine the Details and Final Touches
The final step is to polishing, texture and checking overall uniformity.
- Small imperfections: Real glass isn’t flawless. Utilize your kneaded eraser gently smooth out the perfectly straight line of a highlight or even add a few sloppy bubbles, or subtle, invisible thin streaks of light across the body.
- Check Transitions and Proportions: Step back from your drawing. Are the circles are symmetrical? Does the transition between darker shades as well as bright lights smooth other than when the intention is for a sharp reflection?
- Keep Reflections Soft, but visible: Make sure that the bigger soft reflections are blended effectively so that they don’t appear like separate objects, but are instead part of the glass’s curved surface.
- Compare to reality: Hold your drawing in front of the real glass. What are the differences? Make adjustments to the shading and contrast until you’ve created the most realistic glass drawing step by step.
Common Mistakes and Tips to Avoid Getting into them
Even experienced artists may be enticed by these traps while drawing with glass:
Over-darkening Glass Edges
The glass is defined by interior contrast (reflections/refractions), not heavy outlines. Utilize the darkest shades lightly at the edges and let contrast of the background determine it.
Ignoring Reflections on the Background Reflections
Inadvertently excluding faint or distorted forms of the environment around it renders the glass appear as if it is a flat, unconnected piece of glass.
Utilizing A Lot of Straight Lines
The base, rim, and sides of glasses all contain subtle curvatures (ellipses). Straight lines destroy illusions of three-dimensionality.
Forgetting Contrast
Make sure there is a clear distinction between the brightest highlights (pure white paper) as well as the shadows that are darkest. Contrast makes glass “pop.”
Practice Ideas: Take Your Water Drawing to the Next Level
You’ve learned the basics of glass. You’re now ready to test yourself!
Explore different shapes of glass: A wine glass as well as a curved tumbler or a carafe all presenting unique challenges in elliptical symmetry and slight distortions.
Explore using colored pencils or ink washes: Introduce color for the water (like an hints of green or blue) or apply ink washes for creating softer shadows that are deeper.
Learn to draw reflections on different surfaces: Draw the glass placed on an reflective surface (polished marble, wood, or steel) to practice drawing distortions of the object.
Encourage you to keep sketches of reflections: Dedicate time to drawing the forms of reflections without thinking about the actual object.
Final Thoughts: The Art Of Looking Through Simplicity
Congratulations! You’ve successfully mastered the real power of a drawing, which is not based on technical proficiency only, but rather in sharp observation and perseverance. “The art of Being Seeing Through Simple is recognizing that realism goes beyond replicating but actually understanding the connection between light and matter. Every shadow, highlight, and bubble tells a tale about the world around us.
We hope that you are energized through these methods. Now you are the one to do it!
Action to be taken: Begin your next realism challenge by drawing the water you drink now! Please feel free to share your accomplishments and include us in social channels!
(FAQ)
How can you make water appear realistic in an illustration?
To create realistic water effects look realistic, and concentrate on reflection (how objects that are behind the water appear to be distorted). Use a slight curve for the edge line (meniscus) and apply bright light highlights that are thin and mimic the way light bounces off a surface of liquid. Apply a smooth blend to the part of the body in order to keep the transparency.
How can I draw transparent objects with ease?
The easiest method to create translucent objects is to concentrate specifically on the most dark sharp contrasts (where glass gets thicker and shadow lines) as well as the most pure highlights (the reflection of light). When you focus on these extremes, middle tones (the glasses themselves) naturally fade away giving an illusion of transparency.
What pencils are the best for realistic sketches?
An extensive assortment of graphite pencils are ideal for realistic sketches, particularly starting from two to eight. The pencils that are hard (H/2H) are ideal for gentle sketching and texture, and the pencils that are soft (6B/8B) give the dark, deep tones required to add depth and contrast.