How to Draw a Fantasy Girl: A Beginner-Friendly Step-by-Step Tutorial
Are you ready for stunning, magical characters? It may seem difficult to learn fantasy girl drawing, but this is one of the most rewarding experiences for a beginner. This step-by-step guide will take you from the simplest shapes to a detailed illustration. You will learn essential techniques such as simple anatomy, dynamic poses, and creating incredible fantasy outfits. You’ll develop the confidence to create your own unique artwork by breaking the process down. Grab your pencil and begin drawing your fantasy girl now!
Materials You Will Need
Let’s get your drawing materials together before we begin. To begin, you don’t require expensive equipment. Simple tools will help you learn the basics.
Traditional tools (Recommended for beginners)
- Pencils: A collection of pencils that range from hard to softer, such as an HB for sketching and general work, an HB or 2H for initial light lines, and 2B or 4B in darker shades and for shading.
- Paper: Simple sketch paper is fine. Look for smooth or medium-toothed paper. Bristol Paper is a good choice for final illustrations.
- Erasers: A kneaded eraser works great to lift graphite from the paper without damaging it, while a vinyl eraser (plastic) is perfect for sharp, clean corrections.
- A Ruler/Straightedge: Useful for perspective lines and initial guides.
Digital Tool (Optional)
You’ll also need:
- A drawing tablet: Wacom or Huion are popular options.
- Character illustration can be done using programs like Adobe Photoshop, Adobe Procreate, Clip Studio Paint, Krita, or Adobe Clip Studio Paint.
Materials Selection Tips
Don’t spend too much as a novice. Practice is more important than price when it comes to improving your art. Upgrade only when you feel you are limited by your beginner drawing tool. A set of pencils with six different levels of hardness will be sufficient for your initial requirements.
How to Draw a Fantasy Girl: Basics
You need to have a good foundation in figure drawing before you can create compelling fantasy characters. Understanding the anatomy of the body will help you make your fantasy character feel more real. This is the key to drawing fantasy characters.
1. Anatomy and Proportions
It is not necessary to be a medical illustrator expert, but a basic understanding of proportions will help.
- Heads as Units: An adult figure of about 7-7.5 heads is tall. For a stylized fantasy look, you may want to slightly exaggerate the height of your character. Perhaps make it 8 heads high for an elegant, slim, and elongated appearance.
- Torso & Limbs: Block the torso in a simplified hourglass (or as two connected ovals). Remember that the elbow is usually aligned with the waist and the fingertips are about halfway down the leg.
- Simplified Shapes: Use simple geometric forms to construct the figure. For example, use spheres as joints, cylinders as limbs, and a box/oval shape for the torso or pelvis. It helps you to manage female characters without being overwhelmed by muscle groups.
2. Pose and Gestures
The pose of a great fantasy woman drawing is dynamic. Avoid the rigid “standing at attention” pose.
- Line of Action: Begin each pose with one, flowing Line of Action. This curving line represents the spine of the figure and its overall energy.
- Weight and Balance: Use the “S-curve”,, or the “C-curve,” to suggest movement. Also, remember the contrapposto: if one hip is raised, the opposite shoulder will drop, indicating natural weight distribution. A simple lean will make any pose more interesting.
3. Facial Expressions and Features
The faces of fantasy characters can be stylized.
- Fantasy Eyes: These eyes are often large, expressive, and detailed. The distance between eyes should be approximately the width of an eye.
- Basic construction: Place features with accuracy using the Loomis Method. This involves a sphere marked out in planes. The nose is placed halfway between the eye and chin, and the mouth is between the nose and chin.
- Expressions: Use the eyebrows and mouth to express emotion. A soft smile and slightly arched eyebrows can communicate nobility. Lowered brows and a tightened mouth suggest anger or determination.
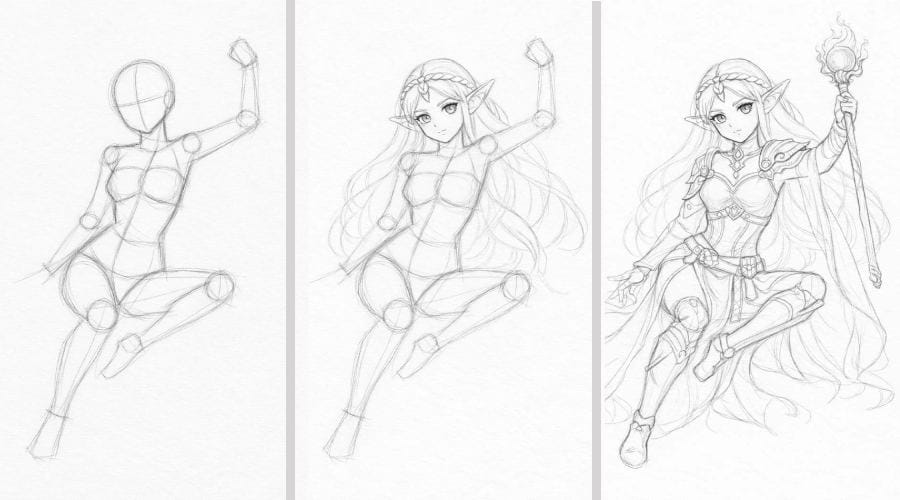
Step 1: Sketch the basic shape
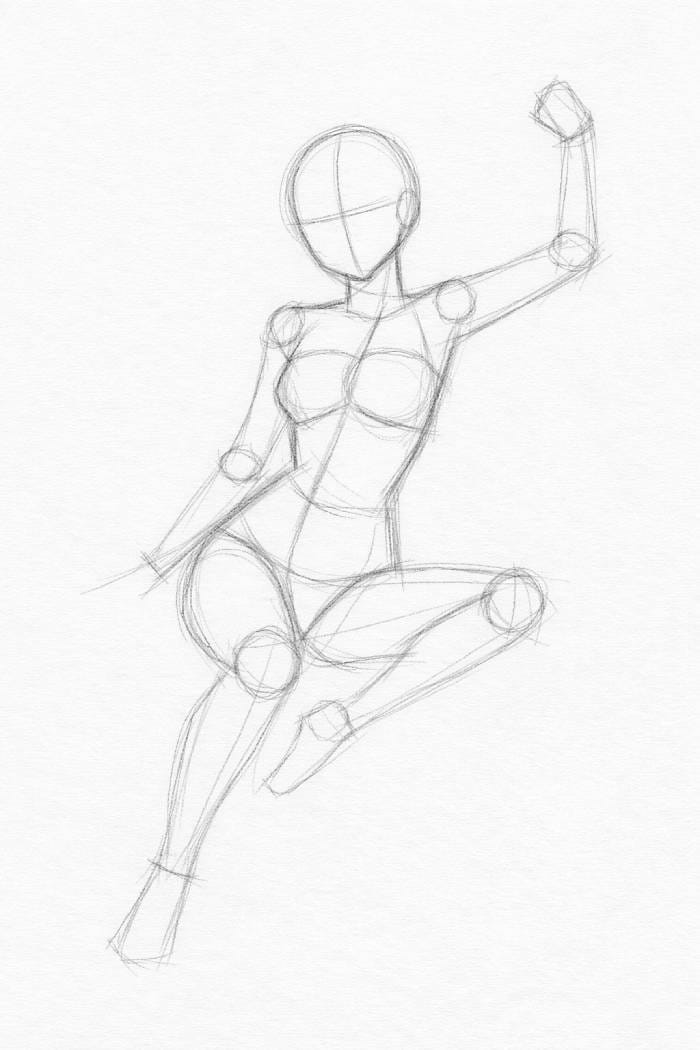
The next step is to block out your composition. This should be light and loose. It also needs to be easy to adjust. You can use this foundation to draw a fantasy girl.
- Begin with the Line of Action: Lightly draw a single, curved line to define the flow of the pose.
- Head: Draw the head as a simple circle and then add a jaw-shaped shape below it. Mark lightly the eyeline and centerline.
- The Torso: Block out the ribcage or pelvis using simple trapezoids or ovals. Connect them to the Line of Action.
- Lines for Limbs: Use light, simple lines to represent the arms and legs. Draw small circles or squares to represent the joints of the shoulders, elbows, and knees. Before drawing the form, make sure you know the length and the placement.
- Do Not Adjust: Use a 2H pencil to sketch your lines. You can then refine or erase your sketch without leaving any deep indentations on the paper. This is the foundation for any successful project. Beginner Sketch Tutorial .
Step 2: Add Details to the Hair and Face
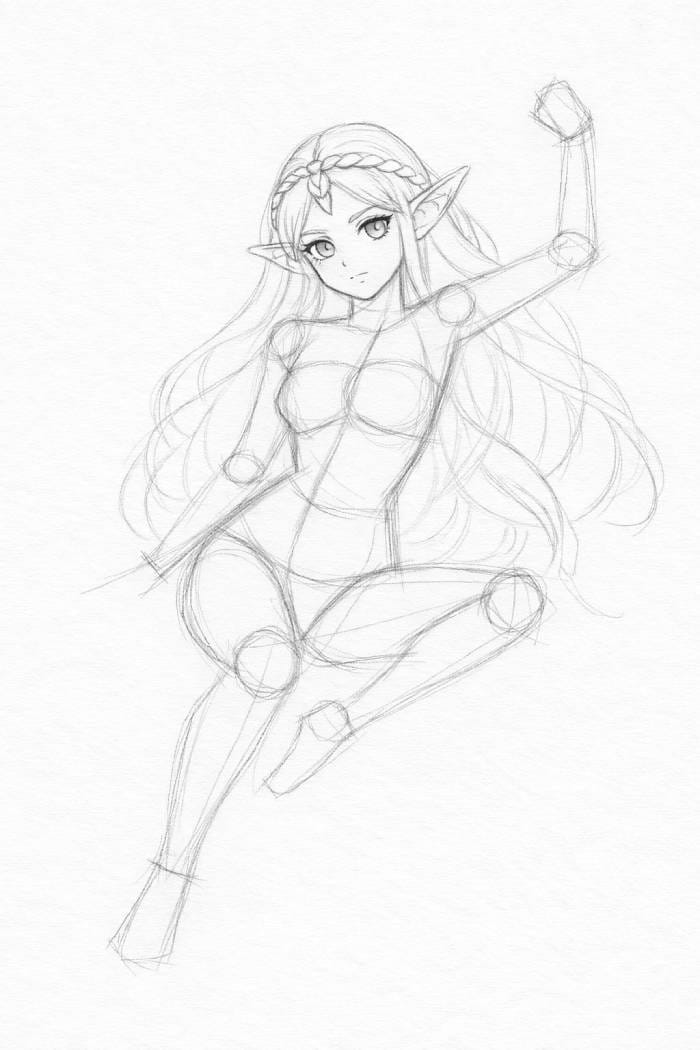
Let’s add some personality to the figure now that it has been blocked out.
The Face
Place your features and refine the oval of the face:
- Eyes: Draw an outline of the eye, and then add the pupils and iris. Fantasy characters usually have large, detailed pupils or an unusual eye shape.
- Lips and Nose: For now, keep these simple. In a stylized approach, a subtle curve on the nose and basic lines for the lips are often sufficient.
Basic Hair Shapes & Flow
The hair is one of the most expressive features of a fantasy character’s face.
- Draw in large volumes: Do not draw individual hairs. Block out the hair in large, flowing shapes. Where does hair begin (the hairline)? Where does the hair flow (due to gravity, wind, or magic)?
- Styling Tips: Fantasy Hair is often long, voluminous, and dramatic. S-curves are a great way to create a sense of flow. Is your character wearing a braid or circlet in their hair, or a subtle glow? Here is where you can establish the major masses.
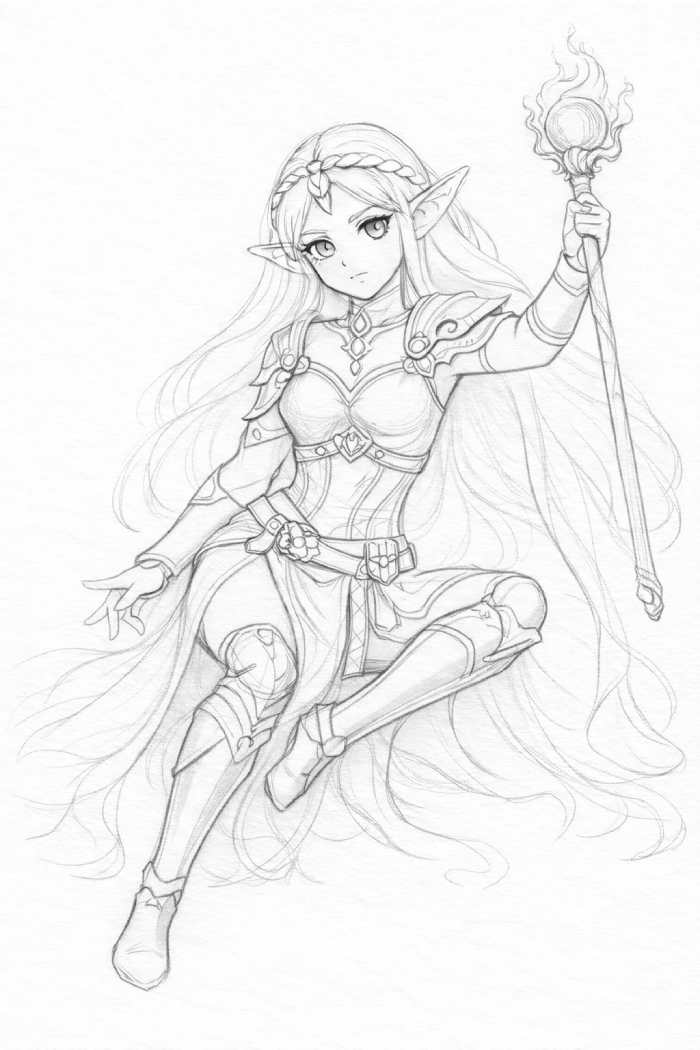
Step 3: Designing your Outfit and Accessories

Here, your character will truly become fantasy. Create an outfit for your character that is representative of her role and world.
Fantasy Clothing
Draw clothes on top of the existing framework. Consider the style.
- Warrior: Layered armour, leather straps, and practical movement.
- Mage/Sorceress: Layered fabric, flowing robes, and high collars.
- Rogue/Ranger: Loose fabric, belts with tools, boots.
- Drapery: Only draw clothing folds where the fabric gathers (at elbows, knees, and waist) or hangs in a natural way. A simple V shape can suggest a fold in fabric.
Add Accessories
Accessories tell the story of a character. This is essential for fantasy costumes.
- Belts & Straps: Add visual interest and utility around the waistline and shoulders.
- Magical Item: Does the girl carry a glowing stick, an amulet unique to her, or a complex sword hilt? First, draw these simple shapes.
- Capes and Wings: To create a dramatic effect, ensure that the cape follows the movement of the pose.
Step 4: Refine the body and pose
Clean up your figure by taking a step back and focusing on proportions and smoothness. You are now transitioning from a “stick-figure” sketch to an accurate figure drawing.
- Connect Shapes: Connect geometric forms that you’ve used to create the legs or torso. Use subtle curves for feminine forms and muscle tone. Avoid a highly detailed musculature unless your character is a powerful warrior.
- Check proportions: Does the head look too large? Are the arms too long? Again, use your “head unit” measurements. Attention to the hands and feet is important.
- Refine Gestures: Adjust angles of wrists or curves of the back in order to enhance the dynamic appearance established by your Line of Action. This refinement of fantasy character details ensures that your drawing is cohesive.
Step 5: Add Final Details and Textures
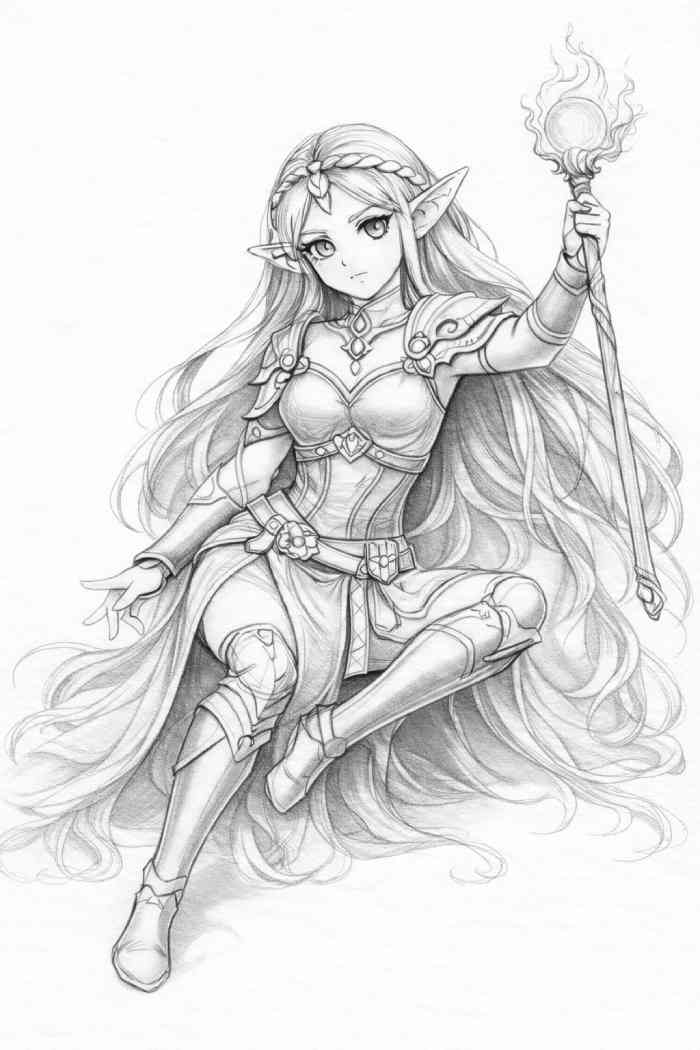
After the clothes and figure are drawn, you can add the fine details that make a drawing stand out.
- Textures for clothing: Add small, sharp folds where your clothes meet the human body. Use lines to suggest fabric textures (e.g., slightly rougher lines if you are using linen and smoother lines if you are using silk).
- Hair strands: Draw clusters of individual hair strands flowing down the main shape. Use darker, sharper lines to define the edges.
- Depth by Shading: Determine where the light source is (e.g., top-left) and add simple cast shadows to the figure. These are the darkest shadows under the chin or folds in the fabric. They can also be added where the limbs overlap.
- Highlights: Use your kneaded pencil eraser to lift the graphite from the area where the light is hitting directly (top of head, nose bridge, clothing edge). You can also leave the area white.
You can also color your fantasy girl.
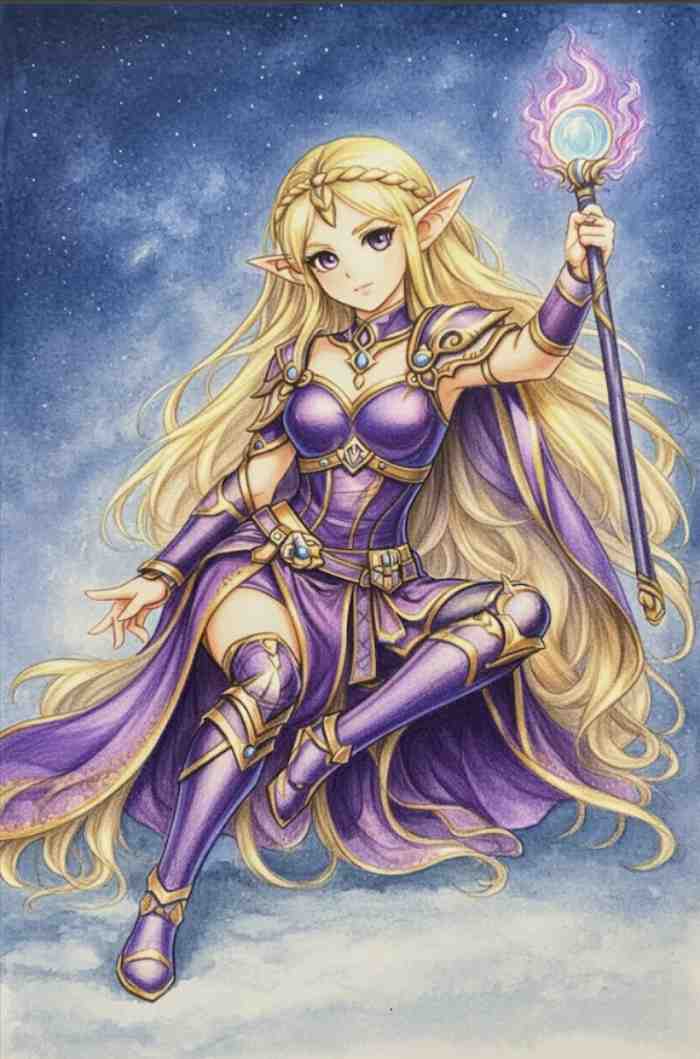
Coloring can add a lot of life and atmosphere to your illustrations.
- Color Palettes: Fantasy themes use specific palettes. A forest elf may use greens and browns with natural tones, while a sorceress could use deep purples and blues.
- Techniques: Use colored pencils or watercolors to slowly layer colors if you are using a traditional method. Digitally, you can use several layers to create flats, shading, and lighting effects. Coloring fantasy illustrations relies on a high contrast ratio to make the elements stand out.
Common Mistakes Beginners Make
You can improve your drawing skills by learning from other people’s mistakes. Here are some common beginner’s drawing mistakes that you should avoid:
- Stiff Pose: Only relying on straight lines and poses that are symmetrical. Solution—Always begin with the Line of Action, and then use the contrapposto principle.
- Disproportionate Faces: Drawing a detailed eye before establishing the head’s outline and shape. Solution—Lightly sketch out the entire head, including its feature lines, before focusing only on one eye.
- “Noodle Limbs”: Draw arms and legs with no joints or clear structure to make them appear boneless. Solution Use cylinders or spheres to represent each limb in the first sketch.
- Messy lines: Pushing too hard during the sketching stage. Solution—Sketch with a 2H pen and save the darker, more confident line for the final inking stage or refinement.
Follow-up tips and practice exercises
Consistent practice is the key to mastering fantasy girl drawing.
- Daily challenges: Spend fifteen minutes a day drawing one part of the body. For example, draw five different poses for your hands or ten different expressions for your eyes.
- Timed Drawing Gesture: Practice a full figure drawn from a photo in 30, 60, and 90 seconds. This will force you to capture energy (gesture), which is essential for dynamic fantasy artwork.
- Copy Master: Select your favorite fantasy artist and try to replicate their drawings. It’s not cheating but a centuries-old way to learn composition, style, and technique.
- Try Drawing Other Characters: After you are comfortable drawing a female character, draw fantasy creatures, hairstyles unique to your face, or armor that covers the entire body to continue to improve drawing skills.
The conclusion of the article is:
Now you have the complete guide to your first successful drawing tutorial. From drawing materials to anatomy, dynamic poses, and magical details. From a blank sheet to a completed illustration, the journey is amazing.
Do not be scared if you make mistakes in your first attempts. Art is a talent, and it comes with effort. Continue to practice, experiment with different styles and themes, and, most importantly, enjoy the creative process.