How to Draw a Realistic Daisy: Understanding Flower Anatomy and Pencil Techniques
The daisy’s simple, bright flower has a plethora of appeal to artists. How to capture the beautiful beauty and dazzling realism on paper? This comprehensive guide will help you improve how you develop your drawings of daisies abilities. We’ll go over the basic anatomy of the daisy flower which gives the flower its distinctive shape and teach you how to use pencil drawing techniques, from sketching basic shapes to more advanced shading. If you’re a beginner, or aspiring artist learning the anatomy of the daisy flower can transform your pencil drawings into an art that is truly lifelike. Prepare to draw stunning, realistic daisy drawing!

Understanding the Anatomy of a Daisy
Before you ever put your pen to paper The secret to drawing the authenticity of a real-looking daisy drawing is to understand the basic structure of the flower. Daisies, also known scientifically as an Bellis Perennis or an equivalent composite flower is more intricate than a regular circle with petals.
The Basic Parts of a Daisy Flower
- Petals (Ray Florets): These are the distinctive, white (or sometimes yellow/pink) structures around the center. They’re not all the same in size or shape, and they always overlap in subtle, natural ways. Ray florets tend to be shorter and flatter than central components.
- disc florets (The Central): What looks like a simple yellow central is actually an enormous cluster in tiny tube-shaped blooms known as disc florets. This central region is domed and not flat and its appearance is crucial to the realism.
- Stem (Pedicel): The stem is typically slender but hard, covered in fine hairs. It’s not always straight, but can be curved in subtle ways that suggest movement and life.
- Leafs: Leaves of daisies are usually spatulate (spoon-shaped) and extend down to the ground, often creating an elongated rosettes. Although you may not be able to include the entire bunch, the ones that you do include should have clearly defined veins as well as natural, slightly uneven edges.
Shapes, Symmetry, and Proportions
To get a photorealistic appearance be sure to follow these rules of structure:
- The Center is Important: The disc floret cluster determines the view. If you’re viewing the flowers straight on, it is perfectly circular. If you look at it from some angle it transforms into an oval, and the curvature has to be evident.
- Radial Symmetry. Not perfect symmetry: While the daisy has radiatal Symmetry (it radiates out from a central point) but it’s flowers have a sloping appearance. The petals are not perfect in any way. They are placed in a spiral-like pattern. Small imperfections like a tear in the edge, a small curve, and an overlap make the drawing appear organic.
- Proportions: In general, the size of the center disc ranges from one-third to one-quarter of the size of all the flowers. Make a sketch of these proportions before establishing an enduring base.
Choosing the Right Materials for Pencil Drawing
The right tools can greatly increase the depth and texture in your realistic sketching. You don’t require a plethora of materials, just a few pencils and papers.
Recommended Pencils and Erasers
To get a full range of tones, from high-glossing highlights to deep shadows, you require a wide range of graphite’s hardness:
- hard pencils (H as well as the HB): Ideal for the first light sketch for mapping out proportions or drawing light precise lines (like subtle veins). The HB also works to use for basic shading.
- Medium pencils (2B as well as 4B): The workhorses of drawing. These pencils are great for mid-tones. creating layers of shadow and for defining the principal part of the petals as well as the stem.
- Soft Pencils (6B and up): Reserved for the darkest shadows, the center of the disc floret area, as well as creating dark, rich accents. Apply them sparingly to help make your highlights pop.
Erasers:
- Kneaded Eraser: It is ideal to lift graphite and create soft highlights, without smudging. It can be shaped to an angle to “draw” fine highlights on the petals.
- Vinyl/Plastic Eraser: It is a great tool for completely eliminating errors, particularly during the beginning phases.
Paper Types and Sketching Tools
Paper: Pick a smooth and slightly textured drawing sheet (often known as Bristol board or Vellum Finish). A tiny quantity or “tooth” (texture) helps the graphite stick to the paper and permits you to create layers without becoming slippery. Avoid rough papers because it is difficult to create smooth shading.
Blending Tools:
Mixing Stumps or Tortillons: Paper tools that are tightly rolled to smooth graphite to create smooth transitions between tones. This is vital for the smoothness that the flowers.
Cotton Tissues or Swabs: Can be used to blend large, soft areas such as the background or the first shade layer.
Step-by-Step Guide to Drawing a Realistic Daisy
This is the basis of the procedure, the practical application of your knowledge about anatomical structures and the selection of materials.
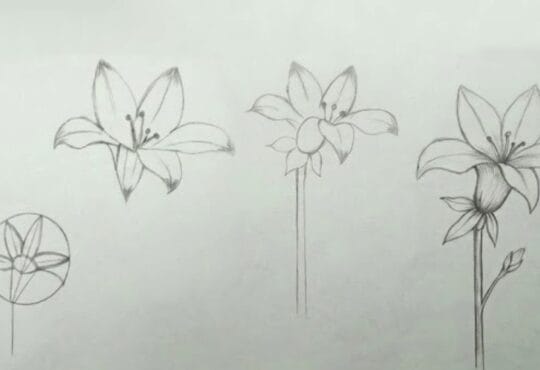
1. Sketching the Basic Shape (The Blueprint)

- The Center Circle: Lightly draw circles (or the shape of an oval based on the angle you choose) with an HB pencil. This is the florets of the disc’s central area.
- The Outer Boundary: Draw an even larger circle that is concentric with the central one. This is the longest distance that the petal can reach. Be aware of that the ratio of 3:1 and 4:1 is the ratio rule for the diameter of the entire and the diameter of the center.
- Mapping Petal Lines: In lieu of sketching individual petals draw lines radiating out from your center. These lines serve as guidelines for the petals, making sure they radiate properly.
2. Detailing the Petals

- Organic Overlaps: Beginning with the petals that are closest to the viewer, draw the form of each petal. The most important thing in this case is an overlap. Draw one petal, and then cover it’s base second petal in front of the previous one. Petals aren’t rectangular They have a slight curvature, which can be conveyed through making lines that are near the base a little concave.
- Natural Irregularity: Variate the length and curvature of the petals. There are some that may be slightly bent and some may be soft, and some might have tiny tears in the middle. This flaw is crucial for authenticity.
- the Back Layer: Lightly indicate the edges on the petals of the rear layer which appear in between those of the front. They’ll be less precise and will be softer as you go through coloring.
3. Adding the Center and Stem Details

- The Disc Texture: The center is the toughest portion. Do not draw individual dots. Instead, make a gentle, controlled scribble using 2B pencils to depict the texture of tiny flower petals. The region that lies in the center is generally the most dark and textured.
- Leave Veins as well as Stem: Draw the lines of the stem with a pencil, noting its gentle curve. If there is a leaf included you can employ an HB pencil sharp enough to trace out the main vein and secondary veins. The lines should be thin; they can be made more distinct with shading later.
4. Shading Techniques for Realism

Shading provides you your authentic daisy sketches form, depth and texture.
- Determine the source of light: Determine where light source is. This simple, decisive decision determines all highlights as well as shadows. The areas that are in direct lighting will become the most brilliant (highlights) while those that are further away, or blocked by an object will be most dark (shadows).
Petal Shading (Smooth Texture):
- Basis Tone: Spread a thin and uniform layer of 2B over every single petal.
- Shadows: Darkest regions are the ones where the petals overlap in the middle, particularly around the point where they touch the disc, as well as the shadow cast by the overlapped petals. Build up these areas with a 4B pencil using a smooth, layered technique (Hatching/Cross-Hatching, then blending).
- Features: Use your kneaded eraser, cut to a sharp point, to gently lift graphite along the middle line and the curved edge of the flower, thereby emulating how light reflects off. Edges of petals which catch the light should be the tiniest.
- Tips for Curve: To create an appearance of curving petals by shading the edges more than the center and vice versa based on the way light hits the petals.
Disc Floret Shading (Textured Depth):
- Enhance the contrast in the middle.Utilize a sharp 4B pencil, and small, well-controlled circular strokes to increase the texture that is bumpy. The disc’s side far from the source of light should be more dark. This creates a deeper shadow which makes the center pop.
Stem and Leaf Shading:
- The stem will appear in a way that it appears darker in one direction (the the shadow side) and lighter on the opposite side. Make vertical strokes to suggest the texture of the stem.
- For leaves, shade around the veins and leave the veins themselves light (the highlight) and making them appear higher.
Common Mistakes to Avoid
Even experienced artists are susceptible to falling to traps drawing fragile objects such as daisies. Beware of these common mistakes can dramatically improve your chances of creating an authentic piece.
- Over-Symmetrical Petals An error that is often made by novices is creating petals that are identical in size in shape, form and angle. This can give the flower an unnatural, fake appearance. Correct: Deliberately vary the lengths, add small bends and ensure that the overlaps appear natural.
- Flat-looking Petals due to the absence of shading: Drawing outlines without using the correct light and shadows result in a 2-D sketch. Edit: Always establish your light source, and be sure to shading the overhangs, the bottom of the petals and the edges to give the shape and dimension.
- Doing nothing to Leaf and Stem Detail: A beautiful flower that is affixed to a lifeless, flat stem ruin the whole sketch. Edit: Include subtle texture (fine lines) on the stem and add shade to make the leaves and stem an elongated shape and volume.
- “The “Dot” Center: Try drawing an outline of the disc’s central area as a cluster of dark, perfect dots. Edit: Use a controlled sketch and shading using different pressures to create the hefty mass of disc florets. Concentrate on the overall form and shadows that are deep to give dimensions.
Tips for Practicing and Improving
The art of creating a realistic drawing of a daisy is a process of observation and practicing.
- Watching real Daisies: Nothing beats looking at what is real. Before drawing take a daisy in your hand and feel its surface and observe the way light falls on its petals and into the its center. Take note of subtle differences in form and color that a photograph may be unable to capture.
- Utilizing Reference Photos: Find images of high-resolution, high-quality that clearly depict how the light is created (strong contrast is the best for practicing) and the appearance that the florets on discs. Take a look from a variety of angles to see how the disc structure works in 3D.
- Practice Fast Sketches: Make five minute sketches with your eyes focused solely upon the size and movement in the flow of petals. This helps you train your eyes to see the essence of the flower in a short time.
- Exploring Styles: Try drawing a flower using just cross-hatching. Next, make a drawing using smooth mixing. This lets you see how the different methods of shading influence the final look and feel of your drawing.
Conclusion
You have acquired the knowledge of anatomy and practical abilities in transforming a plain piece of paper into a vivid, realistic daisy drawing. The key to success is the combination of knowing the anatomy of a daisy flower its proportions organic overlaps, as well as the center’s texture using effective drawing techniques to shade and depth.
Don’t be discouraged by your initial mistakes. Every line you draw increases the spatial perception and your control. Take your pencils and take a close look at your surroundings and apply the techniques described in this article to draw your own breathtaking, realistic flower art. Your masterpiece awaits!