Simple Ways to Bring Life to Your Realistic Lotus Flower Artwork
The lotus flower symbolizes of beauty, purity, and rebirth, which makes it a popular art form for all artists. But capturing its beautiful beauty on paper is difficult. Have you ever thought about how to go beyond a basic outline and add real lotus flower design with a real dimension and a sense of life? This article will show you simple, yet effective techniques that will help you master the fundamentals of shading, to adding intricate details that will transform your work from a simple sketch into a breathtaking, real-life masterpiece.

Understanding the Lotus Flower
Before you pick up pencil the most important aspect is to comprehend the subject. A lotus isn’t merely an ordinary flower with petals, it’s an intricate, multi-layered shape.
Learn the real thing: Look at real lotus flowers, or high-quality reference photographs. Take note of the way that the petals are laid out in layers, not one-to-one. The petals that are on the outermost side are usually wider and cupped, whereas the ones in the middle are more straight and tightly rolled around the central area.
Be aware of the key features: Pay close attention to the soft, soft curvatures in the flower petals. They’re not always perfectly straight. Take a look at the subtle textures, such as the tiny veins that run through the petals as well as their smooth and waxy surfaces. Consider how shadow and light play on the surfaces and create a sense of the volume.
Symbolic Significance: The lotus’s meaning–rising from the mud and blossoming beautifully can help you develop your own artistic style. Explore ways you could visually depict this journey in your art work, perhaps by using a darker base, or perhaps a touch of drops of water.
Choosing the Right Materials
Your tools are the ones you rely on during this journey of creativity. The right tools significantly impact the final result of your art.
Pencils: To draw realistically graphite, a variety of pencils is necessary. A 2H or HB pencil is great to start with a simple sketch. To create depth and shading it is recommended to use the B pencils (2B 4B 6B, 4B) to create darker shades. A better art set should have the widest range of values between soft and hard, offering a wide range of shades.
Paper: the texture on your paper (its “tooth”) directly impacts how your pencils are laid down. To get a smooth, precise shading, use the Bristol smooth or Fine-tooth paper. A paper with a slight texture is ideal to capture the delicate lines of the flower petals but be careful not to use anything that is too rough.
The most important tools to use: A kneaded eraser is a game changer. It can be turned into fine points that can remove highlights and tidy small areas of the image without the risk of smudging. Torillons or mixing stumps are ideal for smoothing out graphite, and allowing smooth transitions from shades. Fine liner pens can be used to create striking, dark accents particular elements, like the central part of the flower.
Building a Strong Foundation
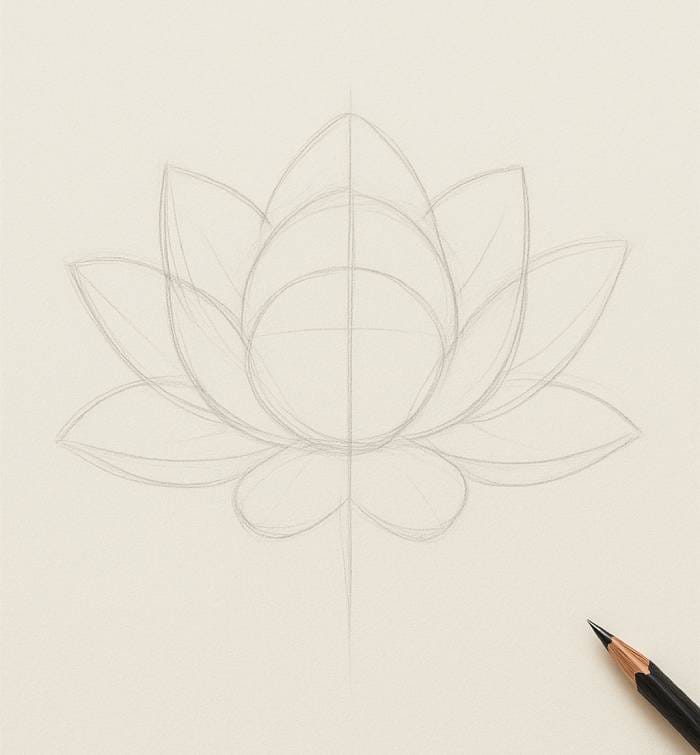
Every great drawing begins with an established foundation. Doing this too quickly can cause a lopsided, or unnatural looking result.
Begin with the Basic Shapes: Don’t begin with an intricate petal. Instead, draw a large, loosely shaped circle or oval to depict what the general shape is of the. After that, you can use the gentle curves to trace the overall position of the petals.
Synthesis and Proportions: While lotus blooms aren’t perfect balanced, they have an inherent balance. Utilize a simple guideline down the center to guide to place the main flowers on either side. Be aware of how the petals are overlapping, with each one sitting just a little behind the one ahead of it. This is what gives your drawing its three-dimensional look.
Keep it light: Use a very gentle hand when drawing. This will allow you to quickly erase and alter your lines, without leaving marks across the page. Consider this step as an exploration in fluidity of the design rather than a fixed sketch.
Adding Realism Through Shading
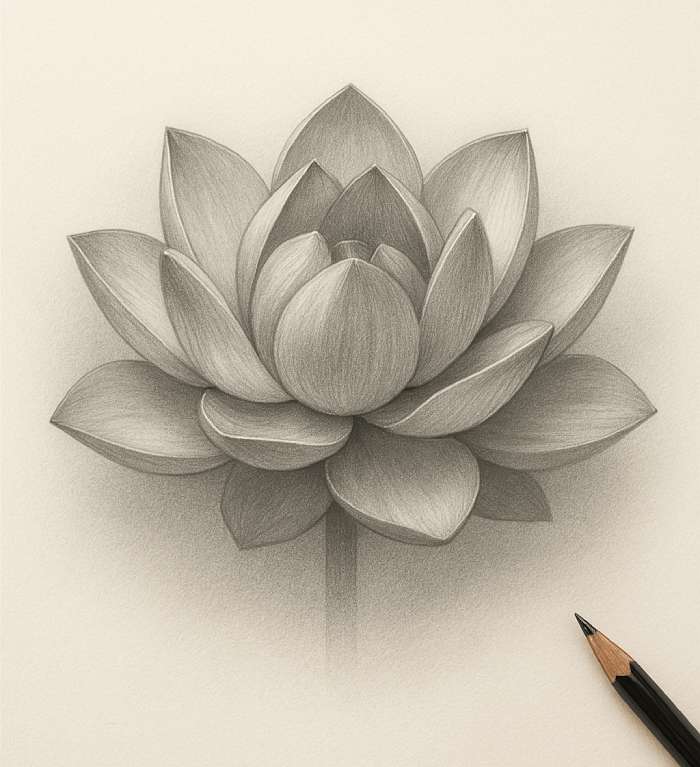
This is when your real-life lotus flower drawing really comes to life. Shading is key to creating shape as well as depth and volume.
Step-by-Step Shading: Start with the lightest shade with your strongest pencil (H or 2H). Create layers of graphite gradually. Each time you build a layer, you can use a soft pencil (B 2, B.) to gradually darken shadow areas. The process of layering is known as “burnishing” and it creates an even, smooth tonal gradient.
Capturing Shadows: The most significant shadows are those that lie within the petal. They are what differentiate petals and gives the flower an impression of depth. Utilize your blending stump for creating soft diffuse shadows when petals overlap and then, using an even sharper pencil to draw the darker, more defined line along the edges of the petal with the overlap.
highlights: The importance of highlights is the same as that of shadows. Utilize your eraser’s kneaded edges in a delicate way to lift the graphite off the top of the petals. This is where the light would directly hit them. This contrast of light and shadow gives the painting its lively sensation and feeling of realness.
Capturing Texture and Detail
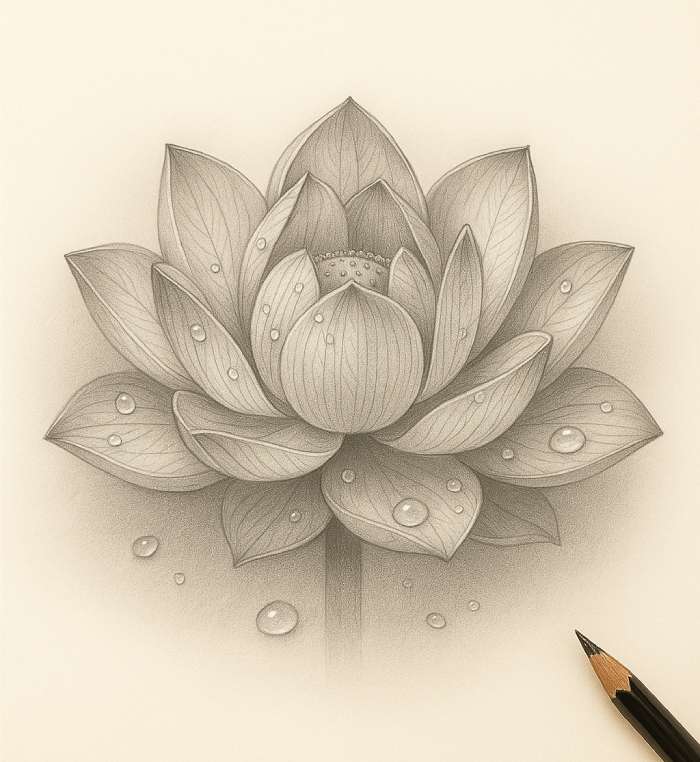
The tiny, fine elements are what make the quality of a drawing to an outstanding one. Don’t be afraid of zooming into the subject.
Subtle Veins: Petals aren’t just smooth surfaces, they also have thin veins that are delicate and delicate. For creating these veins ones, you could either cut them into paper using a sharp, hard pencil or a thin, dark line, and blend it out a bit. Make sure they are subtle. are a part of the surface texture, not a prominent characteristic.
realistic water droplets: To give your HTML0 HTML0 HTML0 extra life, think about drawing a few drops of water. The first step is to draw an outline around the droplet. Then you can color the area around it to increase its volume. leaving a clear, uncolored highlight on the top. The remainder of the droplet should be the appearance of a darker shade reflecting the area beneath.
The of the Lotus: The Center of The Lotus: The center of the lotus is a center of texture. Make use with Stippling (small dots) and tiny organic lines to convey the look of the stamens and seeds. The contrast between the textural lines and smooth petals makes the drawing more interesting visually.
Using Color to Bring Artwork Alive (Optional)

If you’re using colored pencils, then the fundamentals apply, only with a layer of the complexity.
Colours for Layering: Begin with the lighter colors first, and build layers over time. For a pink lotus it could be a good idea to start with a light pink or a white base and adding an ethereal purple or soft magenta over it to create shadow.
Blending: Make use of a blending pencil that is colorless or using some white or a light shade for blending your layer. This will give you an even, smooth look.
Picking palettes: Stick to a realistic color palette. Whites that are soft and delicate, soft pinks, a white with a hint blue under the dark shadows and yellows that have earthy tones in the middle will all seem real and natural.
Common Mistakes to Avoid
Even professional artists have a tendency to make mistakes. Knowing what to look for can help you avoid lots of stress.
Over-Darkening: A frequently made mistakes is creating shadows that are too dark, which could make the petals appear too heavy, and they lose the softness. Begin light and work up slowly. You can always add more darkness, but it’s difficult to remove it.
Ignoring Observation: Don’t just rely upon your own imagination. Even if it’s impossible to locate a real lotus in the wild, make use of numerous reference images from various perspectives to get a better idea of its shape.
Skipping Contrast: Lack of contrast between shadow and light makes your drawing appear dull. Use bold highlights and shadows to give an illusion of depth.
Practice Ideas for Artists
Practice regularly is the fastest method to get better. Here are some exercises to help you improve your ability.
Short Petal Drawings: You should concentrate on drawing the individual petals from various angles. This will help you comprehend their distinct shape and curvature.
Shading Exercises: Choose an outline of one lotus petal and practice your shading skills on it. Utilize different pencils and blending techniques to discover the effects you can make.
Modifications: Try drawing different kinds of lotus: a closed bud, half-open flower, and finally a full, mature flower. This will test your ability to observe and will add variety to your portfolio.
Conclusion
The process of creating a realistic lotus drawing is an enjoyable method that requires an attentive eye with technical skills. Through understanding the structure of the flower and choosing the best tools, and paying attention to the interaction between the shadow and light, you will be able to make your work come to life. Don’t let yourself be discouraged by the initial outcomes. Every line you draw represents an opportunity to improve your skills. Practice, continue to experiment and, perhaps foremost, you should enjoy the process of bringing this gorgeous bloom to life in a paper.
This is your turn! Tell us about your Realistic lotus flower art leave a comment below, or look through our other tutorials in the comments below. lotus flower sketching tips and How do you draw lotsus petal to get more ideas. Thank you for your time!