

How to Draw a Realistic Butterfly Step by Step: Easy Techniques for Beginners
Butterflies have a delicate structure and vibrant colors that make them a favorite of artists. Beginners may find it difficult to “draw a realistic butterfly”, but they are capable of doing so! This guide simplifies a complex process by breaking down the steps into easy, manageable chunks. We’ll make sure that your “realistic butterfly drawing” looks realistic, from the basic shapes to the shading details. Impress your family and friends with these “easy butterfly sketches”. Beginners can enjoy the experience of drawing.
Butterflies are more than beautiful. Butterflies are also an excellent way to learn drawing basics like proportion, shading and symmetry. Although complex, the intricate patterns of their wings can be simplified to simple motifs. This is a great way to improve your eye for detail. This article will demystify the process and help you capture the beauty of those winged wonders.
Materials You Will Need
Let’s get our “butterfly drawings tools for beginners” before we begin. The right supplies will make a big difference to your drawing experience, and ultimately the quality of the final artwork.
Graphite Pencils: A set of graphite pencils in a range of grades, including H (harder, lighter lines), HB, 2B, 4B, or 6B, will give you a wide variety for sketching, shading, and outlining.
Eraser: Regular and Kneaded: The kneaded vinyl eraser works well for more precise, sharper corrections.
Sketchbook or Drawing Paper: Select a paper with a medium to smooth texture. Papers with a higher weight (80-100 gsm or more) are less likely to buckle when shading.
Color Pencils and Markers Optional: A good set of colored crayons will bring life to your butterfly drawing. Markers come in vibrant, bold colors.
Optional Blending Stump and Tortillon: Both of these paper tools smooth out graphite to create seamless shading. A cotton swab, or tissue can be used.
Understanding Butterfly Anatomy in Simple Terms
You need to understand the anatomy to be able to draw a realistic-looking butterfly. Don’t worry! We will simplify this for you. Understanding the shapes and proportions is important.
Symmetry is important: Butterflies are almost perfectly symmetrical. On one side, the wings and body are mirror images. This symmetry will be your guide for the entire drawing.
Wing Structure: Forewings Butterflies have four wings. Two large forewings are located on the top of their bodies, and two smaller wings are below. To identify the different species, it is important to take note of their relative size and shape.
The body of the butterfly is divided into three main sections:
Head: Position of the eyes, antennae and head.
Thorax Middle part of the body where the wings and legs attach.
Abdomen: The butterfly’s segmented abdomen.
Begin with simple shapes (such as triangles or circles). Before you add intricate details, imagine the butterfly’s body as a series of elongated ovals. This is a great approach to making the process easier.
Step-by-Step drawing process
Let’s move on to the fun part: the drawing. Take your time and follow each step carefully. In the beginning, you should use light strokes.
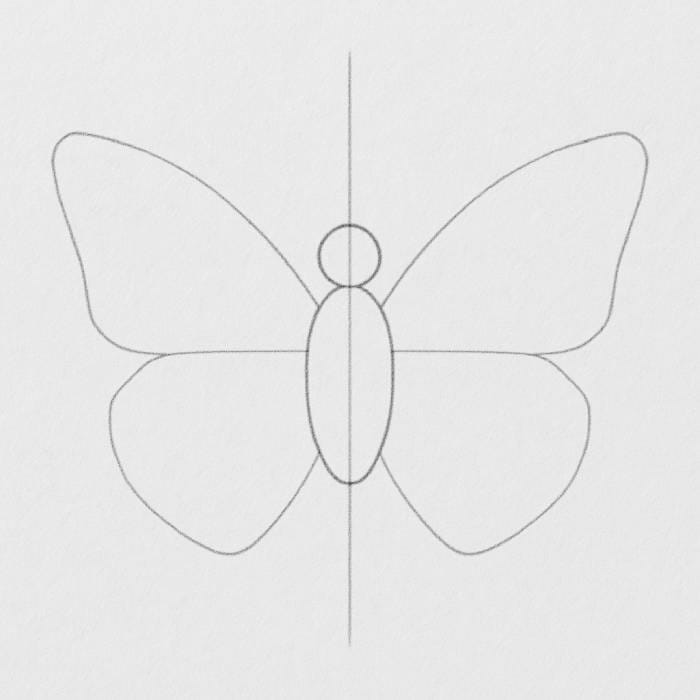
Step 1: Draw a basic outline (body and axis)
Start with the structure. Here, symmetry is key.

Light pencil lines: Use a H or HB pen for these initial strokes. You should make them very light to be able to erase them easily later.
To keep your wings straight, use a vertical symmetry line. Draw an arrow-like vertical line in the middle of your paper. This will be your butterfly’s central axis. Draw a slightly elongated cylindrical or oval shape centered on the line. This will be the combined thorax-abdomen. Add a small circle to the top of the body for the head.
Step 2: Sketch out the wing shapes
Here is where the butterfly begins to form.
Use reference photographs: A reference photo is highly recommended if you are drawing a specific butterfly. You can accurately draw the unique shapes of the wings. Attention to the overall silhouette.
Tips to get symmetrical wings Lightly sketch the shape of the forewings from the center body. They usually extend upwards and away from the thorax. Add the hindwings. They usually appear below the forewings. They extend downwards and to the sides. Compare the left and the right wings continuously, making sure that they are about the same size and shape in relation to the central axis. At this stage, don’t worry too much about the perfection; just focus on the overall shape. Imagine them as large polygons, or curved shapes.
Step 3: Add details to the wings
Bring those wings to life!

Outline the key patterns (spots and veins): After you have established the main shapes of the wings, begin sketching larger patterns and veins. The veins on butterfly wings provide the structure. Draw these main veins lightly. Next, examine your reference photo to see if there are any obvious spots, stripes or patches of colour. Outline these shapes lightly within the wings.
Accentuate texture lightly. You won’t be able to draw every scale but you can begin to hint at their delicate, powdery texture by adding fine, subtle lines or varying the line pressure. Keep it light and delicate.
Step 4: Draw the head, antennae, and legs
These small details give character and realism.
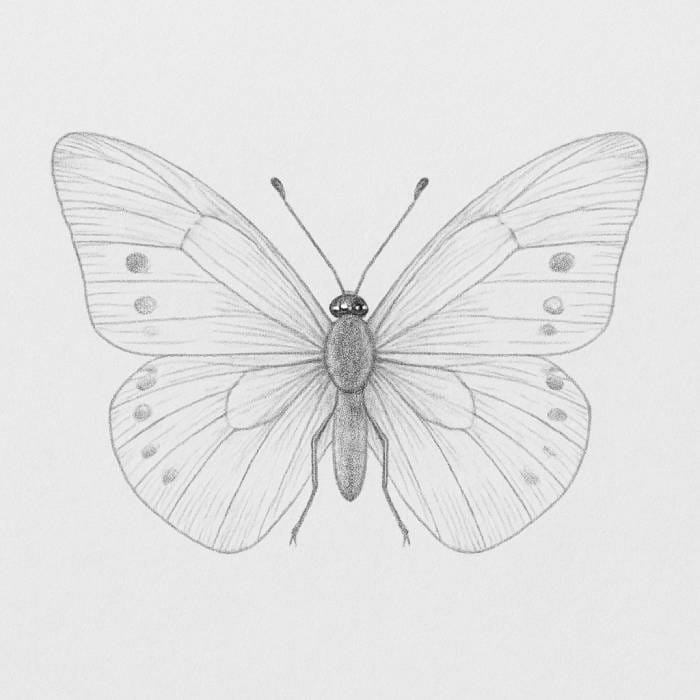
Keep it simple but accurate: Return the head. Draw the antennae from the top of the skull. They usually have a thin, gentle curve and often end with a small knob or club. Lightly sketch the legs, which are six in number (though not all of them will be visible depending on your angle). They should extend from the underside. They are typically very thin and segmented.
Optional Zoom-in for Antenna Detail: You can zoom in to add intricate details, such as tiny segments, or the texture of your club.
Step 5: Texture and Shading
By shading, a flat outline can be transformed into a realistic three-dimensional Butterfly.
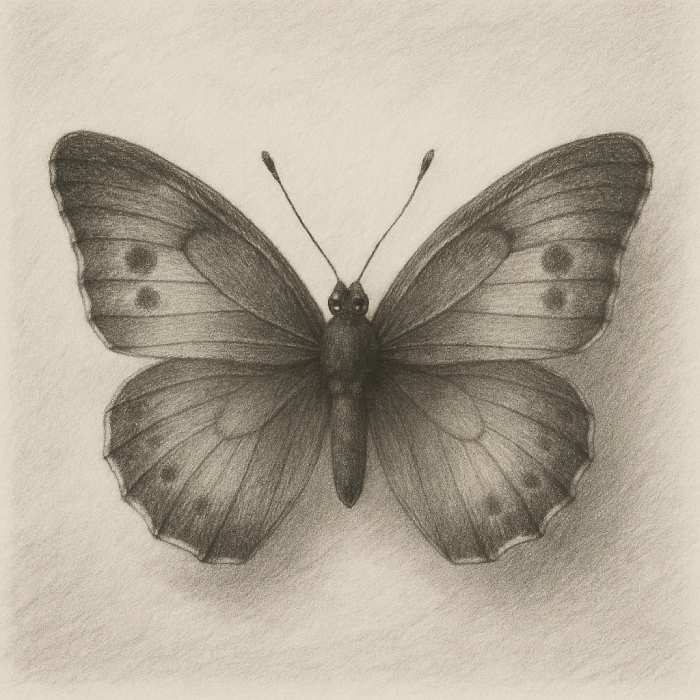
Shade the body and wing edges with softer pencils. You can use your reference picture to determine how much light and shade you need. Darker areas are usually found near the body, such as the edges and veins of the wings. Use light, even strokes to build up the graphite layer.
Blending can be a good way to achieve a 3D effect. This will give your butterfly a more realistic appearance. Be sure to observe how the light falls onto the wings and body. The areas in shadow will appear darker while the ones facing the light will appear brighter. Give the body a rounded, cylindrical shape by shading it. The antennae can be shaded to look round.
Step 6: Optional color
Add color to your butterfly drawing and it will become even more beautiful!

Blending colored crayons: Apply thin layers and increase intensity slowly. Blend colors using layers or a blending pen.
The colors of some popular butterfly species. Monarch, Blue Morpho, etc. ):
Monarch: Iconic wings in black and orange with white spots.
Blue Morpho Blue wings with black edges and “eyespots”.
Swallowtail: Yellow with black wings, and distinct “tails”.
Painted Lady Earthy tones of orange, brown, and black with white spots. Try to replicate the unique color patterns you see on a butterfly that inspires you.
Common mistakes to avoid
Even the most experienced of artists can make mistakes. Knowing common mistakes can help you to improve more quickly.
Smudging or over-shading: Too many layers or an improper blend can result in a muddy or smudged appearance. Use a light touch when blending and build up graphite layers gradually. Use a scrap of paper to protect your hand from smudging.
Uneven Wings: The most common problem. Compare your wings continuously for symmetry. Take breaks and use your vertical guideline to see your drawing in a new light. You can spot errors by flipping your drawing upside-down.
Ignoring references images: Relying on memory alone can lead to inaccurate dimensions and unrealistic details. Use a reference photo to start with. This is your best guide to accuracy.
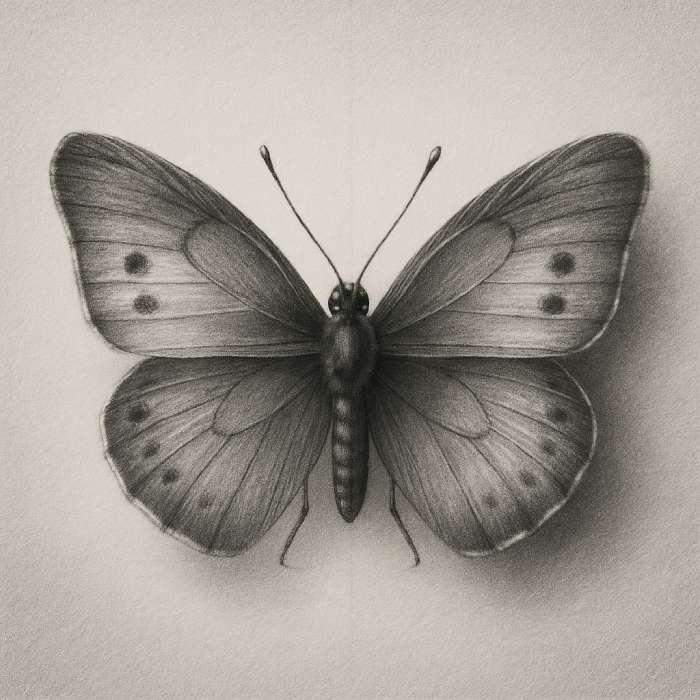
How to Draw a Realistic Butterfly
Practice makes perfect! Here are a few additional tips for improving your skills.
Try different species of butterflies: Every species has its own unique patterns, colors, and wing shapes. You will gain a better understanding of the world and improve your observational skills by drawing a variety.
Use real-life examples or photos. Photos are wonderful, but if you have the opportunity to see a real butterfly in person (perhaps at a butterfly park), don’t miss it. It can be very insightful to observe their subtle movements and details.
Pay attention to the patterns on the wings and their symmetry. These features are what make a butterfly unique. Spend extra time on ensuring that your patterns are accurate, and your wings are balanced.
Easy Realistic Butterfly Drawings for Practice
After you have mastered top-down viewing, try these variations.
Top view vs. side view butterflies: The side view causes foreshortening. Parts of the butterfly will appear shorter due to perspective. This is an excellent way to learn more complex angles.
A butterfly on a flower. You can use this to add a composition element and practice drawing other elements of nature. Take note of how the flower and butterfly interact.
Butterfly flying: Capturing the butterfly in motion can be challenging, but also rewarding. Focus on the blurred wings and the dynamic pose.
Conclusion:
Now that you know “how to draw a butterfly step-by-step”, you can transform simple lines into “a realistic butterfly sketch tutorial” which highlights the delicate beauty these insects. Drawing is a process, not an end. Consistent practice and patience are the keys. View imperfections as opportunities to learn.
Keep sketching and experimenting. Most importantly, enjoy the process. Please share your drawings with us in the comments section below. What butterfly did YOU choose to draw? What did you find most rewarding or challenging? You’re just beginning your journey towards mastering realistic butterflies drawing. With these techniques, you are well on your path to creating stunning artwork.
FAQ
Which pencil is the best for drawing butterflies?
An HB or H is perfect for initial sketches and lines with light tones. A softer pencil, such as a 2B or a 4B, will produce richer tones for shading and darker details. For versatility, a good range is ideal (H to 3B).
How long does it usually take to become a realistic artist?
It is a lifelong journey to learn how to draw realistically. After a few weeks, you will start to see noticeable improvements. It can take many years to master realistic drawing, but each drawing session will help you improve your skills. Instead of focusing on instant perfection, focus on progress.
Related Posts/Read More Links


terima kasih berita nya bermanfaat sekali keren