The Art of Realistic Lily Flower Drawing: How to Capture Nature’s Contrast with Pencil
Welcoming art lovers welcome here “The Art of Realistic Lily Flower Drawing: How to Capture Nature’s Contrast with Pencil. ” If you’ve ever dreamed of being able to draw a real living lily on paper, then you’re in the right spot. This guide will take you through the fascinating process of drawing lily plants and will focus on how to achieve breathtaking realistic results. We’ll cover the intricate lines of petals to the striking interplay of shadow and light, making the drawing of your lily into an amazing masterpiece. Learn the techniques of drawing with pencil and learn the art of capturing the beauty of nature’s beauty in contrast.
1. The Beauty of Drawing Realistic Lily Flowers
The Lily, with its sophisticated shape and sometimes striking colors, has been a source of inspiration for artists from different cultures and years. From the earliest Egyptian hieroglyphs to lavish Renaissance paintings Its presence is a symbol of pureness, renewal and elegance. Artists the lily poses an interesting task of how to translate it’s delicate form, silky petals, and its profound interplay between shadow and light into a 2-dimensional medium. This article will be your complete guide to mastering the art of realistic drawing lily with pencils with a focus on the subtle contrast that bring these flowers to life.
Drawing an authentic lily isn’t only about capturing its form; it’s about understanding what it is that it’s. It’s about seeing how light dances through its petals of wax as shadows expand within its folds, and also how its beauty is manifested through the textures and forms. In this book you’ll learn methods to transform a basic paper and pencil into an impressive illustration of the artistry of nature creating what you call your “realistic lily drawing” a real testament to “pencil flower art” and demonstrate that beauty “nature contrast in art.”
2. Understanding the Lily Flower: A Symbol of Beauty and Nature
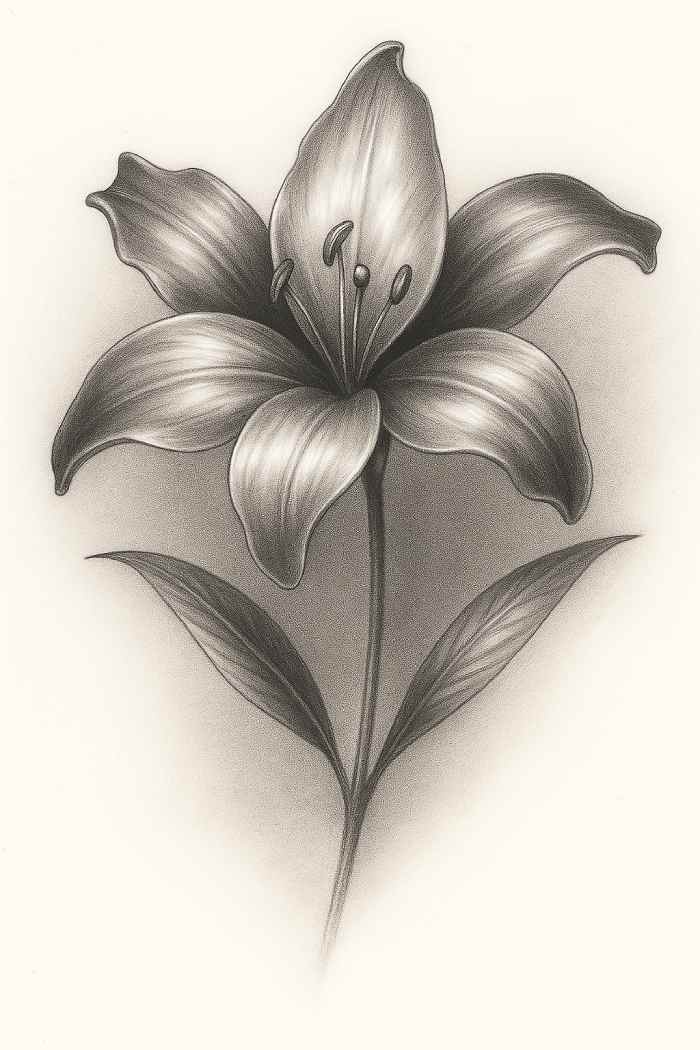
Before we get our pencils, we should spend a moment to take in the beauty of the bloom of the lily. Knowing its structure is crucial for drawing it accurately. A typical lily features an erect stem that huge, often trumpet-shaped or bowl-shaped flowers unfold. The petals are typically placed in groups of six and are arranged in three whorls, or two. Inside, you’ll see prominent stamens, with pollen-rich anthers as well as the central pistil. The leaves are usually lance-shaped, and they are placed in succession across the stem. Each of these elements–the soft, usually slightly curved petals, the slim stamens, and the sharp leaves–helps to create the overall shape and provides unique challenges for the artist.
Lilies are one of the most popular subjects in art that is realistic not just because of their beauty but also because of their deep symbolism. They symbolize purity, love beauty, rebirth, and purity and allow artists to imbue their paintings with deeper significance. Beyond the symbolic the lily can be described as an excellent example of natural contrast. Take a look at a lily under the sun with its glowing, bright edge of the petals versus the soft shadowed, beneath; the subtle changes in hue, even within a single flower and the stark contrast between the soft, smooth petal’s surface and the rougher texture of the stem. The ability to capture the “lily flower anatomy” and the “significance of contrast in nature” is the key to letting that “lily in nature” truly shine off the page.
3. Essential Tools to Draw Realistic Lily Flowers using a Pencil
The right tools are the first step in any artistic endeavor realistic pencil drawing isn’t an exception. Although you don’t require an array of costly tools but a carefully selected set of tools will greatly enhance the ability of creating precise and vibrant lily sketches.
Pencils: It is the primary instrument. You’ll require a variety of graphite pencils for various tones and depths.
H pencils (e.g. 2H H): These are more durable and create smaller, finer lines. perfect for sketches in the beginning with delicate lines, as well as delicate texture.
B pencils (e.g. B 2B, 4B 6B 8B, B): These are lighter and can create dark, bolder lines as well as more vibrant tones. 2B pencils are great for general shading, whereas 6B and 4B are ideal for dark shadows and powerful contrasts. An 8B could achieve nearly black tones.
Paper: The surface you draw on plays an important function.
Paper that is smooth (Bristol hot-press watercolor paper): Ideal for extremely detailed working, seamless blending with sharp and clear contrasts. It allows graphite to stay in the paper’s surface and allows for smoother blending.
Textured Paper (cold-press watercolour paper drawing paper with some tooth): Provides a some grip to graphite. This will add a subtle texture to your shading. It is usually preferable for a soft more natural, organic feel.
Blending and Erasers: These are indispensable for shaping shadows and light.
Kneaded Eraser: Absorbent and malleable ideal for gently lifting graphite to create highlights and making corrections without damaging the paper.
Vinyl Eraser (plastic eraser): More abrasive than a kneaded eraser. perfect to remove dark lines or vast regions of graphite.
Blending Stumps/Tortillons: Paper tools that are tightly rolled that smooth graphite, make seamless transitions as well as soften the edges.
cotton Swabs as well as cotton Balls: Can be used to create a broader and soft blending.
Chamois cloth: Very soft and soft-touch leather that is ideal for wide gentle blending, softening and softening large expanses of graphite.
Making the investment in the “drawing tools for lilies” and learning the finer points that go into “best pencils for flower drawing” will provide you with all the tools you require for “realistic pencil drawing supplies.”
4. Step-by-Step Tutorial: Drawing a realistic Lily Flower using a Pencil
Let’s get at the core of the issue and the process of drawing itself. The process will be broken into steps that are manageable and focus on constructing your lily drawing with accuracy and eyes for contrast.
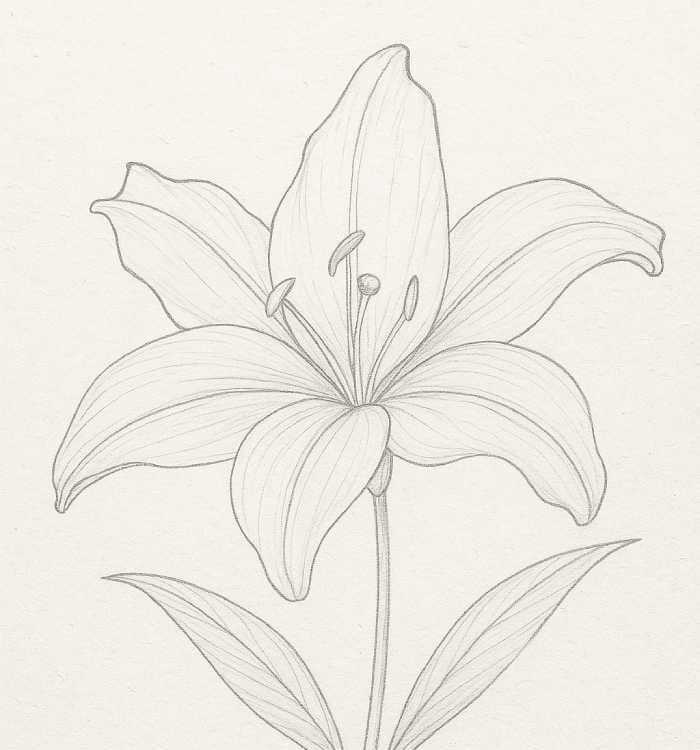
Step 1: Sketching the Basic Shape of the Lily

Begin by sketching lightly the basic structure of your flower. Utilize a soft 2H or H pencil and applying a light amount of pressure. Pay attention to the overall form of your flower’s petals, the angle and the general position of the petals.
Begin with a central circle or oval to form the primary part of the flower, to guide the overall size.
Map out the central stem as well as what direction the leaves are in general.
Draw the main curve and place each petal. Do not worry about the details at this point focus on precise proportions and nature of your flowers. Imagine it as making a wireframe.
Step 2: Detailing the Petals and Leaves
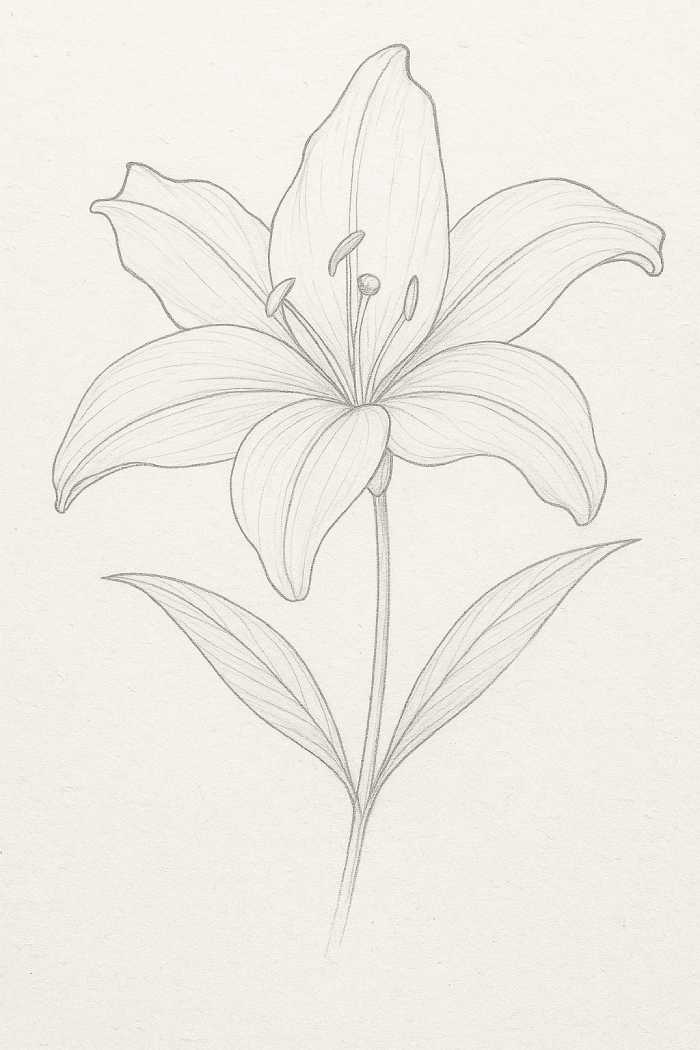
After your initial sketch is done, you can begin to fine-tune the outline using a slightly darker pencil (e.g. HB, the HB).
Petal: Take note of unique curvatures and overlaps of every petal. The flowers often have a delicate curvature or ruffle at their edges. These subtle nuances. Seek out the central vein which usually runs along the entire petal. mark it lightly.
Leaves: The exact form of the leaves, paying close attention to their sharp tips and how they connect on the stem. The main veins are the ones that run through the leaves.
Remove any construction lines no longer required However, you should keep your fingers at a low level.
Step 3: Shading to Create Contrast
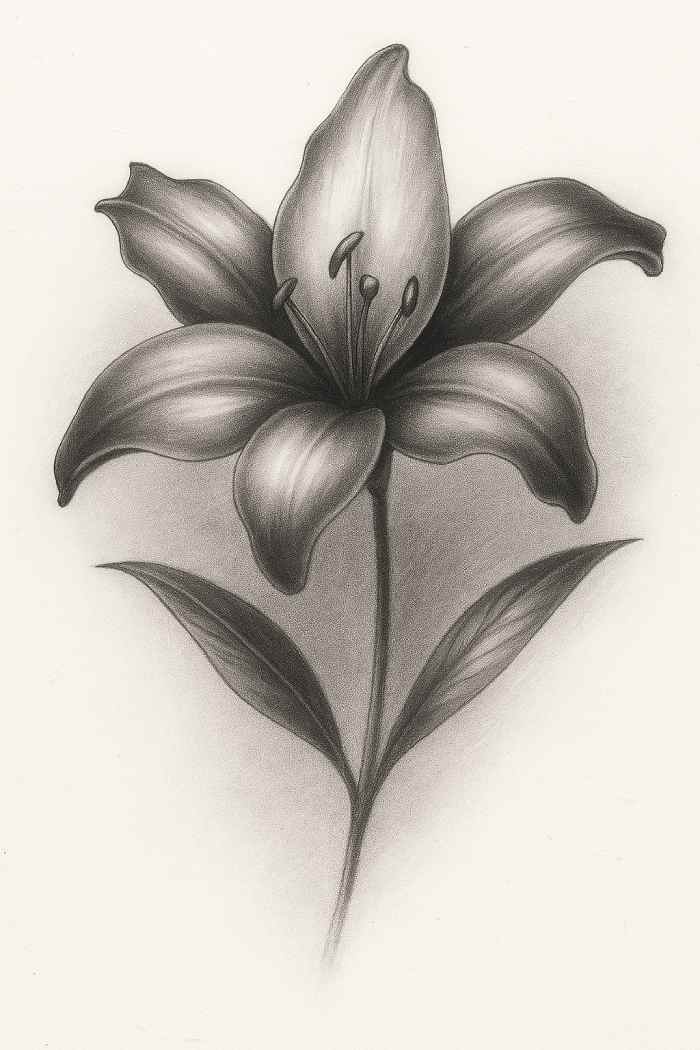
The moment your lily really starts to take shape and form in three dimensions. Shading is the art of learning about shadow and light.
Find Lighting Sources: When you begin making your decision, consider where the light source originates from. This will determine where the highlights and shadows will fall.
Basic Shading: Use a light pencil, such as a 2B or B. Apply a gentle uniform layer of graphite to the entire lily, leaving out the areas with the most bright highlights (which can be marked lightly using the eraser you kneaded). This creates your middle-tone.
Development Depth: As you progress, build dark shades in areas that are the furthest away from light, within those folds in the petals and also in areas where the petals meet. Utilize pencils such as 4B or 6B to create these darker areas. Apply graphite layer by layer, by using small circular movements or strokes parallel to each other.
Blending and Layering: Blending stumps, or cotton swabs in order to smooth the transitions between various shades. Layering is the process of applying several lighter layers of graphite than a single heavy application. This gives a more smooth more richer and deeper look. Be aware of how the light is reflected off the curved surfaces of the petals. Lighter on the outside curve, but darker in the curve to the inward.
Texture: The most common lily has an almost waxy, smooth texture. Make use of very precise uniform shading to recreate this. If you want to create a subtle appearance on leaves, apply gentle quick strokes along towards the veins.
Step 4: Final Touches: Highlights and Refining Details
The last stage is essential for bringing your lily back to life and creating that real contrast.
Highlights: Utilize your pencil to gently remove graphite from regions where light strikes the petals with the greatest intensity. This will create crisp, clear highlights which provide the petals with a glowing appearance and cause them to sparkle. To create bright highlights, make use of the exact edge of your eraser.
Enhancing Contrasts by Sharpening: Re-draw with the darker pencils (6B 8B) and intensify the darkest shadows. Make sure you have a contrast that is strong between the brightest highlight as well as your darkest shadows is clear and intentional. This is what really makes your drawing “pop.”
Detail Refining: Add any final elaborate particulars, like Pollen in the anthers small imperfections on the petals or extremely tiny veins.
If you follow these guidelines, you’ll be able to master “realistic lily flower step by step,” making use of powerful “shading techniques for lilies,” and knowing how to get a striking “pencil drawing contrast.”
5. Mastering Contrast: How to Achieve Realistic Light and Shadow in Your Drawing
Contrast is the essence of a real drawing. Without it your lily will appear dull and uninteresting. Understanding the interaction between shadow and light is essential in achieving depth, shape and emotion in your work.
Picture your blooms bathed by light. What happens when that light interacts with its different structures?
Form Shadows: Shadows define the 3D shape of the petals and leaves. As the petals curve away from light it slowly gets darker.
Cast Shadows: They are shadows that an object casts on other surfaces or directly onto itself. For example, a petal could cast a soft shadow on the petal below it.
Highlights: They are among the most luminous areas in which sunlight directly strikes the surface, and often appears as bright, clear spots.
Reflected light: In shadow regions, there could be some reflected light scattered off the nearby surfaces, which prevents shadows from turning completely black. This reflected light is vital in giving shadows depth, and also preventing them from appearing flat.
To reproduce it in pencil
Layering to add depth: Instead of using a hard pencil for darks, you can build your shadows using multiple lighter layers of soft pencils (2B 4B, 2B, and 6B). This will give you a more rich more smooth tone.
Value Scale: Do some practice drawing the value scale that ranges from pure white to black. This helps you train your eye to detect subtle variations in tone. It also helps you draw the proper tension for every shade.
Edge Control: The hard edges give an impression of speed and sharpness, which is often used to highlight or for sharp transitions. Soft edges, created by the blending process, create a feeling of softness, distance and gradual transitions, which are ideal for soft curves of the petals.
Negative Space: Be sure to remember the area surrounding the flower. The subtle shading of the background will help to emphasize the lighter regions of the flowers, and increase its overall appearance.
Focusing upon “light and shadow in pencil drawing” and learning to master “realistic light and dark contrast,” you can add the most profound “pencil shading for depth” to your lily art.
6. Common Mistakes to Avoid When Drawing Realistic Lily Flowers
Even the most experienced artists make mistakes, however being aware of the common mistakes can greatly enhance the quality of your “lily plant drawing.”
Over-Shading: A common error for novices is pushing too hard and making the drawing too dark and too quickly. This doesn’t allow for darker shadows and leads to undifferentiated, blurred drawings. Always begin with light tones and then build your tones slowly.
Incorrect Proportions: In the beginning, rushing your sketch could result in petals that are too large and too tiny, as well as a bloom which appears to be unbalanced. Make sure to take your time in Step 1 to ensure that you have accurate proportions.
Low Contrast: As mentioned in the previous paragraph, this is a crucial aspect. If your drawing doesn’t have an entire spectrum of values from white to black the drawing may appear sluggish. You can push your darks to preserve your light sources.
Flat Texture: The petals of lilies are smooth somewhat waxy petals. Avoid using rough, heavy lines that imply rough texture. Use smooth, consistent blending.
Ignoring Reference: Even if you are familiar with what a lily looks like, always reference your source image (a real bloom or a quality photo). Nature gives you the best advice.
Over-Reliance on Outlines: A real drawing doesn’t depend on thick lines. The shape is determined by subtle changes in shadow and light and not by the drawn boundaries. The initial outline will gradually fade into the shading.
If you can recognize this “mistakes in lily drawing,” you can discover “how to avoid drawing errors” and advance your progress towards “drawing realistic flowers.”
7. Inspiring Your Art: Finding Beauty in the Details of the Lily Flower
Realism in art is derived through keen observation. To really bring life to the “lily flower drawing,” you need to go beyond the obvious, and immerse yourself in the fine aspects that make each lily distinctive.
Texture: Although generally smooth petals may have delicate ripples or lines. The stem could be a little rougher.
Light: How does the light influence the transparency of the edges of the petals? Are tiny dew drops shining? How does the pollen shine when illuminated?
Symmetry as well as Asymmetry: Lilies can appear as symmetrical, you should be aware of the variations in the petal’s size or curvature. These imperfections enhance the natural appeal of lilies.
Veining: A delicate veining network that run through leaves and petals adds shape and vitality. Do not just draw them, know how they fit into the shape.
Color Definition: Even in a monochrome pencil sketch, you may create a sense of colour by changing the brightness and intensity that your greys. A vivid petal could be represented as a lighter or softer hue in specific areas, whereas the darker tone could indicate richer grey.
If you focus on the “artistic details in lily drawings,” you’ll be able to find numerous “realistic flower art inspiration,” making it possible the ability to learn “capturing nature in pencil drawing.”
8. Advanced Tips for Adding Realism to Your Lily Flower Drawing
After you’ve mastered the basics the advanced techniques are able to help you push your drawing of a lily to an additional level of authenticity.
Soft Gradients: Create seamless transitions that span large areas. This requires constant, gentle pressure, and careful layering typically using blending tools to create the soft curve of petals or the delicate slight falling off.
Different Textures: Explore ways to make the petals’ smooth texture appear more prominent against the rougher appearance of stem, or that delicate fuzz in anthers. Utilize different pencil strokes as well as mixing methods for every.
dramatic shadows: Be prepared for extremely dark, nearly black shadows, particularly within the inner part of the flower or in areas where the petals are in close proximity. These striking contrasts can add the drama to your photos and make your highlights appear more vibrant. Utilize your 6B and 8B pencils confidently by layering them for the highest density.
Atmospheric Perspective (Subtle): If you’re using a background that is very soft, you can subtle soften the details and decrease the contrast of elements further to give the impression of depth even if it’s an occasional blur.
Lost and Found Edges: Not every edge must be sharp. Sometimes, edges can “disappear” into a shadow or blend seamlessly into a different shape, but only to “reappear” later. This is similar to how our eyes see reality. It also gives a refined touch.
This “advanced pencil drawing techniques” will assist you in achieving “realistic flower shading” and generally “enhancing pencil art.”
9. The Final Word: Bring Nature to Life using Pencil
Congratulations! You’ve completed the complex process of making a realistic drawing of the lily. We’ve examined the lily’s fascinating anatomy, the most essential tools of pencil art as well as a thorough method for bringing this beautiful flower to life. We’ve studied the art of contrast, knowing that shadow and light are the most powerful shape-makers, and we’ve discussed the most common mistakes to avoid along your art path.
Keep in mind that art is a process of constant learning and practice. Every lily you draw will provide you with a new understanding of observation as well as technique and the voice you have in your art. Do not be afraid to play and to push the limits, and discover your unique way to interpret the beauty of nature. Continue practicing, continue observing and continue to refine your abilities. The secret to “mastering pencil flower art” is in the dedication.
We would love to hear from you about sharing with us your “realistic lily drawing tips” and beautiful art work with our online community. What were the challenges you faced? What strategies did you find the most efficient? Don’t let the results of your “nature-inspired pencil drawing” inspire others!
Frequently Asked Questions (FAQ)
Here are some questions that artists ask when they begin to draw realistic drawing of lily flowers:
What is the time it will takes to sketch a convincing lily? This varies greatly according to your level of skill as well as the nature of the lily and the amount of precision. A realistic, detailed flower could take from a few hours up to several days of intense work. Don’t be rushed; quality over speed is essential.
Do I have to utilize colored pencils to make an even more vivid lily drawing? Absolutely! While this guide is focused on graphite, the fundamentals of understanding shadow, light shape, texture, and form can be easily transferred using colored pencils. The only difference is more dimension and depth to your hue. Play around with blending and layering colored pencils in order to achieve real depth and vibrancy.
Which are the ideal shading methods for flower petals? For the smooth sometimes waxy look of the petals of lily, applying layers using light pressure and blend using the blending stump or a cotton swabs can be extremely efficient. Apply small circular motions to ensure smooth coverage. You can also vary the pencil’s grades to create depth without creating harsh lines. Remember to take into consideration your petal’s direction curve when you shade.
What is the best method to create bright highlights? The strongest highlights are typically achieved through making the papers white in these areas right from the beginning. In case of existing areas that are shaded using a kneaded eraser, you can lift graphite and create softer highlights, and a Vinyl eraser that has a razor-sharp blade can produce bright, crisp highlights over graphite that is already in place.
What can I do to make my drawing appear 3D? The key to 3D realistic art is mastering contrast. This includes the interplay between light, mid-tones, as well as deep shadows. Understanding how light reflects off forms and creates casting shadows and shadows that form is vital. Additionally, subtle perspective and the use of different line weights can help create perception of depth.
Simple peony flower drawing ideas