How to Draw a Puppy with Pencil and Paper (Beginner Tutorial)
Welcome to the world of aspiring artists! You’re welcome, aspiring artist! This is the place for you. This tutorial is designed for beginners and will teach you how to draw the perfect puppy using pencils and paper. You’ll learn how to draw a puppy using simple materials and easy step-by-step directions. You’ll be able to create your own adorable puppy portrait once you have the confidence and skills. Grab a pencil to get started.

Materials You Will Need
Gather your tools before we get started. This project doesn’t require you to buy expensive art supplies. Most likely, you already have all the materials at home.
Basic Drawing Pencil (2B or HB): The HB pencil works well for initial shapes and light lines. A 2B pencil will give you more depth and darker shades. You can buy these pencils anywhere.
Use a Sketchpad or Drawing Paper of Good Quality: Avoid using thin printer paper as it will tear when erasing. It is better to use a sketchbook or drawing paper that’s a little thicker.
Eraser, Soft or Kneaded: The kneaded eraser is great for lifting graphite and removing it without smudging. For cleaning up lines, a simple soft eraser is also suitable.
Optional Blending Tool (or Cotton Swab): Although not necessary, a blending tool, tortillon or a cotton swab will help you to create smooth transitions and shadows in your drawing.
Tip Keep it simple. To get started, you don’t require a professional kit. You can concentrate more on your technique if you use simple tools.
Understanding Puppy Dimensions (Before you Draw)
Let’s first understand the basic anatomy before we put pen to paper. It’s not about learning complex biology, but about seeing how their simple shapes make up their adorable form.
Imagine the body of a dog in simple geometric terms:
Head The head of a puppy is usually a large, round circle in relation to its body.
Body The body of the is a soft oval.
Features A puppy’s characteristic appearance is characterized by its floppy ears, large round eyes and a button nose.
Legs Puppy’s legs are short, stumpy and often look like rectangles or cylindrical shapes.
Visual Referencing Tip: To understand these proportions, it is best to examine a photo of a puppy. Use a photo that you like as a reference. Do not worry about perfect copying; simply observe the relationship between the shapes. Take note of the size of the eyes in relation to the nose or the length of the ears relative to the head.
Step-by-Step Drawing instructions
The main event is now! Let’s break the drawing down into manageable, simple steps. For these first steps, use only a light touch when using your pencil. These are just guidelines.
1. Draw the Basic Body and Head Shapes
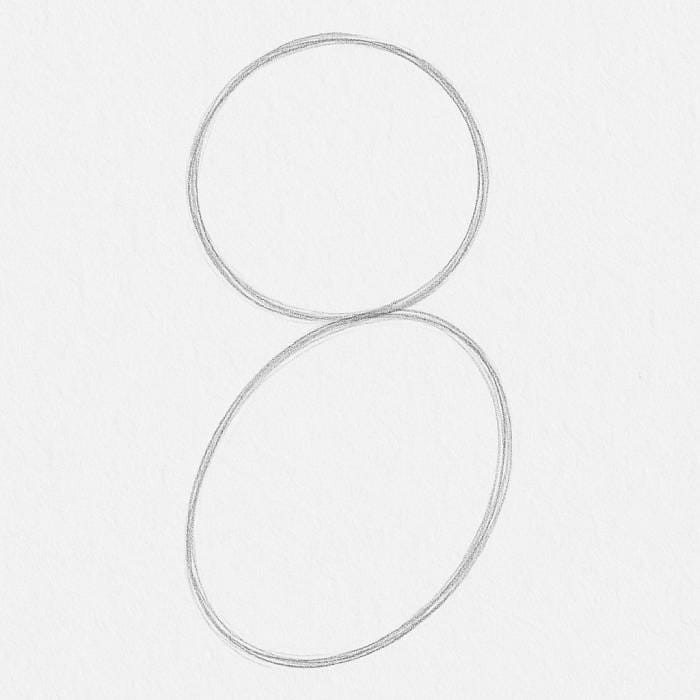
Sketch a large circular shape for the head. It doesn’t have to be perfect, but it can serve as a guide. Draw a slightly bigger oval below and slightly over the head circle. The oval can be tilted a little bit, depending on what pose you want to achieve. These shapes can be easily erased if you use very light pencil strokes.
2. Draw the Facial Features
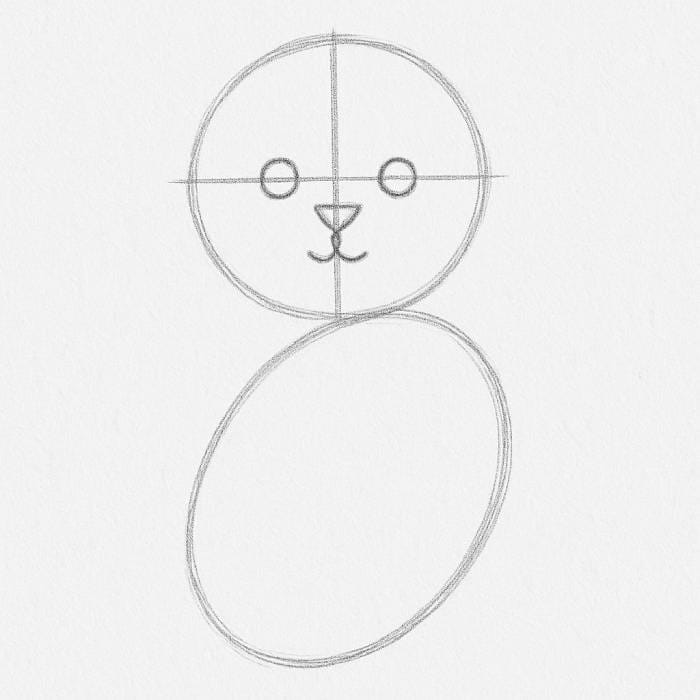
Draw two intersecting, light lines inside the circle. Draw a vertical line through the middle and a horizontal line to indicate where the eyes should be. You can keep your features symmetrical by doing this. Draw two small circles on the horizontal line for the eyes. Draw an inverted triangle to represent the nose, and a small “Y-shaped” mouth a little below the horizontal lines.
3. Outline Ears and Legs
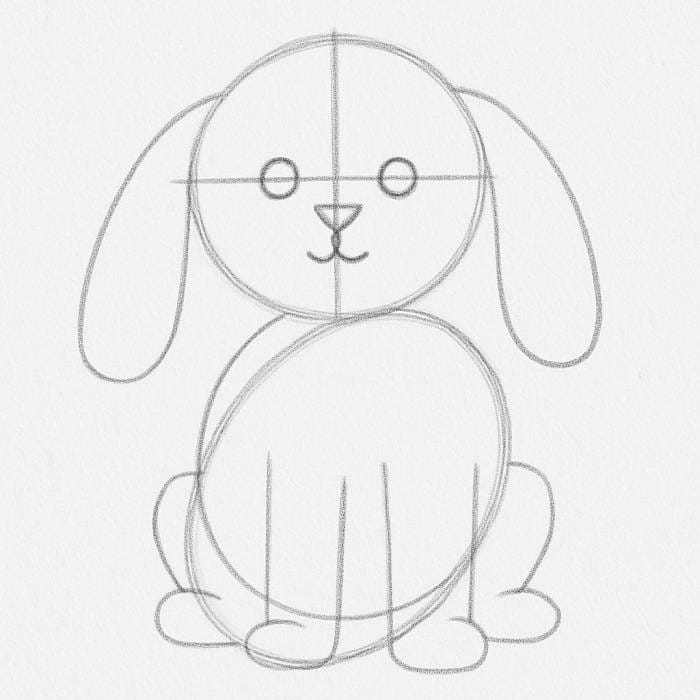
Sketch two large shapes that droop on each side of the head. Imagine them as ovals that are floppy. Draw four rectangles that extend from the oval body to form the legs. Add small circles to the bottom of the rectangles to show the paws. These shapes do not have to be perfect. They are only guides that will help you place everything correctly.
4. Define Tail and Final Body Form
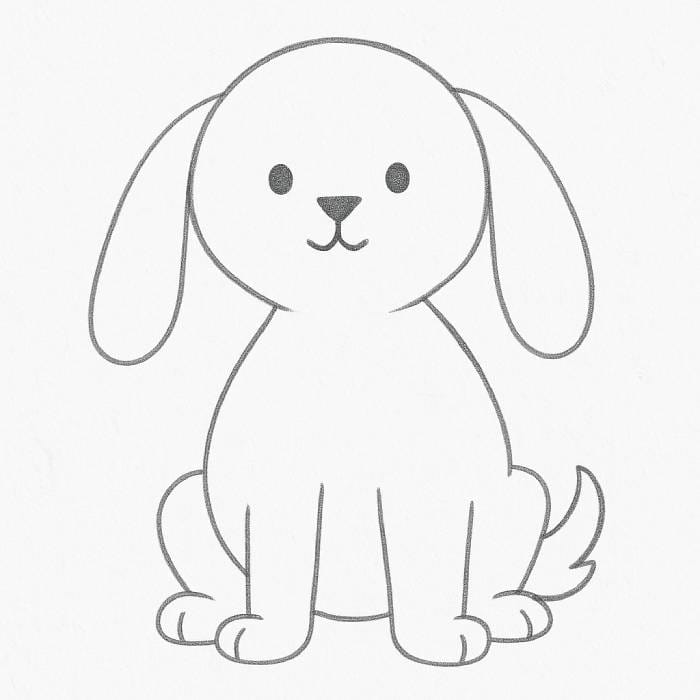
Add a small, curvy shape at the end the oval body. You can use a slight curve or a squiggle. Connect all the basic shapes using slightly darker lines. Draw a gentle, flowing line connecting the head and body. Here is where the final shape of your puppy begins to emerge. Remove any light guides that you no longer need.
Add and refine details
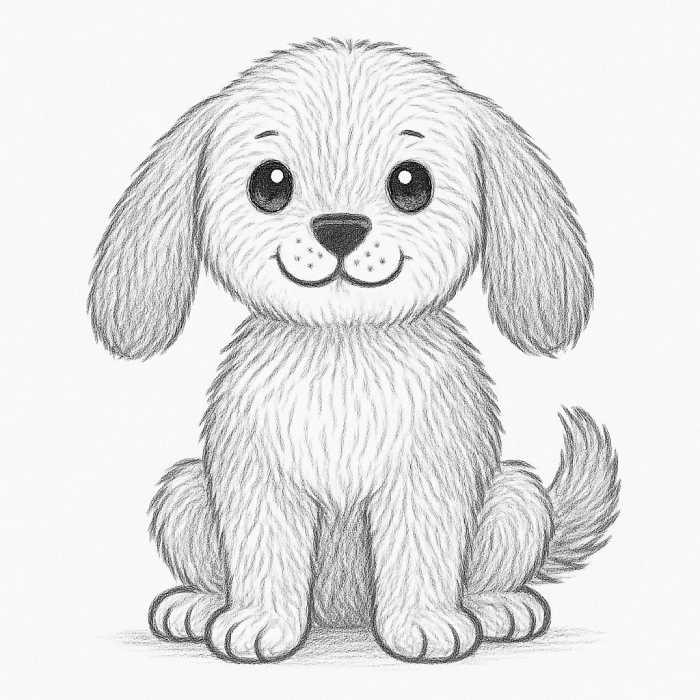
Here is where your dog truly comes to live. Concentrate on the details you have already added.
Eyes : Make eyes more visible. Add a small circular inside each eye to highlight or shine.
Fur Texture Instead drawing long straight lines, make a series short strokes quickly to give the impression of fur texture. Variate the direction of your strokes in order to follow the contours on the face and body.
Facial expression: Add details to the mouth and nose. A slight curve can be used to create a smile while small dots can suggest whiskers.
Final touches and shading
Remove any remaining guidelines with your eraser. It’s now time to add some depth by shading.
Shadows – Add shadows to the belly, the inside of the ears and the underside of the chin. This will give your puppy a more 3-dimensional look. Apply the graphite with a light touch, and layer it gradually.
Blending : You can blend the shades with a blending brush or cotton swab to give them a more realistic appearance.
Highlights Don’t miss the highlights! Your eyes will look brighter and more alive with the little circles that you have drawn in them.
Beginners’ Mistakes (and how to fix them)
Do not be discouraged by a first attempt that isn’t flawless. Everyone makes mistakes when learning to draw. Here are some of the most common mistakes and how to avoid making them.
Start with too dark lines: It is difficult to erase or correct mistakes when you start out with heavy lines. Start with feathery, light strokes to create your guides.
Misaligned Face Features: If you don’t have a guideline in the middle, your eyes and nose can be crooked. In step 4b, the vertical and horizontal lines that we drew are essential for ensuring symmetry.
Complicated Fur: Instead, of drawing every strand of fur, use the quick, short stroke technique to suggest texture. The brain will fill in the rest.
Hurrying the Process: Don’t rush. Slowly build up layers. Drawing is not a sprint, but a marathon.
How to Draw a Better Puppy: Bonus Tips
Do you want to improve your skills? Here are some extra tips:
Practice Drawing Different Breeds: After you have mastered drawing a basic puppy try drawing other breeds. A pug’s face is distinct, while a Labrador’s ears are different. And a Beagle has distinctive markings. You can then observe the different proportions.
Use Real Puppy Photos for Inspiration: Real photos are your best friends. These photos can provide you with a lot of information on light, texture, and shadow. Do not be afraid to examine them carefully.
Create a Sketchbook for Drawing Animals: Use a sketchbook exclusively to practice drawing animals. You can keep track of your progress to see how you have improved over time.
Notice How Fur Follows Body Form: Pay close attention to the way the fur is laid on the animal. It is not just a random pattern; it follows the contours of the muscles, bones and skin beneath.
The conclusion of the article is:
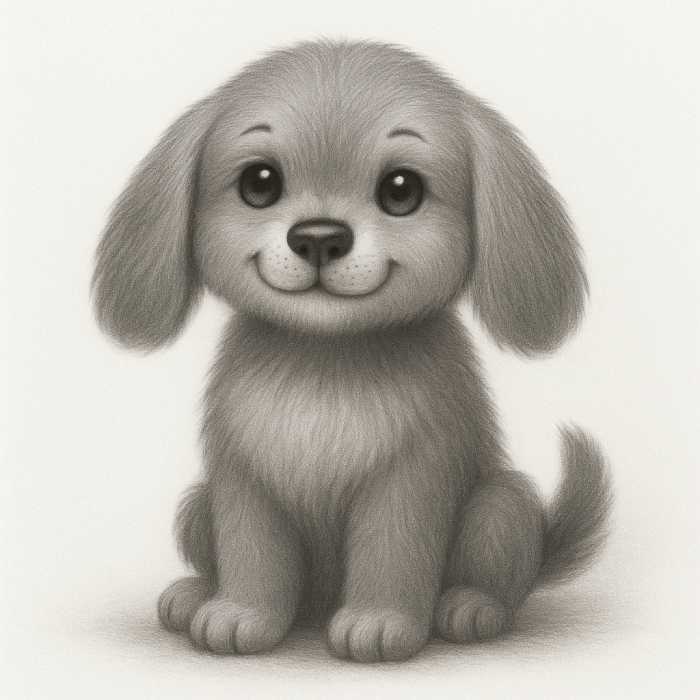
Congratulations! You have successfully completed your puppy drawing tutorial. You’ve learned everything you need to know about puppy drawing, from the basic materials to shading. Practice and observation are the keys to becoming a more accomplished artist. Don’t forget to keep your sketchbook close by, look for more photos of puppies, and never be afraid to give it another go. Each drawing is an improvement. We would love to see your creations! Please share your drawing or ask questions in the comments section below. Enjoy drawing!
FAQs
(Frequently Answered Questions)
Which is the easiest breed of puppy to draw? A Labrador or pug puppy is usually a good choice. The faces of these puppies are round, and the features are distinct. This makes it easy to draw and reproduce their basic shapes.
Is it possible to draw a dog without using a reference photo? You can do so, but a reference photo is recommended when you are just starting out. This helps you to accurately understand light and shadow, as well as proportions. With more practice, you will be able draw more from your imagination.
How long does it usually take to learn how to draw animals? Drawing is a lifetime journey. It is possible to learn the basics within a few short hours. However, mastering drawing takes constant practice. Focus on the journey and celebrate every little improvement.