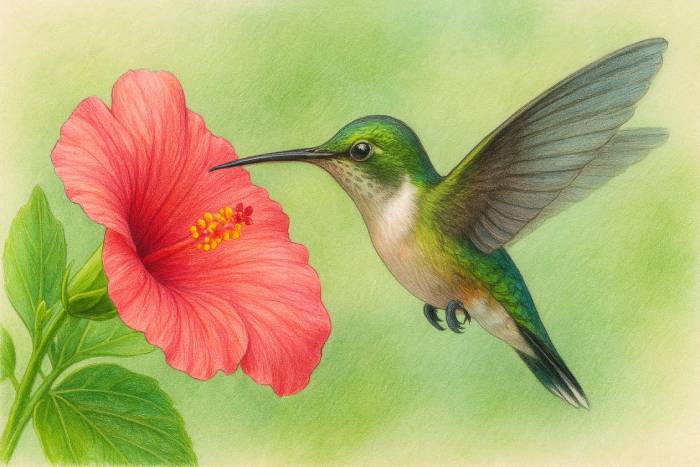
How to Draw a Realistic Hummingbird with Flowers Using Pencils and Colors
Are you mesmerized by the iridescent gleam of a hummingbird’s feathers when it flies effortlessly an eerily blurred motion with the delicate flowers of the flower? These tiny jewels of sky and the blossoms they see are breathtaking subjects for art, and offer an exciting challenge for anyone who wants to be an artist. The appeal of realism is the ability it has to bring an object alive on paper and with the correct methods using pencils and colors it is possible to achieve stunning details. In this complete guide, you’ll be taught the steps-by-step procedure beginning with a sketch, and then the final design in creating stunning, realistic hummingbird with flower.
Materials You’ll Be Needing
Before you start, assembling the proper tools is essential for a successful project. Here’s a list with the most essential tools, and other things that will help your work. Utilizing the top pencils and colors to create realistic Hummingbird drawings can make a major difference in the final product.
Graphite Pencils: A set of various grades (e.g. 2H for sketching light and general use, HB for a more formal style and 4B or 2B for lines and shading that are darker) is the ideal choice.
colored pencils: High-end set that comes with a variety of colors allows for thick layering and smooth blending.
Drawing Paper/Sketchbook: Pick a piece of paper that has some “tooth” or a texture because this will help colored pencils hold the surface and create layers.
Erasers: Kneaded erasers can be used to lift graphite with no smudging. the use of a precise eraser will help by highlighting tiny areas.
Sharpeners: Keep your pencils sharp for fine details. Sharpeners that are electric or manual can be used.
Blending tools: Blending stumps or tortillons are a great way to achieve smoothly-colored transitions.
Optional:
Watercolor Pencils and soft Pastels: These can be used to create initial color washes, or to add dimension and the appearance of your drawing.
Step 1: Look at and Select Your Reference Image
A crisp, well-lit reference image is the most valuable resource you have. It acts as a guide, showing you the complex specifics about your object. Search for images with high-resolution of hummingbirds or flower which show their appearance as well as their posture and how light reflects off their petals and feathers. Spend time looking over the image attentively. Pay attention to the shape of the wings and body as well as the curve of the beak, as well as the way that the petals of the flower are overlapping. Pay attention to the light source and where shadows and highlights fall, as this will be key to creating a sense of three-dimensionality.
Step 2: Drawing the basic shapes
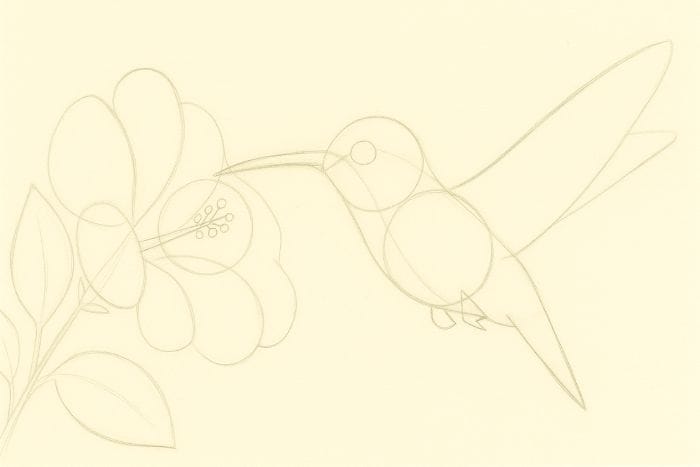
Don’t immediately get into sketching the particulars. Begin by sketching lightly the basic forms that comprise your subject. Imagine the hummingbird as a collection of simple shapes that include An oval body and circles for the head and triangles or ovals to make wings. The same is true for flower, with circles as the center, and larger ovals or simple designs to make the petals. This will help you ensure that the proportions and arrangement are right before you draw the outline. These easy steps to draw the hummingbird and flower can help create a strong base for your final work.
Step 3: Refine the Outline

After you’ve got your basic shape down Once you have the basic shapes in place, you can start to work on your outline. This is when you join the shapes in a smooth manner to create the final shape of the hummingbird as well as the flower. Include the particular details like the form of beaks, fine patterns of the feathers and the distinctive lines of petals. Make use of your kneaded erasers for a gentle lift of the rough lines of the guide leaving a neat and precise sketch.
Step 4: Shading using Pencils to create a realistic look
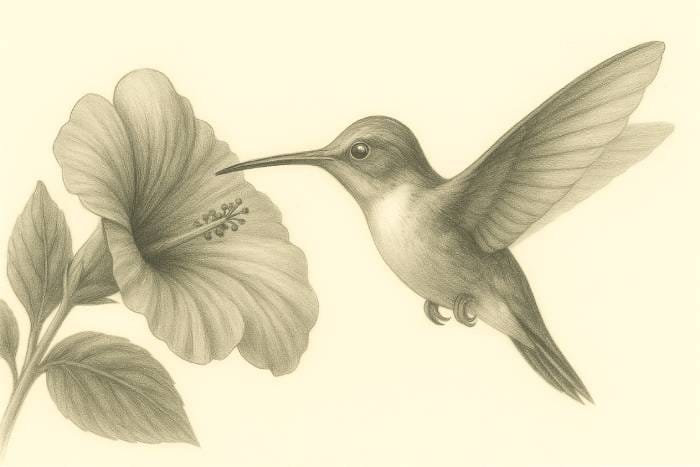
Before adding colors, you should make use of graphite pencils in order to establish your values, the various shades of dark and light. This is crucial to getting real-world quality. Begin with a light grade pencil (like HB) to draw the base layer. Then apply a darker pencil (like 2B or 4B) to add shadows. Pay attention to the hummingbird’s feathers creating soft shadows underneath the wings as well as in the abdomen. For the flower you can shade the areas of overlapped petals as well as the shadows that are within the middle. This authentic shading strategies are essential for bringing an impression of shape and depth to drawings of hummingbirds.
Step 5: Add Color and Blending
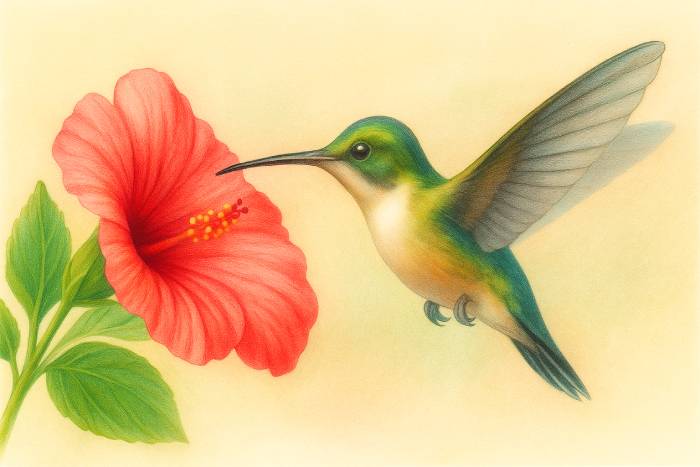
This is the most thrilling aspect of the process – adding color to your life! Begin by applying a thin layer of the colors you want to use and gradually increase the level of intensity. Layering is an important technique in this case; be careful not to press too hard in the beginning. For the feathers of the hummingbirds utilize a variety of shades to get the iridescent look. For instance an hummingbird that has green back feathers could have layers of blue, yellow and black, which creates the shimmering effect. Use blending stumps, or an in-built colorless blender to smooth changes and produce a seamless gradient over feathers as well as the flower petals. It is important to achieve a bright color scheme for real-life hummingbird and flower drawings.
Step 6: Final touches and detailing
After you’ve got your colors in place It’s now time to finish the details to make your drawing stand out. Utilize a sharp pencil to outline areas around the edges on the beak as well as the small lines that are in the feathers. Utilize a precise eraser to delicately lift color and create vibrant highlights of the hummingbird’s eyes and the shiny areas that make up its feathers. To make the flower pop include fine details to those veins on the petals, as well as the texture of the leaves and stems. Use a gentle backgroundsail or soft shade to give more depth and help your subject matter stand out. When you know what has been “finished” is usually an issue of taking a step back and looking at your work. If you believe you’ve successfully captured what you wanted to convey, and the elements are as you intended you want, then you’re ready to put down your pencils.
Tips for beginners
Learn to Draw Feathers Separately: Before you begin to draw the whole bird, you should spend some time drawing different kinds of feathers. This will help make the process more smooth when you are ready to draw the final drawing.
Try different Flower Species: While your source could be one flower, you can draw different kinds of flowers later on to push your skills and broaden your portfolio.
Combining Pencil with Watercolor: For a unique look, begin with a gentle watercolor wash to create your background color or the base colors, and then create the details and shading using colored pencils.
Common Faults to Avoid
Over-blending Colors: While mixing is crucial however, excessive blending can cause the colors look dull and dull. Apply a soft hand and build layers slowly.
Incorrect proportions of Bird and. Flower: Pay at the size of the hummingbird in comparison to the size of the flower. A hummingbird’s size is very small and a large flower can create an appearance that is not natural.
The Skipping of Observation of Real-Life Referrals: You shouldn’t solely rely upon your imagination. Realisticity is based on keen observation always referring back to your photo reference.
Conclusion
Making a realistic drawing of a hummingbird using flower is a satisfying experience that blends the art of sketching and the vivid world of colors. If you follow these steps: sketch refine, shade detail, and color–you can turn a blank paper into a vibrant, living artwork. We hope that this guide has prompted you to create making your individual realistic hummingbird or flower drawings. Don’t be afraid to play around and develop your individual style.
We’d be delighted to see your work! Send us your sketches via the comment section below, or sign up to our newsletter to receive additional drawing tutorials and tricks.