Realistic Hibiscus Flower Drawing Ideas to Help You Get Better at Botanical Art
The delicate beauty of a flower could be among the most satisfying aspects of art that is botanical. The hibiscus, which is known for its striking petals and intricate stamens is a favourite art form for artists from all over the world. However, moving from a basic outline to a more realistic illustration requires dedication and focus on the finer details. This guide offers efficient, realistic hibiscus flower drawing suggestions to assist you in mastering how to draw botanical illustrations. No matter if you’re an amateur or want to improve the skills you have, this guide will help learn methods that can help you improve your artwork.
1. Why Practice Realistic Hibiscus Flower Drawing?
Botanical art doesn’t only involve drawing beautiful flowers, it’s about scientific precision by artistic expression. Drawings that are realistic capture the unique features of plants, making them visible and believable on the paper. Learning to draw with a subject such as the hibiscus is a great method of training your eyes for fine detail. The five-petaled shape as well as the graceful curves and the distinctive central stamen that has pollen-tipped anthers provide a great opportunity for artists of all levels.
Through focusing on realism you’ll learn the fundamentals that are crucial for drawing in all its forms. Learn to notice and accurately draw proportions, as well as use shading and light to give an illusion of 3D form and to draw the subtle textures of leaves and petals. The hibiscus with its wide, open shape is the perfect to practice these skills because its characteristics are easily visible and easy to draw.
2. Getting Started: Tools and Materials
Before you start get your equipment ready. It doesn’t require an expensive toolkit to start, but the essentials:
Pencils: The range of graphite pencils ranging from H (for sketching light) through 4B, or even 6B (for deeper shading) is the best choice.
Erasers: Kneaded erasers is ideal for lifting graphite and avoiding smudging. the standard eraser could be used to make precise corrections.
Sketchbook: An excellent sketchbook that has paper that can handle several layers of graphite or colors is essential.
Colored Pencils/Watercolors: If you intend to paint with color consider investing in a high-quality collection of color pencils (like Prismacolor or Faber-Castell) or watercolors. These types of mediums are ideal to blend and create the vivid colors of blooms of the hibiscus.
It is essential to have a reliable reference. Photographs are a good starting point however, if you have access to a real hibiscus you’ll be able to see its shape, texture and how the light plays with the petals. Digital artists will appreciate drawing tablets and programs such as Procreate and Adobe Fresco offer a world of options for drawing and coloring.
3. Step-by-Step Ideas for Drawing Realistic Hibiscus Flowers
Are you ready to begin? Let’s break the process down into small steps that focus on a distinct element of drawing.
Idea 1: Basic Line Sketch – Capturing the Overall Shape
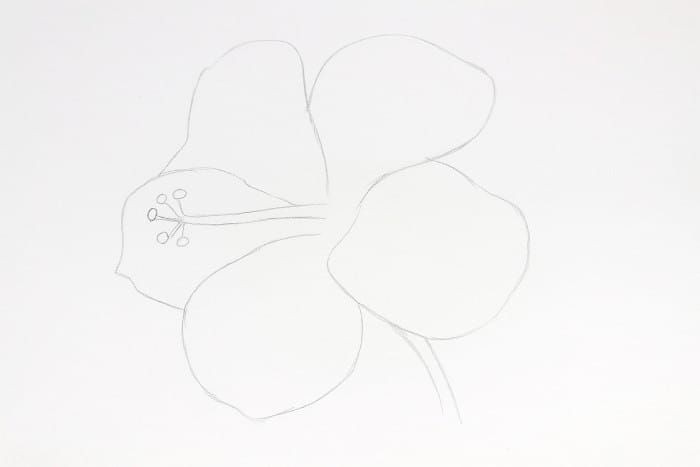
Start with a light, basic outline. Do not worry about the details at this point. Be focused on the overall form that the bloom has, as well as the curvature that the stem has, as well as the location that the flowers are. The hibiscus usually has five petals. Imagine them as simple shapes with a curving design that spread across the middle. Be aware of the negative space – that is, the area around the flower. This helps to determine the proportions of the flower. Keep your lines flowing and ethereal and you’ll be able to erase them in the future.
Idea 2: Adding Petal Details – Showing Curves and Folds
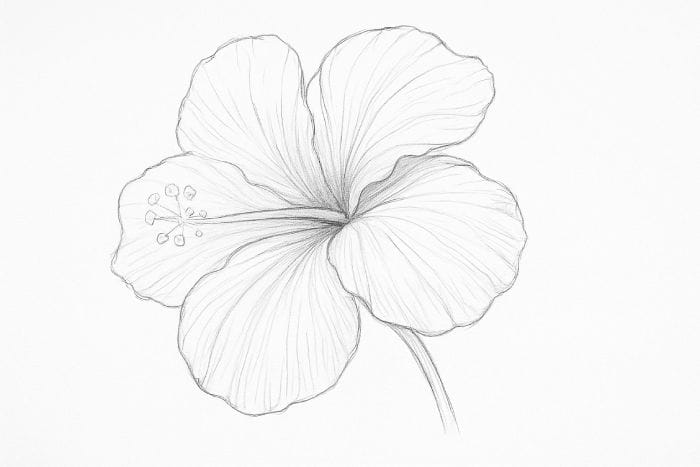
After you’ve got the basic form, it’s time to give it the character. Take a close look at the reference. Note how the petals don’t appear to be flat. They are adorned with slight folds, wrinkles, and ruffles, particularly close to the edges. Apply light strokes of pencil to create the curves and folds. This will give your drawing a sense real movement and authenticity. Consider the direction of your lines. They must follow naturally flowing lines of your petal, starting from its center to the outside.
Idea 3: Shading for Depth – Using Light and Shadow

Shading transforms the flat drawing into a three-dimensional one. Find your light source and shade areas that will be in shadow. The bottom of the petals that meet in the middle of the bloom, tends to be darker. The petals’ tips which curl away from light are also shadowed. Make use of your pencil to build layers of tone, beginning by applying light pressure before gradually darkerening the areas. Utilize a blending stump as well as a cotton swab make effortless transitions in shades.
Idea 4: Focusing on the Stamen – Detailing the Unique Hibiscus Feature
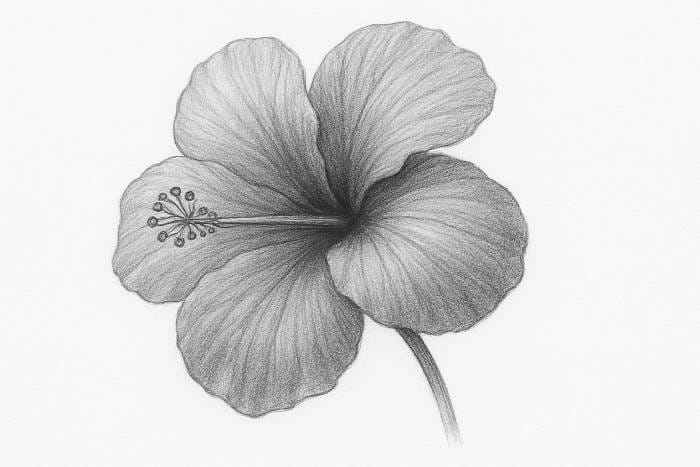
Stamens are the most distinctive characteristic of the bloom of the hibiscus. It’s a slender, long tube that runs from the middle of the flower. It has tiny pollen-tipped anthers on the ends. The central tube is drawn first, paying attention to its width and length. Then, add the tiny circles or ovals to make the anthers. Make use of a pencil with a fine tip to create texture and details to this region. Attention to a tiny aspect can make your drawing appear more precise and complete.
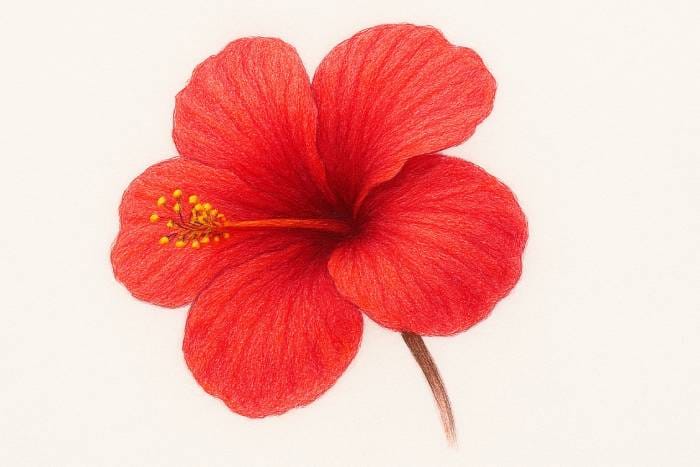
Idea 5: Coloring Techniques – Blending Shades of Red, Pink, Yellow, or White
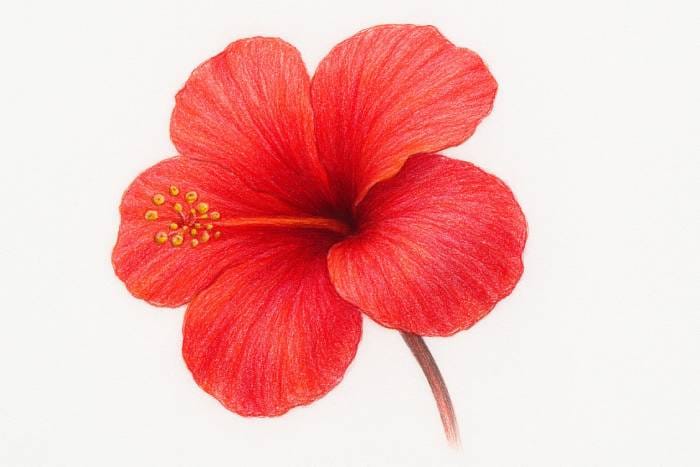
If you’re using colors, the blending of colors is crucial to creating real-world appeal. Begin with a lighter base color. For a hibiscus that is red, apply the lighter shade of orange or pink for your base. After that, you can layer more intense shades of red, maroon or even purple in the areas that are shadowed. Utilize a white pencil create highlights when light strikes the petals. For white hibiscus use gentle blues, grays as well as yellows for subtle shading, and shape. Try different mixing methods to avoid dull, boring shades.
4. Common Mistakes to Avoid
Over-simplifying the petal structure: Don’t draw the petals in simple circles or triangles. Be open to their imperfections. The tiny folds, tear and distinctive curves makes them appear authentic.
Do not pay attention to the proportions of flowers: Prior to adding any additional details, ensure that the overall size and shape of your petals are proportional with each other and the remainder of the flower.
Utilizing flat colors with no mixing: Layering and blending are essential to create dimensions and depth in drawings that are colored. Don’t use just one color to cover a petal.
Doing a rush without looking at the reference attentively: Take your time. Examine the reference image often and carefully. An extra few minutes of observing can make a difference in the time it takes to correct your image.
5. Tips to Enhance Your Botanical Art Skill with Hibiscus Drawing
Sketching with the real flower: It is impossible to beat the experience of observing the real flowers. Learn about its shape as well as the way the petals bend as well as how shadow and light fall upon it.
Learn about different varieties of hibiscus to see the variety: Hibiscus flowers come in a myriad of shapes and colors. Drawing various varieties will help your eyes to recognize subtle variations, and will increase your ability to draw.
Try experimenting with different media: You can draw the same plant in graphite pencils, followed by using colored pencils, and finally, using watercolors. Each medium provides a different way of understanding shape and the color.
Participate in online communities of art to get comments: Upload your artwork through platforms such as Instagram, DeviantArt, or art-specific forums. Feedback from fellow artists is essential to grow.
Conclusion
Practicing realistic real It’s more than an artistic exercise, it’s an essential step towards learning the fine art of floral illustration. Through breaking down drawing into a few, clear steps, you’ll be able deal with the complexity of flowers and increase your abilities to observe as well as proportion and shading. From a basic sketch to an authentic illustration is an enjoyable one that can surely enhance every aspect of your artwork.