How to Create a Realistic Wildlife Portrait: Step-by-Step Guide for Beginners
The art of creating a realistic wildlife portrait involves more than just technical skills. It’s a form of expression that combines observation, patience and a love for nature. This guide will walk you through the entire process, whether you are a beginner or an artist looking to improve their wildlife skills. We will explore the essential materials, subject choice, sketching and shading, as well as common beginner mistakes, so that you can create lifelike animal images with confidence.
Wildlife Portraiture: An Introduction
Wildlife Portraiture is a style of wildlife portraiture that focuses on capturing the animals’ natural essence and capturing them in a lifelike manner. Realistic portraits are more detailed than abstract or stylized animal art. They pay attention to anatomy, texture and light.
This guide is perfect for absolute beginners, hobbyists with a passion for nature or aspiring artists looking to develop their skills in strong data-end=”1285″ data-start=”1263″>realistic wildlife art/strong>. This guide is ideal for absolute beginner, nature lovers, and aspiring artists who want to improve their skills at realistic animal art.
What is a realistic wildlife portrait?
A realistic wildlife portrait is a work of art that attempts to portray animals in their natural environment, with accuracy in terms of structure, texture and lighting. It involves a close examination of fur, scales and muscle shapes. Artists often work from real-life or high-quality reference materials.
This style is different from stylized animal art which simplifies or exaggerates forms to create an effect. Realism is based on:
Correct Anatomy
Realistic colors or shading
Natural expressions and postures
The following are some of the most popular subjects for wildlife art:
Birds such as owls or parrots
Mammals like tigers, deer, and wolves
Reptiles such as turtles and chameleons
Artists will find that each subject offers a unique challenge in terms of texture and form.
Materials You Will Need
The right tools will make a huge difference to the final outcome of your wildlife artwork. These are the essential wildlife art tools, according to different mediums.
Draw or Paint Surfaces
Paper
Canvas
Digital Tablet
Mediums and Tools
Graphite pencils for sketching or shading
Colored pencils for detailed fur or feathers
Oils, acrylics or watercolors for painting
Digital brushes (if working digitally)
Additional Tools
Blending stumps
Erasers
Fine brushes or stylus pens
Images from Reference Sources
Websites for wildlife photography (Pixabay and Unsplash).
Create your own nature photos
Documentaries or field sketches
Quality tools will improve the precision and quality of your work.
Selecting the right wildlife subject
The first step is to choose the correct animal. Here are some tips to help you choose a captivating subject.
You’re more motivated if you start with an animal that you like.
Search for references with high resolution that show good lighting and clarity.
Select expressive poses. A stretched head, a turned-head, or focused gaze adds life.
Focus on animals in your area, or endangered species for a greater awareness
When you are just starting out, avoid backgrounds that are too busy. Simpler scenes allow you to focus on the anatomy and texture of your subject without being distracted.
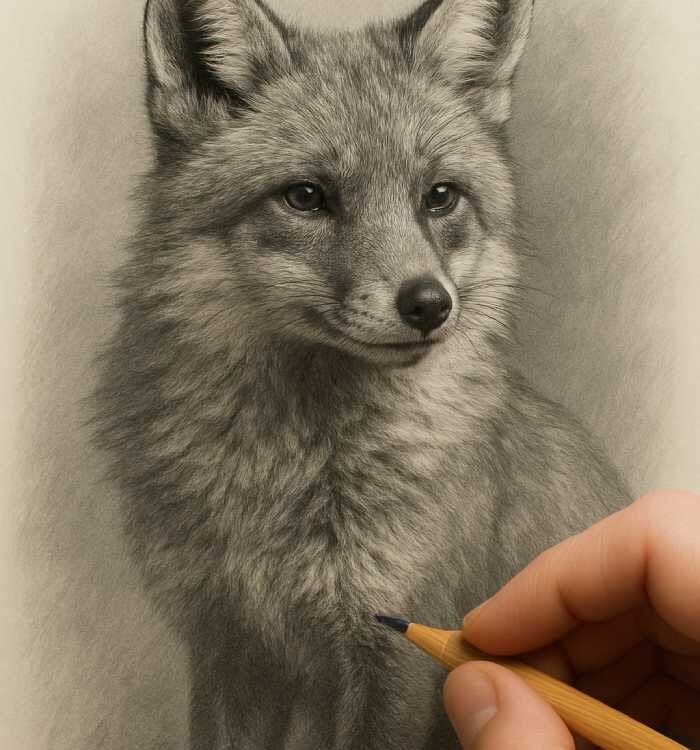
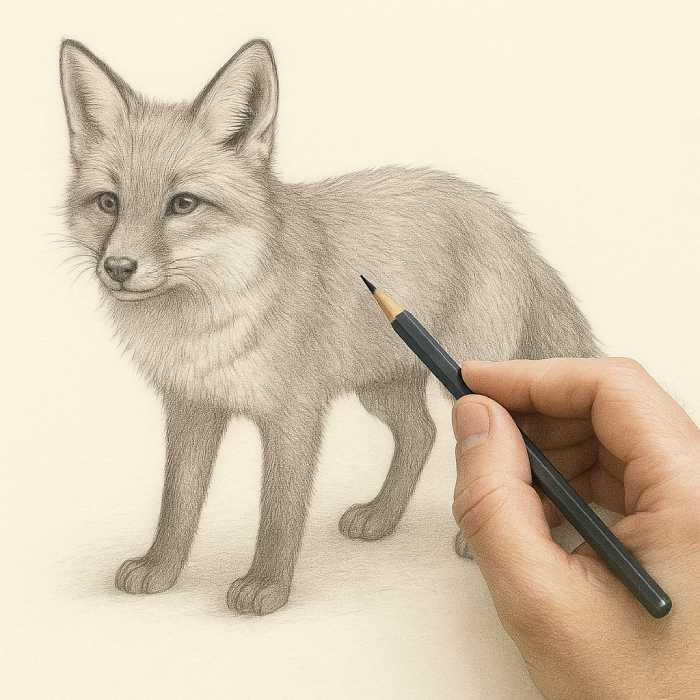
How to create a realistic wildlife portrait: A Step-by-Step Guide
Here’s the wildlife portrait guide. These steps are applicable to all mediums, whether they be pencil, paint or digital.
Step 1: Create a light sketch

Start with a soft outline and block in the basic shape of the animal. If you are working with a traditional brush, use a light pressure. For digital work, use a low-opacity one.
Break the animal down into simple shapes — ovals for heads, rectangulars for limbs
Attention to proportions, and gesture
Mark the position of the eyes, nose or ears
This stage of planning builds a solid foundation.
Step 2: Add Details Gradually

After the structure has been solidified, start refining features.
Draw the ears and any other features you want to include.
Use short, directional strokes for mimicking fur or feathers
Start from the front and add texture.
Do not rush. This is the stage where you focus on building structure and surface details.
Step 3: Add depth with color or shading

Depth brings realism to life. Build shadows according to the source of light in your reference.
For graphite shading, use cross-hatching or blend
Layer colors to add vibrancy to painted or digital pieces
Check for balance in tonal range: darks, mid-tones and highlights
This can take some time. Re-visit areas to gain more depth.
Step 4: Finishing Touches & Refinement
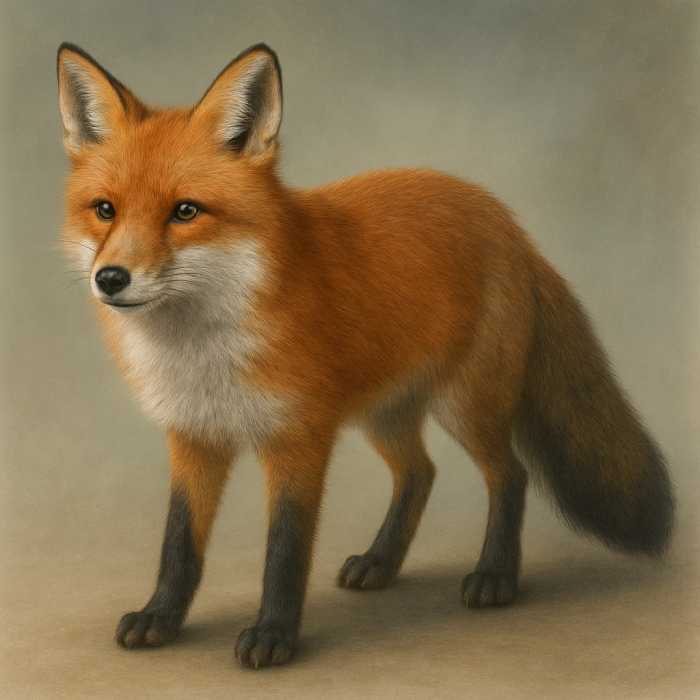
Detail-oriented work will help you polish your portrait.
Add fur highlights or feather glints with a white sharp pencil or paint
Refine your eyes as they are the most expressive features
Add a blur or wash to the background for focus.
Here is where you can transform your work into a realistic wildlife portrait of professional quality.
Avoid these Common Mistakes
These beginner mistakes in wildlife art can be made by even experienced artists.
Overworking details: Too much texture can look stiff or unnatural
Ignoring Basic Anatomy: Learn the structure of bones and muscles, particularly around joints and on the face
Use low-quality images as reference: Pixelated photographs will harm your realism
Jumping directly to the details can lead to proportion problems
It is worth taking your time to plan, observe, and structure.
How to improve your Realism
It’s not just about the technique, but also how you observe and learn.
Learn how to improve your wildlife drawing skills.
Study animal anatomy Use books or anatomical references to understand muscle and joints
Use real photos to practice or draw in the field.
Look at the texture and lighting of nature.
Even for 10 minutes a day, you can develop a habit of drawing.
Every drawing is a practice. Aim for progress, not perfection.
Final Thoughts
To create a realistic animal portrait, you need time, concentration, and an appreciation of nature. You might have trouble with shading, textures or anatomy as a beginner. That’s fine. Everyone starts somewhere.
Consistency is key. You’ll learn to control your hands and improve your attention to detail with each try. You shouldn’t let mistakes discourage you. They’re all part of learning.
This guide to realistic nature art for beginners is intended to inspire you to begin your own project. You can share your animal drawings or ask questions below.
FAQ
Q: What is the best medium to use for wildlife portraits. A. It depends on what you prefer. For fine details, colored pencils and pencils work well. Acrylics and oils are good for painting. Digital tools provide flexibility and undo features for beginners.
Q: How long will it take me to draw an animal realistically? It can be anywhere from 2-20+ hours, depending on the complexity, medium and your experience. Take your time and build realism.
Q: Can I draw animals from imagination?
Yes, you can. But it’s best to first study references. A visual library that you build through observation will help you to draw more freely.
Q: Can digital wildlife art be considered realistic? A: Yes! Digital art can achieve extremely realistic results using proper techniques, brushes, and textures.