How to Draw Skulls for Beginners: A Step-by-Step Guide
You’re not alone if you find it difficult to capture all the details on a skull. You are not alone. Bone structure is intimidating to many artists, whether they are beginners or professionals. Learning to draw skulls can improve your understanding and ability of anatomy, shading, and form.
This guide is designed for anyone looking to demystify the process. It’s perfect for art students, hobbyists, and beginners who are ready to tackle a new challenge. You’ll learn a simple step-by-step technique that will break down the skull into manageable lines and shapes. You’ll be able to draw realistic skulls easily and confidently by the end.
Basic Skull Anatomy
A little anatomical information will go a long ways before you pick up the pencil. You can avoid creating inaccurate or cartoonish drawings by understanding the basic skull structure. Knowing the main features of the skull is not necessary to be a student of medicine.
Orbits: The large, hollow openings around the eyes. These are often rounded and have a distinct shape.
Jawline: Lower jawbone gives the skull shape and structure. Attention to its shape and the way it connects with the rest of your skull.
Cheekbones: These prominent bones create the width of your face. They sweep back from below the eye sockets and are key to creating a sense of three-dimensionality.
Nasal Cavity A large opening, in the shape of a pear, at the center of the facial region where the nose would normally be. This is often the first feature you will sketch.
Tip: Avoid common skull shapes misconceptions. Beginners often make their craniums too wide or too round. Visual references such as real photos, 3D-models, or anatomy books can help you get an idea of the proportions.
Materials You Will Need
To get started, you don’t require a fancy studio. All you need are a few basic tools.
Recommended Pencils A set with pencils of varying hardness is ideal for sketching as well as shading. HB pencils are perfect for drawing light lines for construction, while 2B and 3B pencils are best for shading and fine details.
Erasers The kneaded plastic eraser will help you remove graphite from the paper without damaging it.
Sketchbook A high-quality sketchbook can withstand erasing, blending and other alterations.
Optional tools: You can create smooth shadows with a blending stump, or even a paper towel. For creating the initial guidelines, a ruler is useful. A good reference image, however, is essential.
A tablet with a stylus, and a program such as Procreate or Photoshop will work just as well if you prefer digital artwork.
How to Draw a Skull: A Step-by-Step Tutorial
Now let’s have some fun! You’ll soon be drawing a fantastic skull if you follow these simple steps. Keep your first lines loose and light. You’ll refine them later.
Step 1: Draw the basic head shape

Sketch a rough circle or oval for the cranium. This is the top of the skull. Draw a smaller oval shape or an inverted egg for the jaw. This foundation will help you determine the size and location of your drawing. You can add a vertical centerline and a horizontal one to aid in symmetry.
Step 2: Map out the proportions
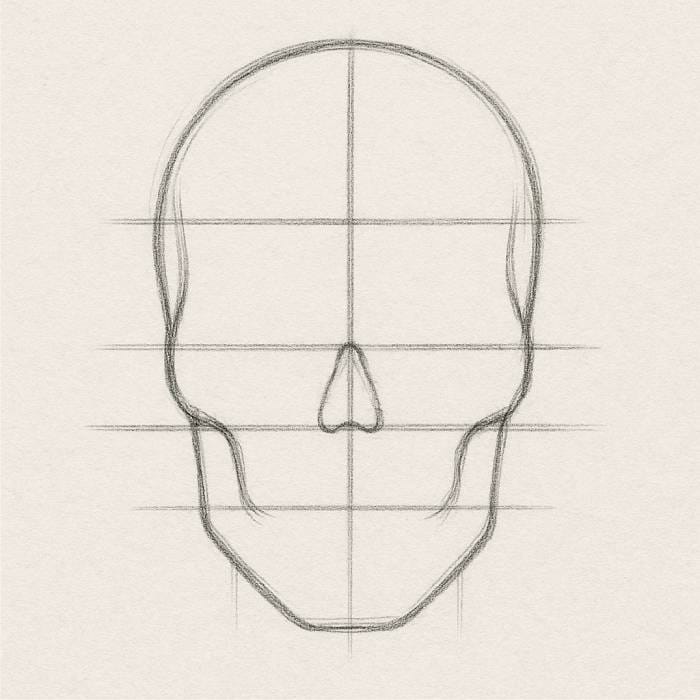
Divide the area of your face using your guidelines. The horizontal line may represent the tops of the eye sockets. The brow ridge can be marked by a line that runs about one-third of the way from the top of cranium. A line about halfway between the eye-sockets and the bottom jaw can be used to guide the placement of teeth and the nasal cavity.
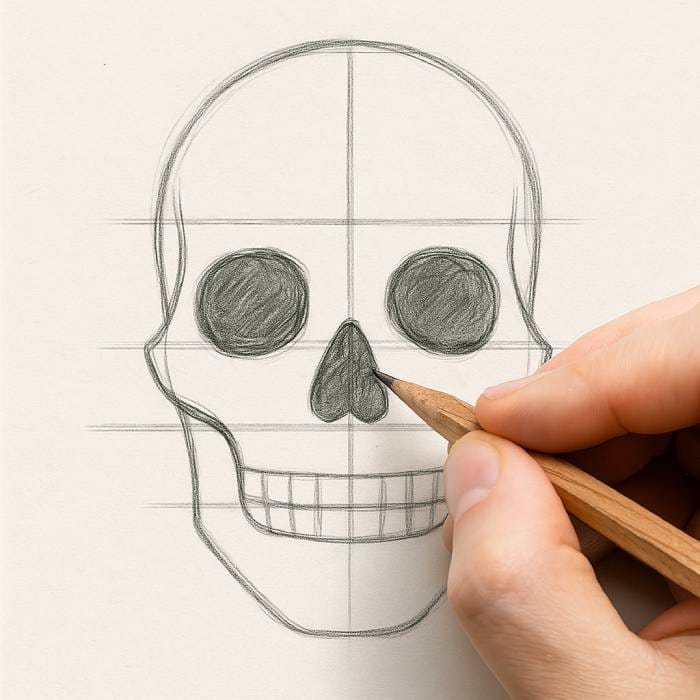
Step 3: Sketching Eye Sockets & Nose
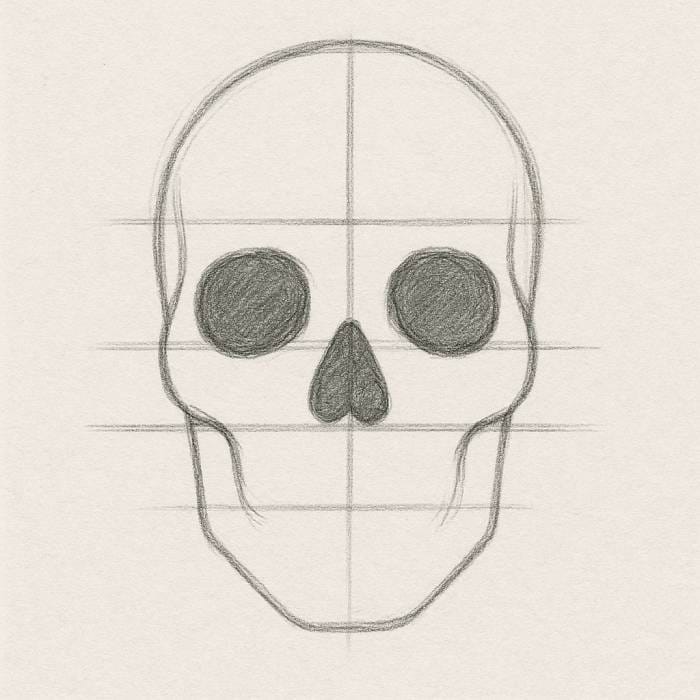
It’s now time to give your skull its personality. Make sure to draw two large hollow ovals or circles for the eyes. Draw an upside-down shield or heart for the nose. This will be the nasal cavity.
Step 4: Outlining your cheekbones and Zygomatic Arch

Draw a line that sweeps outwards and downwards from the bottom of the eyes to create the zygomatic arches. This is the cheekbones. This step is essential for giving your skull depth and dimension. For now, keep these lines simple.
Step 5: Shape the jaw and teeth area

Connect the cheekbones with the jawline. The jawline should be curved downward and then rise up again to form the chin. To indicate the rows, draw horizontal lines to show the teeth. At this stage, you don’t need to draw individual teeth. Just use simple guides.
Step 6: Add Details and Refine Lines

Now that you have the structure in place, it is time to focus on the details.
Teeth Draw the individual teeth paying attention to size and shape. It doesn’t need to be perfect. Even slight imperfections can enhance the realism.
Defined Features: Darken eye sockets and the jaw. Add subtle lines that define the brow line and the temporal lines along the sides of your cranium.
Smoothing : Gently remove your initial construction lines, and smooth the edges of your drawing.
Shading Techniques and Depth Techniques

The shading is what brings your skull alive. Light and shadow are the key to creating a three-dimensional shape.
Determine Your Light Source Determine where the light comes from. You will know where to place the highlights and shadows.
Blending and Hatching: Create smooth gradients by using a technique such as blending or hatching.
Darkening: Darkest shadows are in the deepest part of the skull, such as the nasal cavity and spaces beneath the cheekbones. The sides of your cranium are also darker than the top because it catches more light.
Exercises and Tips for Practice
Consistent practice is the key to improving.
Daily Practice Spend only 5-10 minutes a day drawing a skull. Focus on the proportions and shapes, not perfection.
Draw skulls in different angles: Try drawing skulls in different angles, such as side profiles, quarter views, or even from the bottom. This will help you to understand how form changes as it moves through space.
Use References You can use online anatomy models or photos. If you have a plastic skull, that’s even better.
Keep a Sketchbook: Dedicate a sketchbook just for skull studies. This is a great tool to keep track of your progress.
Common mistakes beginners should avoid
Over-Symmetry: A perfect skull looks unnatural. To make it look more realistic, add slight imperfections and variations.
Unaligned Features – Be cautious with your first guidelines. Too high or too low eye sockets can ruin the whole drawing.
Drawing only the outline: Do not ignore structure. As you draw, consider the bone structure beneath.
Dark Lines Too Soon: Beginning with dark, heavy lines makes it hard to correct mistakes. Keep your initial sketches light.
Bonus: Try Fun Variations
After you are comfortable with the basics, enjoy yourself!
Sugar Skulls Enjoy the intricate and vibrant designs of traditional Dia de los Muertos Skulls.
Gothic Skulls : Experiment more with stylized, dramatic and dark interpretations.
Cartoon Skulls Simplify shapes and features to create a fun animated look.
Animal Skulls : Applying the same principles to animals of different species
The conclusion of the article is:
You have learned How to Draw Skulls for Beginners fundamental principles, from anatomy to shading. To become a skilled artist, you need to practice consistently and have patience. Make mistakes. They are an important part of learning.
FAQs
How difficult is it to draw skulls? – It can be difficult at first but it gets easier with practice.
Which pencil is best for drawing skulls? – The 2B pencil works well for sketching as well as basic shading.
How long does drawing skulls take? – Your dedication is key. Even a few weeks of consistent practice can result in significant improvements.