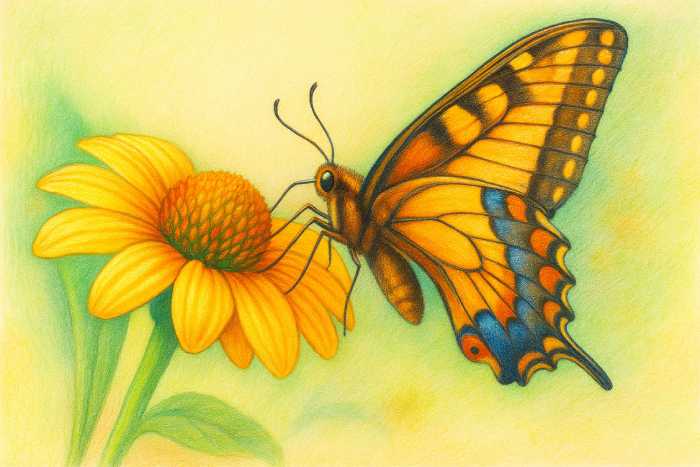
How to Draw a Realistic Butterfly on a Flower: Step-by-Step Guide for Beginners
Flower and butterfly compositions are timeless themes in art that captivate with their beautiful beauty and vibrant colors. If you’ve ever wanted achieve the skill of butterfly drawing This is the right instruction for you! In this simple guide to drawing butterflies that will guide you through the step-by-step procedure to make an amazing as well as authentic butterfly illustration placed on flowers. This tutorial for beginners includes everything you need to know from the basics of designs to the finer details and shading. It will ensure that you’ll be able to draw your own stunning sketch of a butterfly perched on a flower. Let’s sketch!
Why Draw a Butterfly on a Flower?
The combination of a butterfly with flowers is more than just attractive visually and symbolic; it has deep meaning and provides amazing opportunities to develop your artistic skills.
Symbolism in Art
In a variety of cultures butterflies are a powerful symbol for metamorphosis, hope and renewal, and also the cyclical nature of life as its existence is short, but stunning. In fact, the Ancient Greeks even used the word “psyche” to refer to both ‘butterfly’ as well as’soul.’ Flowers however represent beauty, growth and the natural cycles of life. When you draw the sketch of a butterfly sitting on a stunning flower sketch the artist isn’t simply drawing nature, you capture the moment of change and tranquil beauty. This topic is ideal to express profound, natural themes in your artwork of nature.
A Perfect Subject for Beginners
If you are a beginner drawing this type of composition, it’s an excellent exercise. You must work on:
Essential Shapes: A circular shape of the flowers, and the symmetrical ovals of butterfly’s wings and body.
Symmetry: Making the perfect mirror image pattern for butterflies’ wings is an excellent lesson in accuracy.
Details and Texture: The fine veins that line the wings as well as the tiny hairs on the butterfly’s body, as well as the organic, soft texture of the petals.
Shading: Learn how you can use shadow and light to make an insect appear 3D and the petals appear soft and curly.
For sketchbooks for asrt or for a nature-themed school project or to add a touch of decor mastering this art form can significantly improve your drawing abilities.
Materials You’ll Need
Before you get into the fundamentals of the course, acquiring the appropriate tools will prepare you to be successful. The use of high-quality materials makes the process easier, particularly when trying to create an authentic look.
List of Essential Materials:
Drawing Paper: Smooth-to-medium-thick sheet of paper (like Bristol or a good cartridge paper) is ideal to blend and add detail.
Pencils (Graphite): A variety of grades of hardness is crucial for realism.
H, 2H: for sketches with guidelines and light sketching.
B or HB: For mid-tones and general outline refinement.
2B and 4B: For dark lines and shadows.
Kneaded Eraser: It is ideal for gently lifting graphite and without damage to the surface, and to create subtle highlights.
Plastic/Vinyl Eraser: To make accurate corrections, sharp highlight highlights and precise edges.
Sharpener: Make sure your pencils are sharp to create fine details such as the butterfly’s antennae or the veins on its wings.
Ruler (optional): Helpful to check symmetry, but freehand is recommended.
Colored pencils or paints (Optional for coloring phase): Use artist-grade pencils (like Prismacolor, Derwent, or Faber-Castell) or watercolors/acrylics to get the vivid final.
Why the Right Tools Matter
Making use of the top pencils to draw butterflies–those that have a variety of hardness allows you to attain a broad spectrum of tonal value that range from the lightest and softest to the most intense shadow that is vital for creating realism. The quality of the paper you use is important; poor quality paper could break or crack when you attempt to layer or blend colors. Making the effort to invest in the materials you use is investing in the final work.
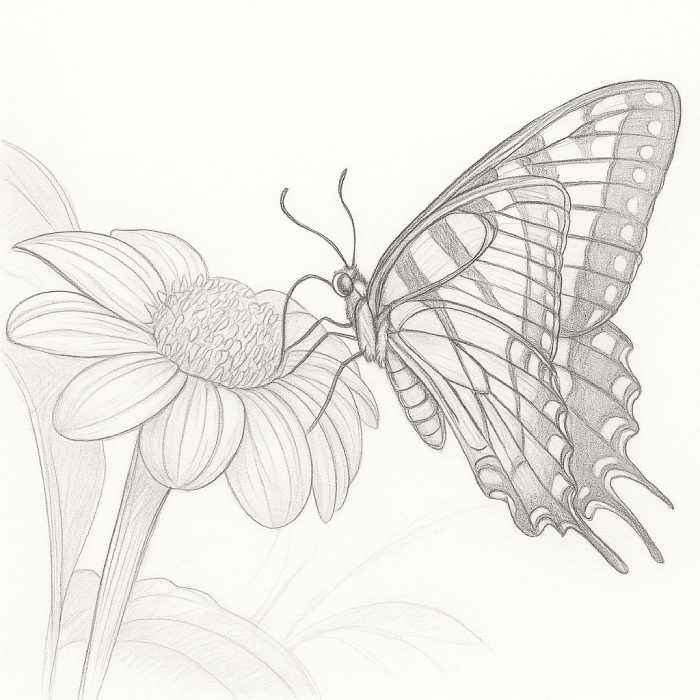
Step-by-Step Guide: Drawing a Realistic Butterfly on a Flower
This is the premise of our lesson. Follow these steps in order to achieve the most stunning results.
Step 1: Outline the Flower and Butterfly

Begin with a gentle hand, and use your 2H or H pencil. Don’t press too to hard! These lines are only guidelines.
Positioning and the Flower Base: Draw a big circle to represent the main portion of your flower (like the coneflower or daisy head). Draw a slightly curly line to represent the stem, and then an oval that sits over the circle, to represent the center of the flower.
Butterfly Body: Put a large thin oval, in a slightly different direction from the flowers head, to create the body of the butterfly (thorax and abdominal).
The Wing Outlines: Create four huge asymmetrical teardrop, sail or forms for the wings, two on either sides of your body. Make sure to keep your wings in the right to be a identical mirror to the wings of the opposite side to create the initial symmetry.
Step 2: Draw the Butterfly Wings in Detail
Then, switch to your HB pencil, and begin to refine the basic forms.
The Body can be refined: Add a small circle to the head, and two lines that are thin and curving to form the antennae. Make small sections or bands around the abdomen.
Shape the wings: Look at a image of a reference butterflies (e.g., Monarch, Swallowtail). The wing edges should be refined. They aren’t always perfectly smooth. Make small curves, scallops and points on the edges.
Set Symmetry: Be sure to check both the right and left wings. Are they at an equal angle? Are their sizes and shapes similar? Make use of a ruler or scrap of paper take measurements at important points and adjust until you are satisfied with the symmetry.
Add Patterns and Veins: Lightly sketch the principal veins that radiate from the body to the four wings. Once the veins have been placed in place, draw lightly the patterns that are prominently colored in the wings. Be aware that these veins provide structural support, and must be drawn first. the patterns and colors follow the veins.
Step 3: Refine the Flower Petals and Details
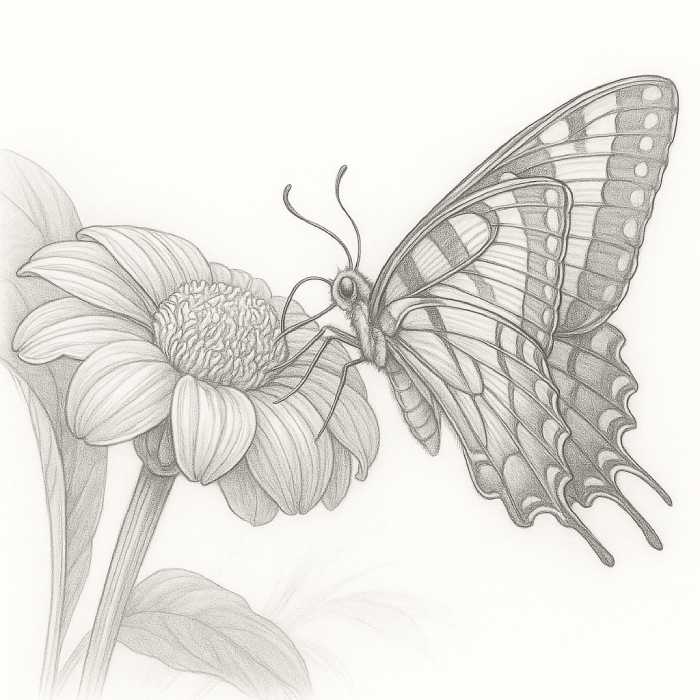
Refocus your attention to the central star that is the main focus.
Drawing Petals: Draw the different petals and let them naturally overlap. To create a realistic appearance make sure that you do not draw each flower identically; some are best bent, slightly folded or observed at different angles. Choose a slightly wavy organic line, rather than a straight, rigid one.
Flowers Centers: Draw the texture of the flower’s centre. If it’s a daisy it might be a dense pattern made of tiny dots or tiny circles. For roses it could be more complicated folds.
Guidelines for Erase: Gently erase all your first, faint outline shapes that you saw in Step 1 and 2.
Step 4: Add Realistic Shading and Textures
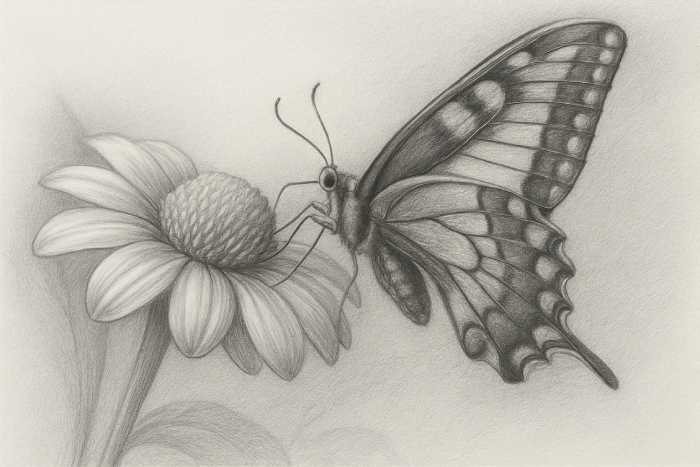
Change to your 2B or 4B pencil to cover the most dark areas. Then begin to make the transition to realistic.
The Butterfly’s Body Shading: Apply dark shading to the body, recollecting that it’s an circular shape. Its sides are darker as well as the top of it will be highlighted with an ethereal highlight. The result is that the insect appears like a fuzzy and round shape.
Butterfly Wing Texture: Shading on wings is all about texture. Utilize tiny, overlapping feathery strokes to create the look of scales found on the wings of butterflies, creating the edges less slender as opposed to the veins. Apply the darkest shade to the wing patterns as well as near the body, leaving the lighter tone for the highlights on the top surfaces.
shading the flowers: Focus on creating depth. Shade the petals heavily when they overlap, and also where they meet the center of the flower. The petals’ tips ought to have a lighter shade. Make use of a soft pencil or a blend stump (tortillon) to smooth out the shading of the petals, giving them the appearance of soft, delicate. This is crucial to drawing flowers in fine detail.
Step 5: Coloring (Optional but Recommended)
To achieve a vibrant, real-looking finish, you can use color pencils and paints.
The Layering Color: Layer in lighter layers. For example for the Monarch wings, begin with a light yellow/orange color, and then add layers of an orange that is darker then use a red-brown color to darken the areas around the veins and body.
Color Blending: In order to create seamless transitions you can use the specialized blending pencil that is colorless or a solvent similar to mineral spirits, using an swab of cotton (if employing wax-based pencils) or apply a thin coating of white pencil on top of the shades.
Last Highlights: Utilize your pencil eraser, or pencil with a white color to draw precise, small highlights–like tiny specks of light in the eye of the butterfly or the shimmer on the petal’s edge to truly bring the work to life.
Tips for Realism
To create the realistic butterfly drawing is a matter of patience, as well as having a keen eye for fine detail. Here are some professional tips:
Watch real references: Never draw from memory by itself. Look at photos of real butterflies and flowers. Note how light hits flower petals, and how the wings’ patterns adhere to the veins as well as the subtle color variations.
The importance of symmetry: A butterfly is almost completely symmetrical. Make sure to use light measuring lines along into the middle of your sketch to make sure that the wings are mirror-like in size, shape, and patterns. Uneven wings instantly break the illusion of real.
Blending to create soft transitions: The real world rarely has sharp lines. Utilize a blending stump tissue, a blending stump, or your tiniest pencil (HB) to smooth out graphite and produce gentle shades that are graduated and make the form appear smooth and round.
Avoiding Common Mistakes:
Over-Shading/Heavy Outlines: One common mistake made by beginners is drawing rough, slender lines. In realism, the edges define themselves by contrast between shadow and light rather than cartoon-like lines.
Uneven Wings: Like I said, always make sure to check and make sure you have symmetry correct as you go.
Beginning with the details: Always block out the most basic forms and proportions first. Don’t waste time on an antenna that is tiny only to discover that the wings are in the wrong location!
Inspiration and Variations
After you’ve learned the fundamental technique Once you’ve mastered the basics, it’s time to explore the possibilities of drawing butterflies with a creative flair and build your portfolio!
Explore a variety of butterfly species: Move beyond the typical Monarch. Consider the shimmering blue of the blue Morpho or distinctive patterns on the striking patterns of a Swallowtail as well as the pretty, transparent wings of the Glasswing.
Explore Flowers: Learn how to draw butterflies on various flowers. A Monarch with a vibrant purple thistle is a stunning palette and a smaller one on a huge sunflower offers an intriguing challenge in terms of scale and details. Consider drawing on roses daisies, or lilies.
Switch Your Mode: Shift from a pencil sketch in graphite to a watercolor sketch to create a soft, blended effect. You can also use bright acrylics to create a more lively, graphic appearance.
Beginner-Friendly Practice Exercises
To improve your abilities, devote some time to these easy butterfly drawing drills.
Outline: Make a sketch of the butterfly or flower, and practice coloring and shading inside the lines before trying an entire freehand drawing. This will help you build muscle memory to practice layering.
Wing Symmetry Exercises: Learn to draw the same intricate pattern of wings (e.g. or a checkered design) on two wings that are mirrored in a row, but with no body. This is a specific exercise in drawing flowers focused on accuracy and symmetry.
Coloring gradients: Make use of colored pencils make a smooth transition from the lightest to the darkest on a sheet of paper by using just the one hue (e.g. the yellow-to-deep orange). A mastery of gradients is a key to creating soft, realistic coloring of the wings.
Conclusion
Congratulations! You’ve learned the entire procedure of drawing an authentic illustration of a butterfly on a flowers for those who are new to the art. The first step was to start with basic forms that you then refined the intricate detail of the petals and wings and then added the necessary shading and colors that bring the design to life.
Realistic thinking takes time and effort. Don’t let yourself be discouraged if the first sketch isn’t perfect. Every sketch is an incremental step in the right direction. Always work on your symmetry, look at nature, and concentrate on the subtle changes in value. We invite you to post your completed drawings on the internet or with your family and acquaintances, or just continue filling up your sketchbooks.
Frequently Asked Questions (FAQ)
Q: What’s the most straightforward method to draw an image of a butterfly sitting on the flower?
A: The most efficient method is to break the subject into geometric shapes that are simple such as An oval to represent the body of the butterfly and circles for the flower’s head. Make sure you get your proportions, symmetry and angles correct using light lines before adding any additional details. Begin by taking a side-view of a butterfly as the symmetry is more straightforward than a direct top-down view.
Q: What pencils will give you the most realistic butterfly designs?
A: For realistic graphite drawings using a pencil set that range from soft to hard is ideal, like the Staedtler Lumograph as well as Faber-Castell’s 9000 series. A good choice is 2H (for sketching with lightness) and 4B or HB (for mid-tones) and 4B and 6B (for the most dark patterns and shadows).
Q: How can you color butterfly wings so that they look authentic?
A: To paint realistically the wings of butterflies using a technique, you must use layering and mixing. Apply color in light layers that increase the level of the color. Choose a dark shade to shade around the veins, and a lighter shade to cover the entire wings’ body. Blend the colors with the help of a mixing crayon or a solvent in order to get rid of sharp lines that resemble that soft and scaled look of real wings.
Q: Can beginner artists draw flowers and butterflies without drawing?
A: Absolutely! Although tracing is an effective exercise for exercising motor memory, the most important thing to drawing without drawing is to do it repeatedly. blocking the basic forms and proportions first. Make use of the grid method, or take care to measure the main lines before drawing any specifics. Regular practice will build your drawing observational and freehand abilities.