How to Draw a Koi Fish: Easy Step-by-Step Guide to Create a Beautiful Sketch
They are known for their vibrant colors and graceful movements. Koi fish are a symbol for perseverance and are a favorite artist’s subject. If you’ve ever wanted to draw their beauty on paper and canvas, you’re in the right spot. This easy-to-follow tutorial will help you we’ll be able to master drawing a Koi fish drawing starting from scratch.
No matter if you’re a total beginner or are looking to improve your skills, we’ll teach you the most important tools, including breaking down the body’s form as well as adding realistic scales and using soft shading. After this course, you’ll be able to create a beautiful flowing sketch that you can show off. So, grab your pencils and begin!
Tool and Material You’ll require
Before beginning to sketch, having the proper arrangement will help make the process easier. There is no need for expensive art tools to create impressive drawings; ordinary office supplies are sufficient with ease. However, artist-grade tools provide more control.
Essential Tools
Pencils: An HB pencil for sketching initial sketches and a 4B or 2B for shading that is darker.
Eraser: An eraser that can be kneaded is the best choice to lift graphite without causing damage to the paper.
Sharpener: Make sure to keep a point to see details such as eyes and scales.
Additional Tools
Fine Liners: Pens with waterproof ink (0.3 mm and 0.5 mm) are great to outline.
Colored Media: colored pencils, pastels, or watercolor markers in the event that you wish to add the distinctive red and orange Koi patterns.
The Recommended Paper
Choose the smoothest drawing paper (at at least 90 gsm) to be able to erase well. If you intend to use markers, choose mixed media paper to avoid bleeding through.
Learn the basic shape of Koi Fish Koi Fish
The key to creating a vibrant drawing is to understand anatomy before you draw. A koi fish isn’t an uncurved tube, it features fluid curvatures.
- The Body Form: Think of a tapered cylindrical or long, curving teardrop shape. It is the thickest close to the head and then tapers effortlessly towards the tail.
- Position: The head takes about 20 percent of the body’s length. The fins don’t hang to the body randomly. The pectoral fins rest in the middle of the gill covers.
- Patterns of Color: While we are sketching, be aware of where the famous “Kohaku” (white and red) also known as “Sanke” (white, black, and red as well as black) patterns could take place.
Referrals: Try to examine a reference image. Koi aren’t always straight. Observing a picture will help you understand the twist in the back.
Step 1: Draw The Body Form
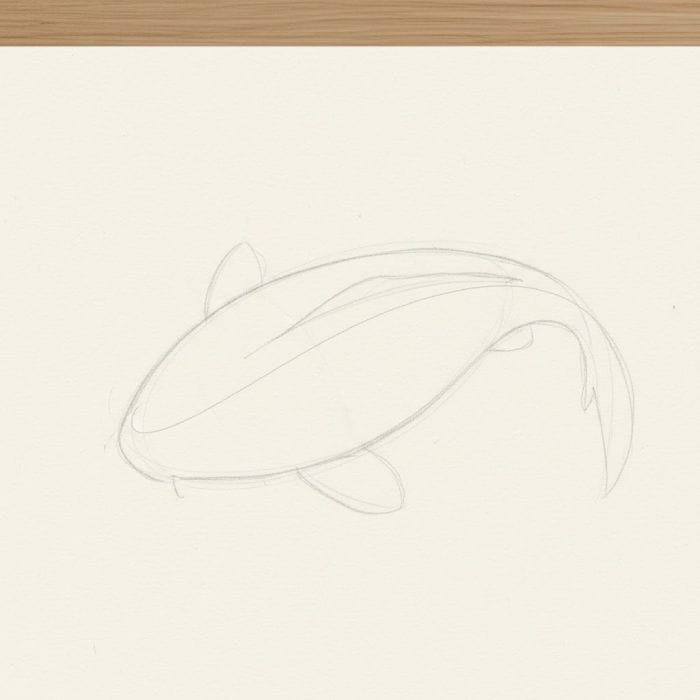
Start by drawing with a very gentle hand. The lines will guide you, but they will be erased or drawn over in the future.
- Drawing the Central Line: Sketch a curving straight line (“S” curve) or “C” curvature) to determine the motion of the fish. This is called the spine.
- Design the Oval: Make a lengthy oval from the center line.
- Enhance the flow of text: Make the oval larger in to the “front” (the “head”) and narrower towards the “back” (the “tail”).
- Direction: Decide now if your fish is moving upstream, turning, or looking through the air (top-down view is the most suitable for novices).
Pro Tip: Keep your wrist loose. If you are pressing too hard right now, you’ll leave a few indentations on the paper, which will appear later on after shading.
Step 2: Add the Head and Barbel Details

Now that the principle mass is there, let’s provide the fish some persona.
- The Head: Draw a rounded curve on the front of the oval. Koi have slightly blunt, rounded snouts, now not sharp factors.
- The Eyes: Place the eyes on the perimeters of the pinnacle. From a pinnacle-down view, they will look like small bulges at the define.
- The Barbels: This is the defining function of a koi (carp). Draw two small, whisker-like fleshy filaments close to the mouth vicinity. This distinguishes them from ordinary goldfish.
Step 3. Draw the Tail and Fins

Fins are what give the koi fish its elegant look. They should appear soft and flexible, not like rigid triangles.
- Pectoral Fins: They are big fins that are on the side that are just behind the head. Draw them in a fan shape with a curving backwards motion like the water is pushing them.
- Dorsal Fin: This is situated on the upper part of the lower back. It should be curved to follow the curve in the spinal.
- The Tail (Caudal Fin): Create a butterfly-shaped, large tail near the narrow end on the back. The lines should appear to be wavy, suggesting movement through water.
- Pelvic/Anal Fins: Don’t ignore the smaller fins located on the lower part of the body. They are typically visible from the lower belly area.
Step 4: Draw the final shape

At this point your drawing is an unfinished piece of art. Now is the time to commit the lines.
- Clean Up: Take your eraser and take out the internal lines of construction (like that spine line).
- Smooth Outline: Sketch over the pencil sketch with an elongated stroke that is slightly darker. Attach the fins to the body in a smooth.
- Line weight: Choose a more robust line to cover the shadow and belly regions and a thin line to cover the fragile edges of fins. This will instantly add dimension.
Step 5: Add Details and Texture of Scale

Many beginners make the error of drawing grids for scales. The scales for koi fish are big with rounded edges and are overlapping.
- Guideline for Scales: You don’t need to draw every scale. Draw a few scales in detail on the top of your rear (dorsal region) and fade them out as they move down the sides.
- The shape: Draw small “U” shapes that overlap each other as roof tiles.
- Fin Rays: Create thin lines within the fins that radiate from the body to the outside. The lines must be a little faint and align with the curve that the fin follows.
Clearness: Ensure your hand isn’t scratching or smudging the graphite. You can place a scrap of paper in your palm while you draw.
Step 6: Add Shading and Color (Optional)

You may simply stop at the art of the line but shading the fish to life.
- Shade: Locate your lighting source (usually at the highest level). Cover the edges of the fish, as well as the region where fins meet the body. Make sure to keep the upper backside lighter.
- Blending: Make use of a mixing stump, or even a piece of tissue, for softening graphite for an unslippery, wet appearance.
- Color: When using colors, block out areas of red or orange. You can leave white spaces for traditional patterns of koi.
Highlights: Utilize an eraser take off a small glowing spot on the head or on the contour of the body of the fish to make the fish appear more shiny and moist.
Step 7: Draw Water or a Simple Background (Optional)

The fish needs water! Placing your subject within an environment is the basis for drawing.
- Ripples: Make concentric circular or oval rings radiating from the fish to display the tension on the surface.
- Shadows: Include a gentle cast shadow beneath the fish to create the illusion that it’s hanging over that bottom part of the lake.
- The minimalist approach: Keep the background simple. A few lily pads, or floating leaves, are enough context to not distract from your koi fishing.
Common Errors for You to Avoid
Even experienced artists get into problems. Beware of these traps:
- “The “Stiff” Fish: The body should be a straight line. Koi are flexible. Always employ the curve.
- Flexible Fins: Designing fins to appear to be similar to hard plastic. Make sure you wave the edges.
- Over-Detailing: Each scale has been drawn using a lot of pressure. This causes the fish to appear like it is armored, rather than soft.
High-Definition Outlines: Pushing too hard soon makes it difficult to make corrections.
Practical Tips to Get Better Results
- Exercise Curves: In the beginning, before you begin to fishing, practice drawing “S” lines on a piece of paper to ease your wrist.
- Angles: When you have mastered the top-down view, you can try making a drawing of a fish swimming in front of you or banking on a turn.
- Contrast: Make sure your deepest shades (usually pupils of eyes or shadows that lie beneath the stomach) are sufficiently dark to make the highlights pop.
- Referencing Photos: You can’t be sure! Look up “Koi fish swimming in the top view” to discover what happens when the fins flare naturally.
Conclusion
Drawing a koi fish is an enjoyable and relaxing artistic activity. If you break the process down into smaller steps—starting with an oval shape, then adding flowing fins, and then carefully indicating scales, you can make a sketch that conveys the tranquility of these pond-dwellers.
Don’t fret even if your first try isn’t flawless. Try different poses, and keep playing around with adding colors or ink.