Step-by-Step Face Drawing Tutorial: From Simple Shapes to Finished Portrait
Are you having difficulty with portraits that aren’t quite right? It’s easy to learn what to do with faces, which may seem daunting. But the trick lies in breaking complex designs into manageable, simple forms. This step-by-step tutorial will guide you from drawing a basic circle to a more refined portrait. The tutorial will cover the fundamental proportions, positioning and shading techniques utilised by professional photographers. When you’ve finished this course, you’ll be able to apply the skills and knowledge to create stunning, authentic portraits starting from scratch!
Materials You Need
Before we get started, get the tools you’ll need. There is no need for expensive equipment to begin and just the basics are sufficient.
Essential Drawing Tools
- Pencils: Standard #2 and HB pencils to start sketching lightly, and an even heavier (2B or 4B) pencil for final lines and shading.
- Eraser: Kneaded erasers are ideal for gently lifting graphite as well as a plastic/vinyl eraser to make clean corrections.
- Paper: All standard paper is acceptable, but silky Bristol paper is perfect for mixing.
Additional Tools
- Blending Stump/Tortillion: A paper that is tightly rolled tool that is used to smooth graphite and make subtle shadow transitions.
- Ruler: It is useful for evaluating the initial proportions, although freehand is encouraged in later years.
Tips for beginners: Always start with the simplest lines you can. You should be able erase your first guides completely, without leaving any indentation! Try a gentle tension until you feel comfortable with your placement.
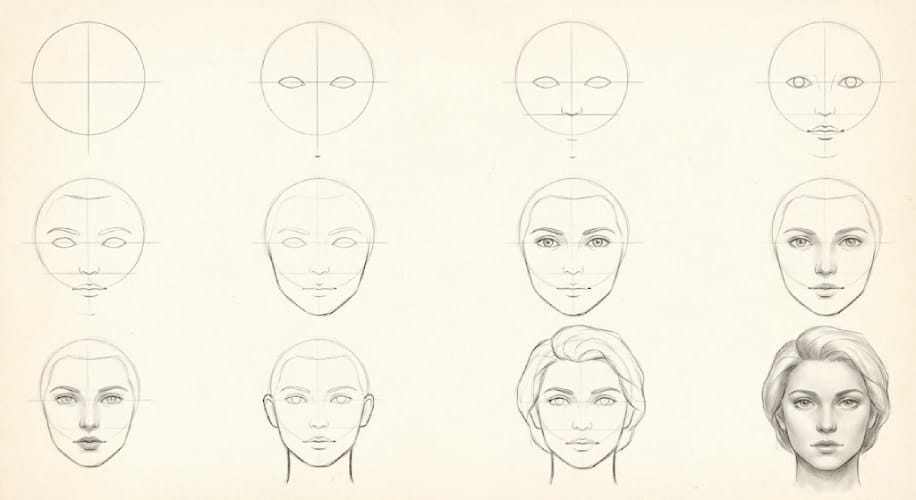
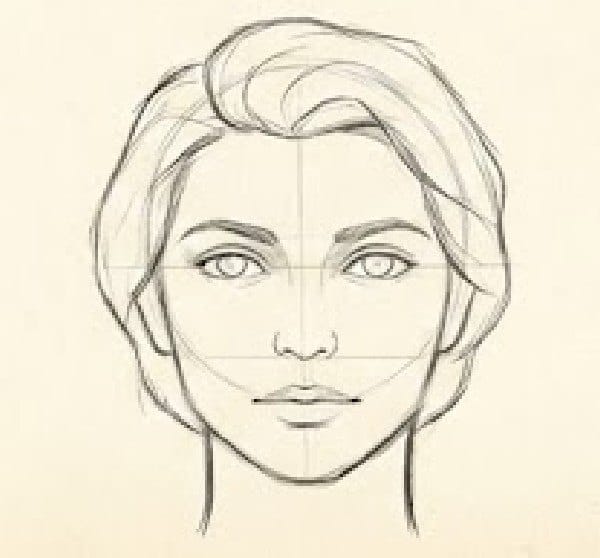
Step 1: Begin with simple shapes
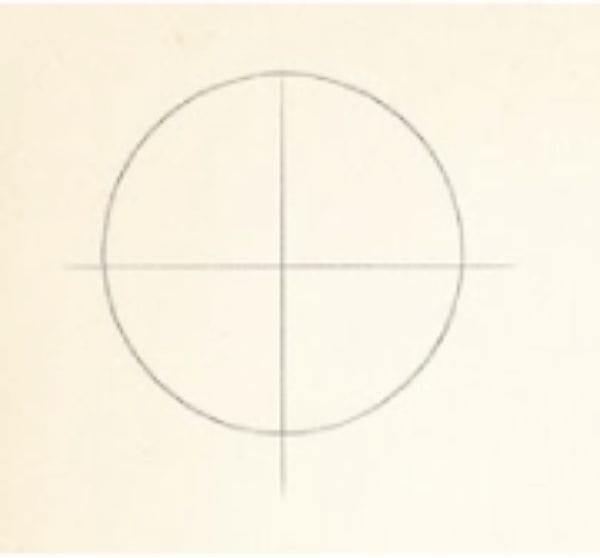
Every great portrait starts with a simple base.
- Drawing a circle for the Skull: Make a sketch of a perfect circle. This represents the top of the skull (the skull).
- Add a Vertical and Horizontal Guideline: Draw an elongated vertical line straight in the middle of the circle (dividing it into two equal half). Then trace a horizontal line along the middle. These are your basic proportion and symmetry guides.
- Explaining proportions in a simple, beginner-friendly manner: The circle you drew represents what is at the highest point of your skull from the brow line down to the eyebrow line. The lower part, that is, the facial area (eyes, nose, mouth and chin), will be incorporated below the initial circle.
Step 2: Draw the Eye Line

The eye position is the most frequent mistake novices make.
- Positioning the Eyes Halfway Down on the Head: Amazingly enough, eyes are located on a line halfway between the high point of your skull as well as the top of your chin. Expand your vertical centre line down, then mark the area where your chin will eventually be. Draw the horizontal line from the top of your forehead and the point of the chin lineThis is your eye line. It’s your eyeline.
- Spacing Between Eyes: An average rule for distance between two eyes is the size of one eye.
Simple Tips for Practice: Sketch simple almond or oval designs on the Eye Line. Make sure that they’re separated only by just one eye’s worth.
The eye position is the most frequent mistake novices make.
- Positioning the Eyes Halfway Down on the Head: Amazingly enough, eyes are located on a line halfway between the high point of your skull as well as the top of your chin. Expand your vertical centre line down, then mark the area where your chin will eventually be. Draw the horizontal line from the top of your forehead and the point of the chin line This is your eye line. It’s your eyeline.
- Spacing Between Eyes: An average rule for distance between two eyes is the size of one eye.
- Simple Tips for Practice: Sketch simple almond or oval designs on the Eye Line. Make sure that they’re separated only by just one eye’s worth.
Step 3: Draw the Nose Placement
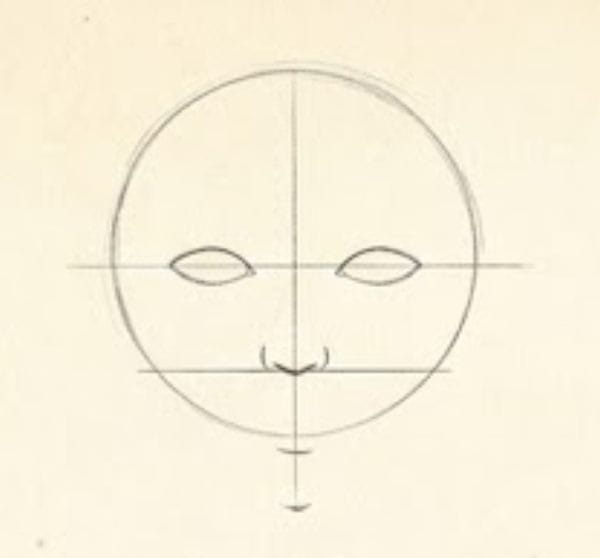
The face is usually divided into three parts.
- Dividing the lower half of the face: The distance from the Eye Line to the chin is to be split into 2 equal sections. First, the segment (closer to your eyes) signifies the top of the nose.
- Basic Triangle (or Curved) Shape for Blocking the nose: Don’t try to draw your nostrils until you’ve got the right shape. Just block out the form of the nose using an easy downward curve to the top of the tip and two small vertical lines for the side wings (alae).
- Common errors that beginners make: Drawing the nose too big or beginning with the nostrils and not the entire mass.
Step 4: Insert the Mouth Line
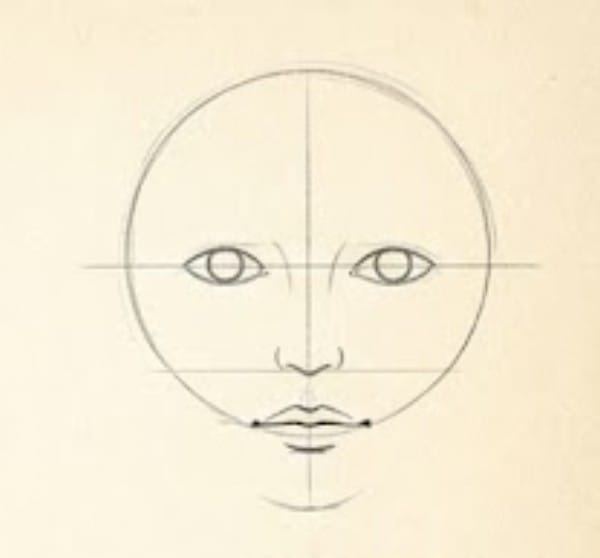
The final proportion line defines where the mouth will be located.
- Where the Lips Lie in Relation to Their Nose as well as the Chin: The distance from the top to the nose to the chin is divided into two halves. The top half is the area where the mouth and lips are enclosed. Draw a horizontal line to mark the principal opening of the mouth, also known as the mouth line.
- Marking the corners of the mouth: The corners of the mouth usually align vertically with the pupils of the eyes.
- Keeping Proportions Natural: The top lip tends to be thinner and has a smaller shadow, while the lower lip is larger and holds more light.
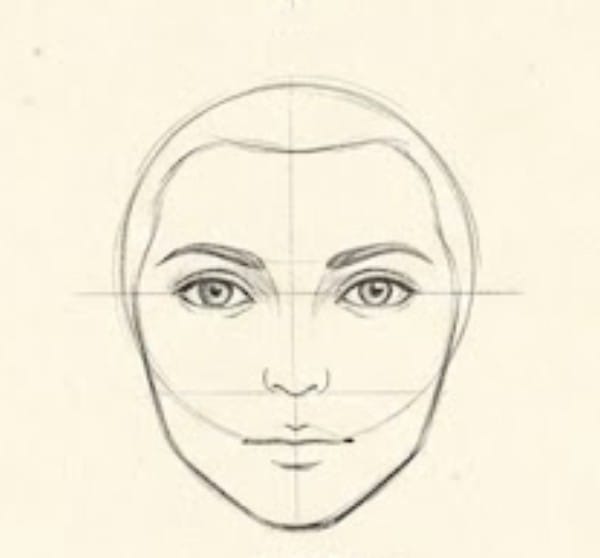
Step 5: Draw the Eyebrows and hairline

These elements make up the upper frame of the face.
- What eyebrow shape forms the expression: The eyebrows sit on the brow ridge just above your eye line. They are crucial for communicating emotions. A simple, slightly curly line is sufficient for the moment.
- Placement of the hairline using simple measurements: From the brow line (where the eyebrows are located), from the middle until the top of the skull, is the 3rd main segment. The hairline typically begins around 1/3 of the way from the high point of your skull. It varies from person to person.
Step 6: Form the Jaw and Chin

Let’s now transform this circle to create a real head shape.
- The circle is now an asymmetrical head shape: From the top sides of your circle, you can begin to tilt your lines towards the back, slightly beyond an eye line. The head is the largest in the area of your temples.
- Making a Smooth Jawline: The jawline is roughly aligned with the ear (which lies in between the brow line as well as the nostril line). Straighten the lines until they meet the chin line you created in step 4.
Adjusting for male and female faces: for a male face the jawline will typically be wider and the chin larger. For female faces, the jawline can be soft and taper sharply towards the chin, which is narrower.
Let’s now transform this circle to create a real head shape.
- The circle is now an asymmetrical head shape: From the top sides of your circle, you can begin to tilt your lines towards the back, slightly beyond an eye line. The head is the largest in the area of your temples.
- Making a Smooth Jawline: The jawline is roughly aligned with the ear (which lies in between the brow line as well as the nostril line). Straighten the lines until they meet the chin line you created in step 4.
- Adjusting for male and female faces: For a male face the jawline will typically be wider and the chin larger. For female faces, the jawline can be soft and taper sharply towards the chin, which is narrower.
Step 7: Cleanse the Eyes
Eyes are often the main focus of every portrait.
- Simple oval structure: Refine the simple designs you created in step 2 into more real round shapes or ovals.
- Add Eyelids, Pupils Highlights, and Eyelids: Draw the eye’s iris (the circular area that is colored) within the eye, ensuring that the upper eyelid is partially covered (rarely can you observe an entire eyelid). Draw the tiny dark pupil within the center. Then, a tiny bright light dot (the highlight) provides the eye with life.
- Guidelines for Symmetry: Utilize the vertical center guideline to continuously ensure that eyes are mirroring across both sides.
Step 8: Draw the Details of the Nose

Get rid of hard lines and take advantage of shading.
- Keep it soft and shadow-based: Avoid outlining the nose with a sharp line. Instead, concentrate on the shadows that are created from the source of light. The sides that form the front are more dark than the bridge.
- Avoiding harsh Lines: Only the edge of the tip’s underside and the gentle nose should have a distinct edge.
- Realistic shading tips: Use light, soft pencil strokes to define the shape of the nose. Concentrate on the shadows that lie beneath the tip and on the wings.
Step 9: Form the Lips
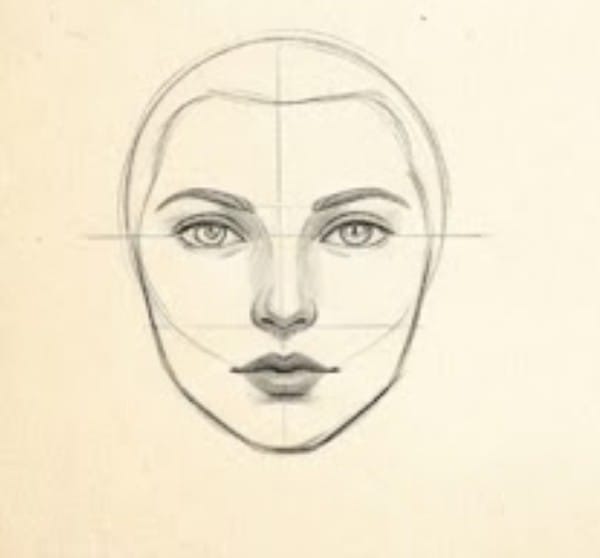
Giving form to the mouth.
- Using simple shapes (Bow Curve + Soft Lines): Start with the “Cupid’s bow” shape of the upper lip. Make use of an easy, dark line to open the mouth. The lips themselves are made up of two tubes or cylinders: the upper lip and the lower lip.
- Keep the Lips Balanced: The lower lip is typically larger than the top lip.
- Add Light and Shadow: Shade the region under the lip on the bottom to give it a round appearance and make it protrude a little protruding. Make the top lip a little lighter than the lower lip.
Step 10: Add Neck and Ears
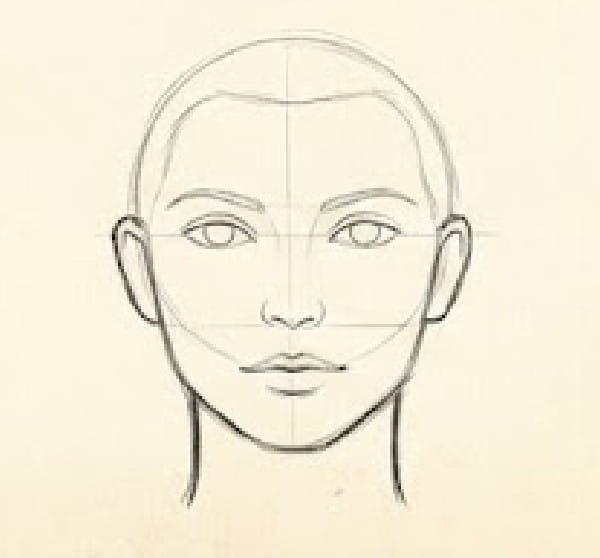
The support features of the head.
- Where the ears align to the face: The ears generally align between the eye line (or the brow lines) as well as the nose line. Draw an easy “C” form or create an oval to create an overall design.
- The Neck Connects Naturally: Your neck can be very thick! It starts under the ear and expands towards the shoulders. Beware of drawing the neck with a weak, thin line.
Step 11: Add hair Volume and Flow
Hair should be a mass of hair and not be merely hair strands.
- Sketching Large Shapes first: Go back to the hairline marking (Step 7.7) and then expand it. Hair is a thing which rests upon the head, providing the head additional size and height. Draw the overall size and the direction of the hairstyle first.
- Drawing Strands without Over-Detailing: Only draw implied hair strands to show the texture, direction and flow. Don’t draw every single hair strand, since this can appear like it’s not natural.
Step 12: Shading and the Final Details
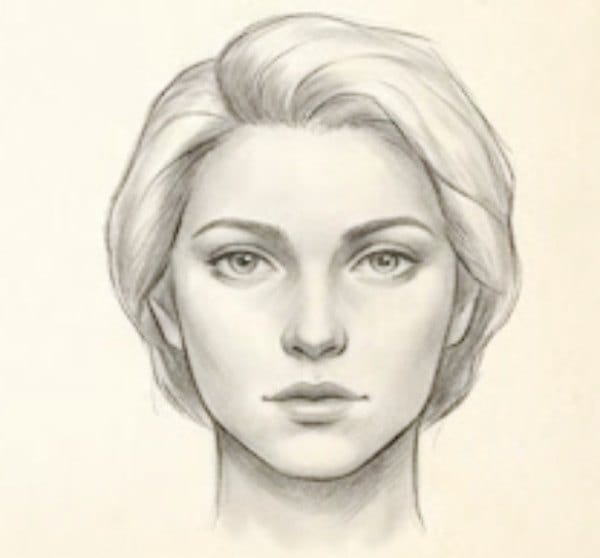
This is the step that will bring your drawing to life.
- Lighting Source Fundamentals: Choose where the light source is (e.g., top-left). Shadows should be placed to the aspect (bottom-right).
- Adding depth to the eyes, nose and lips: The most intense shadows can be seen in the sockets of eyes, on the underside of the nose’s tip, and the corner of your mouth and beneath the lip’s bottom.
- Smooth Shading Methods For beginning users: Use your blending stump or a soft cloth or tissue to smooth your graphite. This smooths out rough lines and gives the appearance of smooth skin.
Before-and-After Comparison
- How the Face Changed from Forms to Portraits: Look at your final portrait and think about comparing it with the original circles and crosses. The face was a flat and basic form and turned it into a complicated, three-dimensional design by utilising precise proportions and observation.
- What Readers Can Learn from the Transformation: The main lesson to take away is the fact that the proportions and positioning can be the two most vital actions. Shading can only help a well-drawn structure.
Practice Tips to Improve Your Performance
Consistency is essential to improve.
- Daily sketch ideas: Challenge yourself to draw five different faces using magazines or photographs each day, and focus solely on the first proportions guidelines (Steps 1-6).
- The importance of watching real faces: Take note of the people around you! What happens when the light hits the cheekbone? How far from each eye is your favorite film star? The artist’s observation is his most effective tool.
- Recommended Sources: Look up artists such as Andrew Loomis or George Bridgman to find foundational proportion guidelines.
Conclusion
You’ve successfully completed the fundamental steps of how to draw the face of a person. The process involves moving from a simple, geometric circle to a complex, shadowed, detailed portrait. Keep in mind it’s a process that is developed by repetition. Don’t get discouraged by your first results. Each drawing you make will help you learn something new. Continue to practise these fundamental techniques, and soon you’ll create amazing portraits effortlessly!